Ways to Modify Windows 10 System Sounds - Personalize the Audio on Your Computer
Windows 10 offers a variety of default system sounds that accompany various actions and notifications. If, however, you discover the default sounds to be dull or desire to customize your PC with a personal flair. A great thing to note is it is possible to conveniently alter and tailor the system sounds as per your preference to your liking. Let’s dive into discovering different methods to access sound settings and customize the audio output on your Windows 10 personal computer.
Windows 10 allows customization of which sounds? In the latest version of Windows?
Customizing the sound configurations for diverse system notifications and sound effects is possible on Windows 10. These include events such as battery notifications, Other examples include instant messages and moving menu items The sound settings menu categorizes them into the following groups:
Windows (system): Sounds related to battery notifications and instant messages.
File Explorer: Sounds that correspond to activities like moving menu items and resolving issues with blocked pop-up windows.
Windows Speech Recognition: Audio cues for enabling and disabling the speech recognition functionality.
How to Access Windows 10 Sound Settings:
Getting to the Windows 10 sound settings is a straightforward process. You can follow these steps:
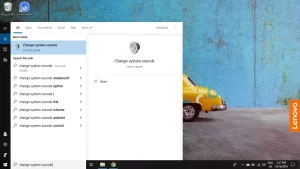
Type “Change System Sounds” in the Windows search box.
Select “Change System Sounds” from the search results.
Alternatively:
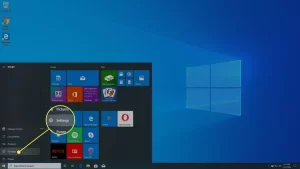
Give a tap to the icon that represents Windows found in the lower section of your monitor.
Click the gear icon to open Windows Settings.
Select “System” from the Settings menu.
Choose “Sound” in the left pane.
Select “Sound Control Panel” found under the Related Settings category in the top-right corner.
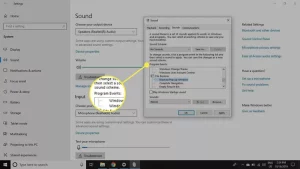
Access the “Sounds” tab within the appearing window.
How to Customize Windows 10 Audio Settings:
Once you have accessed the sound settings, you have two main options to customize your Windows 10 system sounds:
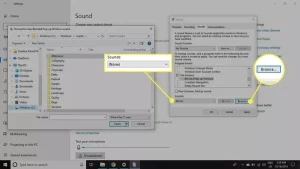
Change Sound Effects for an Event in Windows 10:
Select an event under “Program Events.”
Select a sound from the provided options If desired, you can explore your computer for WAV format sound effects
Preview the sound effect with the “Test” button, Finally, press both “Apply” and then confirm by clicking on “OK”.
Turn Off the System Sounds:
To disable all system sounds in Windows 10:
Opt for “No Sounds“ under “Sound Scheme.”
Click “Press Apply”, followed by selecting OK” to apply the changes.
If you prefer to disable sound for individual events:
Opt for one of the options under “Program Events.”
Choose “None” from the list that appears under “Sounds.”
Using this straightforward method, you can customize your Windows 10 system sounds to be in line with your specific choices. Whether you’re interested in adding a personalized touch or enhancing the immersion of the audio. The versatility provided by Windows 10 to make your PC sound based on your personal liking. Have fun customizing your audio Also, relish in the benefits of a highly personalized computing experience!