Sony’s Remote Play feature for PlayStation 5 allows gamers to enjoy their favorite PS5 games on compatible devices with a reliable connection. However, Remote Play may encounter issues that prevent it from functioning correctly. In this guide, we present the top 6 fixes to help resolve any problems with Remote Play on your PS5, so you can continue gaming hassle-free.
Make Sure Remote Play Is Enabled:
Before using Remote Play, ensure that the feature is enabled on your PS5. Follow these steps to enable Remote Play: Press the PS button at the center of your controller to access the main menu. Go to Settings and select Remote Play. Toggle the “Enable Remote Play” option.
Update Your Console’s Firmware:
Outdated firmware can cause Remote Play to malfunction. To update your PS5 firmware, follow these steps: Press the PS button at the center of your controller to access the main menu. Go to Settings > System > System Software. Select System Software Update and Settings. If “Update Available” appears, proceed with the update.
Reset Your Connection on Remote Play Device and PS5:
Resetting the Remote Play connection can resolve connectivity issues. Here’s how: Press the PS button at the center of your controller to access the main menu. Go to Settings > System > Remote Play. Select Connection History and press triangle to clear all Remote Play connections. Reinstall the Remote Play app on your device and follow the setup instructions again.
Check Anti-Virus Settings on Remote Play Device:
Firewall and anti-virus settings on your device may block Remote Play. Temporarily disabling them can help determine if they’re causing the issue. Reconfigure the settings to exclude Remote Play from being blocked. Change Your Network Settings on PS5: For optimal Remote Play performance, ensure a stable and high-speed network connection on both your PS5 and Remote Play device. Follow these steps to check your PS5 network settings: Press the PS button at the center of your controller to access the main menu. Go to Settings > Network Settings > Test Internet Connection.
Check Your Remote Play Device Specs:
Ensure that your device meets the specifications required for Remote Play compatibility. Verify the requirements for PC, Mac, Android, and iOS devices to ensure seamless Remote Play functionality.Remote Play Is A Great Way To Play: Despite any issues encountered, Remote Play offers a convenient way to play PS5 games on compatible devices. The PS5 will continue running even if the Remote Play device disconnects, preserving your progress. Improving Remote Play Experience with DualSense Alternatives: For an enhanced gaming experience, consider using DualSense alternatives. These controllers provide additional features and customization options, elevating your Remote Play sessions.
Conclusion:
By following these top 6 fixes, you can address any issues with Remote Play on your PS5 and enjoy gaming on compatible devices with ease. Remote Play enhances the accessibility of PS5 games, allowing you to play your favorite titles wherever you are. Resolve any problems quickly to maximize your gaming experience with Remote Play.
The PS5 DualSense regulatorfeatures an eye– catching lightbar that adds to the immersive gaming experience. Did you know that you can customize the light bar color on your DualSense regulator to match your preferences or enhance your gaming atmosphere? In this companion, we’ll exploredifferentstyles to change the lightbar color on your PS5 regulator, offering you a moreindividualized gaming experience.
Styles to Change PS5 Controller Lightbar Color
There are colorfulways to changethe lightbar color on your PS5 DualSense regulator. We will bandy three popularstyles. UsingBrume to Change Lightbar Color. Steam offers a straightforwardway to customize the lightbar color on your DualSense regulator. By penetrating the regulatorsettings in Steam, you can select your asked color for the lightbar.
DS4Windows is a free app that enables you to customize the geste of DualShock 4 and DualSense regulators on Windows PCs. Through DS4Windows, you can choose a customcolor for your DualSense lightbar.
Customizing Lightbar Color with DS4Tool
DS4Tool is another free app that allows you to change the lightbar color of your DualSense regulator on Windows PCs. analogous to DS4Windows, DS4Tool offers lightbar customization options. preventives and comity. Before changing the lightbar color, it’s pivotal to insuregame and app comity. Not all games and apps support lightbar customization, and using third- party apps may havecertainpitfalls, similar as voiding the regulator‘s bond or causing comityissues.
Connecting DualSense Controller to PC or Mac
To change the lightbar colorusing third- party apps, you will need to connect your DualSense regulator to a PC or Mac via Bluetooth or USB. We will guide you through the way for both connectionstyles. Step– by- Stepcompanion to Change Lightbar Color. We will give a step– by- stepcompanion for each system. Using Brume for Lightbar Customization. Open Steam and access the regulatorsettings to customize the lightbar coloraccording to your preference.
Changing Lightbar Color with DS4Windows
Download and install DS4Windows, connect the DualSense regulator to your PC, and follow the app’s instructions to change the lightbar color. Customizing Lightbar Color with DS4Tool. Download and install DS4Tool, connect the DualSense regulator, and use the app’s options to elect your asked lightbar color.
Troubleshooting ConnectionIssues
Still, we’ll give troubleshooting tips to resolve the problem, If you encounter any connectionissues while trying to change the lightbar color. We will coverwaysimilar as resuming the regulator, PC, or Mac, using a different USB string or Bluetooth appendage, and streamlining the regulator firmware.
Conclusion
Customizing the lightbar color on your PS5 DualSense regulator allows you to epitomize your gaming experience and add a uniquetouch to your gameplay. By following our step– by- stepcompanion and icingcomity, you can change the lightbar color safely and enhance your gaming sessions on your PS5 press.
The PlayStation VR2( PS VR2) offers an immersive gaming experience with its slice– edge technology. To insure a flawless gaming experience, it’s essential to understand the comity of PS VR2 with PlayStation consoles, the supportedgames, and the VR regulatorscompatible with the headset.
PS VR2 Console Compatibility
PS VR2 is designedto worksimply with PlayStation 5 consoles, furnishing the stylish virtual reality gaming experiencepossible. It isn’t compatible with Play Station 4 consoles, so druggiesneed to enjoy a PS5 to enjoy PS VR2.
PS VR2 Game Compatibility
There’s no comitybetween PlayStation VR and PS VR2. Gamesdesigned for PS VR systems can not beplayed on PS VR2, and vice versa. When viewing a game, druggies can identify its VR comity through specificiconsindicatingsupport for PS VR or PS VR2. VR Play StylesSupported by PS VR2 Games PS VR2 gamessupportdifferent VR playstyles to feed to varyingpreferences, SittingGames Playable while sitting. Standing Games Playable while standing. Room scale GamesBearfreemovement in a largerplayarea of at least 2m x 2m. Filtering PS VR2 Games. To filter PS VR2 games, access the Game Library, select the Your Collection or Installedtab, and alsochoose Sort and Filter> VR. This allows druggies to concentrate on gamescompatible with their PS VR2 headset.
PlayStation VR2 Sense ™ regulators are simplycompatible with PS5 consoles and PS VR2 headsets. Some PS VR2 gamessupport DualSense wireless regulator and druggies can check the game‘s PlayStation Store runner to find out if DualSense is supported or needed. PS VR2 systems aren’t compatible with Play Station Move stirregulators or PlayStation VR Aim regulators.
Conclusion
Understanding PS VR2 game and presscomity is essential for an immersive and pleasurable gaming experience. PS VR2 is simplycompatible with PlayStation 5 consoles, and gamesdesigned for PS VR can not beplayed on PS VR2, and vice versa. druggies can filter PS VR2 games in their gamelibrary for easyaccess. The PlayStation VR2 Sense ™ regulatorsworksimply with PS5 and PS VR2 headsets, while some PS VR2 gamesalsosupport DualSense wireless regulators. By knowing the comity and supportedregulators, gamers can completelyenjoy the immersive world of PS VR2 gaming on their PS5 consoles.
Impeccably sequestration- Conserving AI What’s it and how do we achieve it?
Data sequestration has come a critical concern in recent times, with regulations like GDPR and CCPA emphasizing the need to cover stoner data. As AI models decreasingly interact with sensitive information, icing sequestration becomes consummate.” sequestration by Design” plays a crucial part in clinging to these regulations and erecting stoner trust.
still, achieving impeccably sequestration- conserving AI remains a challenge, and there’s a lack of comprehensive guidelines in this area. In this composition, we explore the four pillars needed to achieve perfect sequestration in AI and bandy slice- edge technologies that address each pillar. Drawing on recent exploration in sequestration- conserving machine literacy, we exfoliate light on this fleetly evolving field.
The Four Pillars of impeccably sequestration- Conserving AI
In our exploration, we linked four essential pillars for sequestration- conserving machine literacy
Training Data sequestration icing vicious actors can not reverse- wangle the training data, guarding data generators.
Input sequestration Guaranteeing that stoner input data remains nonpublic, shielded from third- party spectators.
Affair sequestration icing that model labors are only visible to the stoner, maintaining data confidentiality.
Model sequestration precluding the theft or reverse- engineering of AI models, securing model generators.
While the first three pillars cover data generators, the fourth pillar aims to guard the intellectual property of model generators.
Image by: https://pressmaverick.com/
Training Data sequestration
exploration shows that reconstructing training data and rear- engineering models is more doable than anticipated. Exposure criteria are used to quantify the liability of rear- engineering a secret from model labors. results similar as Differentially Private Stochastic grade Descent( DPSGD) and Papernot’s PATE help achieve training data sequestration without compromising model generalizability.
Input and Affair sequestration
Conserving stoner data sequestration is pivotal, as data leaks can lead to abuse or unauthorized access to sensitive information. Homomorphic Encryption, Secure Multiparty Computation( MPC), and Federated Learning are effective results for icing input and affair sequestration without compromising data mileage.
Image by: https://pressmaverick.com/
Model sequestration
AI models are precious means, and guarding them from theft and reverse- engineering is vital for companies. Differential sequestration can be applied to model labors to help model inversion attacks. Homomorphic encryption is an option for cracking the model in the pall, although it comes with computational costs.
Satisfying All Four Pillars
Achieving impeccably sequestration- conserving AI requires combining colorful technologies
the four pillars of impeccably sequestration- conserving AI lay the foundation for a secure and secure AI ecosystem. By using slice- edge technologies like homomorphic encryption, discriminational sequestration, and allied literacy, we can cover stoner data and AI models, enabling the responsible and ethical development of AI- driven results. As the field of sequestration- conserving AI continues to evolve, it’s essential for experimenters, inventors, and policymakers to unite and insure data sequestration remains at the van of AI advancements
If you are a Mac user, you might have heard the name “Gatekeeper” at least once in your life. Nonetheless, many Mac users lack knowledge regarding its true nature or functions. As indicated by its name, Gatekeeper functions as an app security guard. But before diving into the details about Gatekeeper, let’s understand what file quarantine means in Mac devices.
File Quarantine in macOS
Quarantine of apps, files or documents downloaded from the internet involves assigning tags. The assigned tag, which is alternatively referred to as the quarantine flag, is given to the files by the downloading application. Web browsers are part of this Mail apps also fall under this Notwithstanding that, it is not compulsory to mark files, plus, numerous third-party app stores and installers do not mark the files they download.
The primary objective of marking files aims to provide information to the device regarding the source of downloaded files, emphasizing potential harm. When an individual tries to access a quarantined file, an advisory message is given by the system regarding the unverified source of the file. User is required to acknowledge before opening the file on condition that the user accepts the warning
Introduced in 2007, file quarantine came alongside the update of OS X 10.5 Leopard. At the start, using only file quarantine wasn’t particularly effective, due to users being simply warned, and after confirming it, the files remained accessible. However, with subsequent updates, more features were introduced that utilized the file quarantine function, and among these features was Gatekeeper.
I’m curious about the functionality of macOS Gatekeeper on a Mac. and What Does It Do on Mac?
The OS X 10.8 Mountain Lion update brought about the introduction of Gatekeeper. On Mac devices, users can determine the specific categories of apps that are allowed to be installed. To illustrate, individuals are able to select between installing applications via the Mac App Store or obtaining them through third-party channels. There is a choice for users to either limit app installation solely to the Mac App Store or also involve identified developers.
The activation of Gatekeeper occurs when apps are authorized for download outside the Mac App Store. When downloading an app, plug-in, or installer package from a non-store source if someone attempts to launch it. There are two major settings for Gatekeeper:
1 Allow apps only via the official App Store only
2 Allow apps from the App Store and identified developers
In previous releases of macOS, “Allow apps from anywhere” was a setting that existed.
By default, the setting is usually “Allow apps from the App Store and identified developers.” Mac App Store apps are deemed safer because they go through rigorous testing conducted by Apple to detect malware and other harmful elements prior to being approved.
In contrast, this is inaccurate concerning apps created by external developers. Running possibly dangerous applications on their devices makes Apple cautious. To check third-party apps, the applications must have a valid code signature. To adhere to this condition, it is mandatory that the apps are endorsed with the developer’s identification and equipped with a certificate granted by Apple that specifically caters to reputable developers.
Once Mac devices open third-party apps, Verification of the app’s code signature by Gatekeeper results in execution being granted only when all details match. If Gatekeeper is unsuccessful in verifying the details, the system will display a cautionary message. As per the warning message, the app originates from an unreliable source therefore installation is not allowed.
Apple has now introduced notarization, giving users increased assurance, installing third-party applications can now evoke greater user confidence. Notarization is the process by which Apple checks an app for known malicious threats and verifies the code signature. If apps pass the notarization process, a notarized emblem is granted to them, assuring users of their safety when distributed.
Mac Notarization: Essential Information for Mac Administrators
To guarantee the absence of known threats, Mac notarization ensures that apps and other executables are safe. When initiating third-party apps, plug-ins, extensions, and similar software on a Mac, The notarization badge or ticket is validated by Gatekeeper. In case it exists, The app/file can be instantly opened by Gatekeeper with no warning messages displayed. Should the file be without a notarization ticket, Gatekeeper checks if the code signature maintains its integrity.
To configure Gatekeeper settings, follow these steps:
Access System Preferences → Privacy & Security is found under System Preferences. → Security & Privacy.
In the General tab, mouse over or press on the lock symbol at the bottom left part and input the required admin authentication.
Select an option from “Allow apps downloaded from: App Store” or “App Store and identified developers.”
How to Bypass Gatekeeper?
Although it is not recommended, Multiple ways exist to go around Gatekeeper. Bypassing Gatekeeper allows users to install apps downloaded from anywhere, and not even a warning message will be displayed if Gatekeeper is switched off.
Image by:https://www.hexnode.com/
1. Bypass Gatekeeper using right-click or control-click:
In case you prefer opening an app without disabling Gatekeeper, opening the app through Finder with a control-click offers the optimal solution. Discover the app in Finder, use a control-click method to bring up a contextual menu, and pick “open.” Once prompted with the warning message, proceed by clicking on “open”. In spite of applying highly restrictive settings, this will aid in accessing the app.
2. Bypass Gatekeeper using System Preferences:
Bypassing Gatekeeper is also possible by utilizing System Preferences. To begin with, you must determine the specifics of the blocked application within the “Enable apps from the App Store and verify developer” preferences. Afterwards, press the “Open Anyway” button to access the app without any disturbances.
3. Bypass Gatekeeper using Terminal:
By employing the Mac Terminal, you can switch off Gatekeeper completely. Even though Apple eliminated the “Anywhere” choice for Gatekeeper, Enforcing it using Terminal is still possible. To ensure this, Make certain that System Preferences is disabled.
Hit the return key, input the administrator login details if prompted, and hit return once more. Under the General tab of System Preferences, you will now find and select the “Anywhere” option under “Allow apps from”.
Is relying solely on macOS Gatekeeper effective in safeguarding your device from malware?
In the beginning of its introduction, Gatekeeper solely operated on files/executables with quarantine markers. The precautions in place were inadequate for maintaining device security, since a file lacking the quarantine flag could effortlessly bypass Gatekeeper Bypassing file quarantine is not really challenging is not much of a challenge, and Even taking away the quarantine flags isn’t too hard.
Gatekeeper, subsequently, underwent an upgrade that includes checking all applications regardless of their origin. Minor glitches and vulnerabilities were identified by cybersecurity professionals, creating an opportunity to manipulate malware into a system.
Gatekeeper doesn’t do runtime checks on apps. This might cause serious issues if a malicious app posing as an innocent one gets past the initial check. Furthermore, it merely watches for familiar dangers and disregards recent ones.
However, Apple doesn’t compromise on safety issues, and many Gatekeeper updates have been released to resolve existing bugs. Gatekeeper’s adoption as a standard for app-level security is Apple’s ongoing endeavor.
Remotely Modifying the Configuration of macOS Gatekeeper
In organizations with over 10-20 devices, manually configuring Gatekeeper on every individual device can be overwhelming. A UEM solution such as Hexnode proves to be useful in this situation. Setting up Gatekeeper settings for multiple devices becomes effortless when utilizing UEMs and a few mouse clicks. Switching on Gatekeeper is possible with a UEM, Alternatively, there exists the ability to disable it entirely. Using this can be highly advantageous if organizations heavily rely on proprietary software. In-house apps are those built for use inside the organization, Moreover, most of these applications do not necessitate code signing or notarization .
To be permitted by Apple, third-party kernel or system extensions usually need to undergo a process of notarization. Nevertheless, kernel and system extensions pushed to devices through a UEM do not require notarization. This has a positive impact because organizations can use necessary extensions within their organization without waiting for the notarization process. Time is saved abundantly.
Conclusion
To sum up, Gatekeeper may come across as bothersome occasionally, nevertheless, it is significant in its contribution to protect your Mac device from familiar threats. The prudent choice is to turn on Gatekeeper and refraining from attempting to bypass it except when absolutely needed. A safer computing experience and enhanced security for your Mac devices are guaranteed when you grasp the purpose of Gatekeeper and merge it with UEM.
Introduction to the Windows 10 Weather Widget:
For those who have been actively seeking a weather app or widget to use on their Windows 10 Taskbar, you are in good fortune! Microsoft has recently introduced a native Weather Widget on the Taskbar, doing away with the requirement to install any external applications., This eliminates the necessity of downloading and installing external apps.. Conveniently view daily weather updates directly from your Windows 10 PC’s Taskbar with this feature.
Adding and Showing Weather in the Taskbar on Windows 10:
For optimal use of the Weather Widget featured on your Taskbar, confirm that your Windows 10 PC is updated to the latest version. On Windows 10 versions 1909 and above, this feature is accessible, which also includes versions such as 2004, 20H2, and 21H1. For those who are still not using the latest version, to keep your PC up to date, access Settings > Update & security and look for available updates.
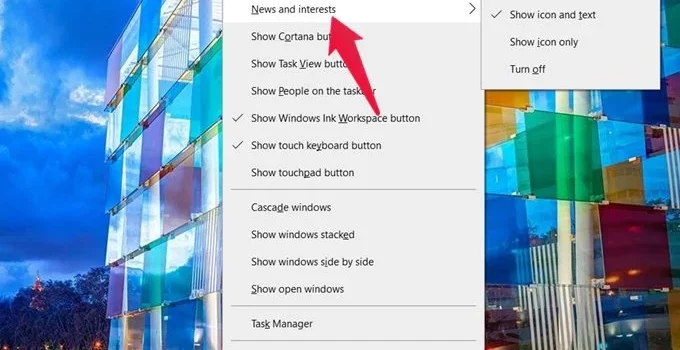
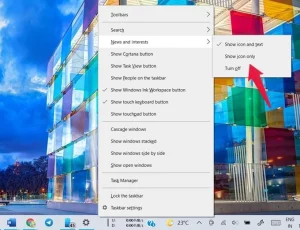
After updating your PC, the Taskbar will display the weather icon automatically. If it fails to, Access News & interests by right-clicking on the Taskbar. Select ‘Show icon and text’ from the available options to show the weather on the Taskbar. for displaying weather information on your Taskbar.
Changing Weather Location in the Taskbar Widget on Windows 10:
Upon enabling the Weather Widget on Windows 10 Taskbar, it might show an incorrect weather location. To customize the weather location, follow these steps:
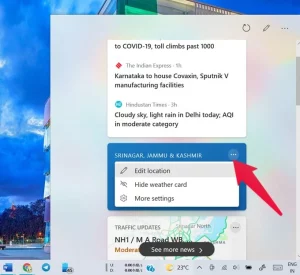
Hover your mouse over the weather icon for accessing the News and interests panel.
Scroll down until you see the Weather card and click on the three-dot icon.
Select “Edit location.”
Choose between “Choose based on your preference between automatically detecting the location” and “Enter manually” based on your preference.
If the automated feature doesn’t function, input the preferred location by hand afterward, click on “Save.”
For accessing weather data for a different location, click on the Refresh icon positioned at the top of the panel. to check out current weather conditions in another geographical spot.
Disabling the Windows 10 Weather Widget in the Taskbar:
If you prefer not to see the weather icon in the Taskbar, you have two options:
Right-click on the Taskbar and select News and interests. Choose “Switch off” to entirely deactivate the weather widget, please take note that this will also cause the News feed to be hidden.
If you want to continue seeing the News feed but prefer not to display the temperature text,, opt for “Icon only” from the provided selection.
Removing Weather Card from News and Interests Panel:
Displays solely the present temperature. only indicates the current temperature. If you find that the Weather card takes up unnecessary space in the feed, you can hide it:
Tap the three-dot icon situated within the News and Interests panel, click on the Weather card.
Select “Hide weather card” to remove it from the panel.
Adding Weather Card to News and Interests Panel:
If you want to add the Windows 10 Weather widget card back to the News and Interests feed:
Access the News and Interests panel and Select the Edit/Manage interests option (pencil icon) located at the top.
A fresh browser tab will open up, where you should log in to your Microsoft account.
Click on “Experience settings” in the feed personalization window.
Find the Information cards section, then flip the switch under Weather for “Display weather in my feed.”
Customizing Windows 10 Taskbar Icons:
Besides modifying the Weather Widget, you can also center Windows 10 Taskbar icons to create a more structured appearance and ambiance.
Pinning Favorite Websites to Taskbar for Faster Access:
Maximize the utility of your Taskbar through pinning preferred websites for convenient and swift access.
Conclusion:
The Windows 10 Weather Widget is a handy feature for users who want quick weather updates right on their Taskbar. By implementing the directions outlined in this guide, you are capable of establishing, tailoring, and overseeing the weather widget to suit your individualized preferences. Moreover, take the initiative to discover different approaches in personalizing your Taskbar for a more optimized computing experience.
Staying concentrated in a society filled with diversions can present difficulties, yet, it is fundamental for being efficient and attaining success. These 10 tips are designed to help you reduce distractions and improve your concentration, enabling you to accomplish tasks efficiently.
Plan Ahead
Begin each dawn by outlining a precise course of action via pinpointing two essential duties that need to be accomplished. Having a backup task allows you to maintain your productivity level despite unexpected events. Start your day without checking emails or social media by, since they often lead to loss of concentration.
Turn Off Distractions
Seize command of your devices by switching off push notifications on smartphones and desktop apps. Limit email checking to specific times during the day so as to minimize any disturbances and uphold a focused work routine.
Photo by Kris K: https://www.pexels.com/photo/black-smartphone-288530/
Create a Comfortable Environment
Find the ideal work environment that promotes comfort and focus. This could involve adjusting the room’s temperature, choosing comfortable clothing, listening to background music, or using a supportive chair.
Practice Meditation
Incorporate meditation into your daily routine for achieving mental tranquility and maintaining inner balance. Start by allocating a small amount of time daily for serene sitting, counting slowly to 34. Whenever there are distractions, softly shift your attention without criticism, progressively developing your skill to concentrate.
Set Smaller Goals
Segment major aspirations into more feasible, bite-sized missions. Focusing on smaller pieces allows for shorter bursts of concentration, This will enhance the probability of successful task completion..
Prioritize Sleep
Show consideration for your body’s sleep requirements through obtaining a range of seven to nine hours of undisturbed sleep nightly. Avoid sacrificing sleep for extra work, since sufficient rest improves concentration and overall health.
Use Visual Reminders
Present visual prompts, like adhesive notes or signage, that promote concentration. A straightforward expression like “Pay attention, Pay attention, Pay attention” has the ability to function as an impactful cue to maintain concentration when tackling challenging tasks.
Photo by Hasan Albari: https://www.pexels.com/photo/close-up-photo-of-dart-pins-on-dartboard-1424745/
Reward Yourself
Enhance your capacity to postpone instant gratification through the establishment of rewards for completing designated tasks. Plan ahead by choosing a motivating reward, like browsing social media or treating yourself, to reinforce your focus.
Take Short Breaks
Frequent breaks, like taking a brief walk or exiting the office space, can refresh your mind and body. Pausing your work temporarily can assist in restoring attention and enthusiasm.
Photo by meo: https://www.pexels.com/photo/photo-of-head-bust-print-artwork-724994/
Engage in Non-Work Activities
Getting involved in non-digital activities such as exercise, sports, or brain teasers can stimulate both your mind and body, can stimulate your mind and body. A healthy body and mind contribute to better focus and productivity.
Conclusion
Amplifying concentration and lessening disruptions are key proficiencies for attaining productivity and achieving success. are critical abilities for accomplishing efficiency and prosperity. You can effectively increase your focus and conquer tasks with greater efficiency and effectiveness, Implementing these guidelines in your daily routine allows you to boost concentration levels, leading to increased task productivity.
Social Engineering Scams Targeting Remote Workers: Spotting Fraudulent Requests for Sensitive Information
As remote work becomes more prevalent, so do social engineering scams that target remote workers. Recognizing and protecting against these scams is essential in maintaining a secure remote work environment.
Understanding Social Engineering Scams Targeting Remote Workers
Social engineering scams involve manipulating individuals into divulging sensitive information or performing actions that compromise their security. Remote workers are especially vulnerable to these scams due to the isolation and potential distractions in their home offices.
Photo by Anamul Rezwan: https://www.pexels.com/photo/two-man-holding-white-paper-1216589/
Red Flags of Fraudulent Requests for Sensitive Information
Being aware of red flags can help remote workers spot fraudulent requests for sensitive data. Some warning signs include:
Unsolicited emails or messages requesting sensitive information like passwords or financial details.
Urgent requests that pressure workers into taking immediate action without verifying the sender’s identity.
Emails with grammatical errors or mismatched branding that indicate possible phishing attempts.
Requests for data that should not be shared outside the company or violates the organization’s policies.
Building a Secure Remote Work Environment
Creating a secure remote work environment involves implementing measures to protect sensitive data and communications. Companies should:
Use secure and encrypted communication tools and networks for remote work.
Enforce strong password policies and implement multi-factor authentication.
Regularly update software and systems to patch known vulnerabilities.
Provide remote workers with company-issued devices to minimize security risks.
Educating and Training Remote Workers on Cybersecurity
Educating remote workers about social engineering scams and cybersecurity best practices is crucial. Companies should conduct regular training sessions on:
How to identify and report suspicious emails or messages.
The importance of not sharing sensitive information unless appropriately verified.
How to recognize and avoid phishing attempts and malicious links.
Conclusion: Empowering Remote Workers to Defend Against Scams
Protecting remote workers from social engineering scams requires a proactive and informed approach. By educating and training remote workers and fostering a culture of cybersecurity awareness, companies can empower their employees to defend against fraudulent requests and maintain a secure remote work environment.
Encourage remote workers to stay vigilant and report any suspicious activity to the IT or security team promptly. Together, we can build a strong line of defense against social engineering scams and protect sensitive information in the remote work landscape.
Online Dating Sextortion Scams: Recognizing Attempts to Exploit Personal Photos and Videos
Online dating platforms provide a convenient way to connect with others, but they also present risks, including sextortion scams. Being aware of the signs and taking preventive measures is essential in protecting your personal media from exploitation.
Understanding Online Dating Sextortion Scams
Online dating sextortion scams involve perpetrators engaging in deceptive online relationships with the intention of obtaining explicit photos or videos from their victims. Once they possess compromising media, the scammers blackmail and extort money or other favors under the threat of sharing the content publicly.
Photo by Budgeron Bach: https://www.pexels.com/photo/hispanic-man-using-smartphone-while-woman-watching-6532618/
Red Flags of Sextortion Attempts
Spotting red flags can help you identify potential sextortion attempts. Some warning signs include:
Rapid escalation of intimacy and sharing of personal media.
Requests for explicit photos or videos early in the relationship.
Threats to share compromising content if specific demands are not met.
Unwillingness to engage in video calls or meet in person.
How to Safeguard Your Personal Media
To safeguard your personal media from exploitation, follow these precautions:
Be cautious about sharing explicit content with individuals you’ve only met online.
Use secure messaging apps with end-to-end encryption for private communication.
Adjust your privacy settings on social media platforms to limit access to your personal content.
Consider watermarking your photos to discourage unauthorized use.
Reporting Sextortion Scams and Seeking Support
If you encounter a sextortion scam, report the incident to the dating platform and law enforcement immediately. Avoid engaging with the scammer or complying with their demands.
Seek emotional support from friends, family, or support groups to cope with the emotional toll of such experiences. Remember that you are not alone, and there are resources available to help you navigate through these challenges.
Conclusion: Empowering Safe Online Dating Practices
Being informed and vigilant is key to protecting yourself from online dating sextortion scams. Practice safe online dating by taking measures to protect your personal media and recognizing the signs of potential sextortion attempts.
Prioritize your safety and well-being in all online interactions. By empowering yourself with knowledge and caution, you can enjoy a safer and more positive online dating experience.
Should you face any issues while connecting your Mac to the Magic Keyboard, Magic Mouse, or Magic Trackpad, Rest assured. To assist you better, we have compiled a set of uncomplicated guidelines that can help fix any usual difficulties that arise while using your Magic accessories, allowing them to function perfectly.
Turn Off and Switch on Your Supernatural Contraption
The first step in troubleshooting any connectivity issue attempt to restart your Magic accessory If you have a Magic Mouse, take note of the switch positioned at the device’s base. Concerning the Magic Keyboard and Magic Trackpad, you can find the switch at the back edge. Adjust the toggle to deactivate the device (green light not present). Afterwards, move it in the opposite direction to power up the equipment (green light becomes conspicuous). For those who possess a previous generation, locate the power button on the device’s right side. Continue to press and hold it until the green LED on the top stops shining, subsequently, apply pressure again to switch on the device.
Ensure Bluetooth is Turned On
In order to create a wireless link between your Magic accessory and Mac, you should check whether Bluetooth is activated. If your Mac is currently linked to a USB mouse, go to the Apple menu () > System Preferences, and click on “Bluetooth.” Ensure that Bluetooth has been activated. Should you be without a USB mouse but have your keyboard connected, Access Spotlight search by pressing Command-Space bar Input “Bluetooth File Exchange,” followed by pressing the Return or Enter key, and ultimately, hit Return or Enter one more time to activate Bluetooth.
In case you face any challenges while trying to activate Bluetooth, consider rebooting your computer and trying to enable Bluetooth once more.
Connect the Lightning Cable for Pairing and Charging
When using newer Magic accessories such as the Magic Keyboard and Magic Mouse, you can use the Lightning to USB Cable or USB-C to Lightning Cable enabling you effortless connectivity between them and your Mac. Connect the cable, Pause for approximately sixty seconds, afterwards, detach the connection. This action will pair the accessory with your Mac and while also recharging its built-in battery. To check the charge level of your accessory, Just press or click on the Control Center icon present in your menu bar, and then pick Bluetooth from there..
For earlier models that don’t utilize a Lightning cable for charging, replaceable batteries might be available. Look up Apple’s recommendations for steps on how to link these devices via your Mac device.
Image by:https://support.apple.com/
Check for Wireless Interference
If your Magic accessory still won’t maintain a stable wireless connection, interference from surrounding wireless devices may be the reason. To resolve this, inspect for any possible Wi-Fi and Bluetooth signal interferences. By simply relocating your Mac or Magic accessory, you may experience improved connectivity.
Conclusion
To summarize, resolving connectivity problems with your Magic devices shouldn’t seem overwhelming. By implementing these sequential directions, you can conveniently restore the link between your Mac and the Magic Keyboard, Magic Mouse, or Magic Trackpad. Remember to power cycle your device, verify that Bluetooth is activated, (when applicable) connect the Lightning cable for both pairing and charging. By following these troubleshooting tips, you can optimize your experience with Magic accessories on your Mac for a seamless and hassle-free usage.