Introduction

In this article, we will dive into the latest major updates and features for Your Phone apps. We value your feedback, so don’t hesitate to try out these exciting features and let us know what you think. You can report any issues under Your Phone > Settings > Send feedback or directly through the Feedback Hub.

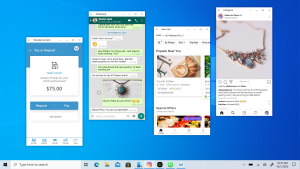
Your Phone Multi-Apps Experience

On November 11, 2020, we introduced the Your Phone multi-apps experience, allowing you to interact with multiple Android mobile apps simultaneously on your Windows 10 PC. Supported on select Samsung devices, you can now run apps in separate windows, giving you the power to multitask with ease. Pin your favorite apps to the Favorites, Windows 10 taskbar, or Start menu for quick access. Moreover, you can search for previously pinned apps using Windows search from your Start app list. Stay connected with family, keep up with your social feeds, or order food, all from the comfort of your PC, without installing apps or signing in again.

Phone Apps
Image by: https://learn.microsoft.com/en-us/windows-insider/apps/your-phone

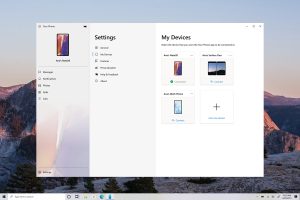
New Your Phone Settings for Seamless Device Management

On September 30, 2020, we rolled out a new user experience for managing linked devices within the Your Phone app. With this update, you can effortlessly link a new device, remove an old one, and switch between active devices, all within the app. We’ve also made visual improvements by displaying each device on its own device card with your personalized synced wallpaper. While this update is gradually rolling out to Insiders, it will soon be available for everyone, so keep an eye out for it in your Your Phone app.

Phone Apps
Image by: https://learn.microsoft.com/en-us/windows-insider/apps/your-phone

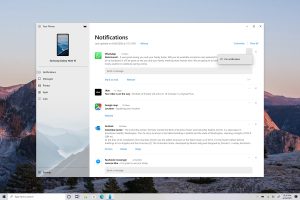
Pinning Important Notifications with Your Phone

On September 23, 2020, we added a new pinning feature to the Your Phone app’s notifications feed. You can now easily pin important notifications to the top of your feed for quick access. This way, you won’t lose track of essential updates and can use all your favorite functionality, like in-line reply, with ease. When you no longer need a pinned notification, simply unpin it with a tap. This feature is rolling out gradually, so be patient if you don’t see it in your app immediately.

Phone Apps
Image by: https://learn.microsoft.com/en-us/windows-insider/apps/your-phone

Your Phone Apps Now Available for General Public

On August 21, 2020, we were thrilled to announce that the Your Phone apps feature, highlighted during the Samsung Unpacked event, is now gradually rolling out to the general public. With Your Phone apps, you can instantly access your Android phone’s mobile apps directly from your Windows 10 device. Pin your favorite apps to the Taskbar or Start menu for quick access and enjoy multitasking with separate app windows. Whether you need to reply to messages, manage social posts, or order food, do it all with ease using your PC’s large screen, keyboard, mouse, pen, and touch screen, alongside your other PC apps.

Conclusion

With these fantastic updates for Your Phone apps, Microsoft is committed to enhancing your experience and making your life more convenient. Stay tuned for more exciting features in the future. Try them out and share your valuable feedback with us as we continue to improve Your Phone apps to meet your needs better.

Reference

For more details click here

For more details click here

Introduction

Network troubleshooting commands are essential tools for network administrators to diagnose and resolve network issues efficiently. In this article, we will delve into seven crucial network troubleshooting commands that can help you identify and fix network problems quickly.

1. Ping: Testing Connectivity

Ping is a widely known network troubleshooting command available on various operating systems. It sends an ICMP echo request to a host and receives an ICMP echo reply if the host is reachable. By measuring the time it takes to reach the host and detecting errors or packet loss, ping provides insights into network connectivity.

To use the ping command, open the command prompt and enter ping followed by the IP address or URL. For instance:

ping www.facebook.com

Network troubleshooting commands
Image by:https://blog.invgate.com/


2. Tracert/Traceroute: Tracing the Route

Tracert (or traceroute) reveals the route between a source and destination by displaying the IP addresses of routers along the path. By using ICMP routers, tracert helps pinpoint network bottlenecks and identify routing issues.

On Linux systems, use the terminal and type traceroute followed by the hostname or IP address. In Windows, use tracert followed by the hostname:

tracert www.wikipedia.com

Network troubleshooting commands
Image by:https://blog.invgate.com/

3. Pathping: Combining Tracert and Ping

Pathping is a unique command developed by Microsoft, combining the functionality of tracert and ping. It identifies routers causing network issues and provides latency and packet loss data for each hop.

To use pathping, enter the command followed by the URL or IP address in the command prompt. You can customize parameters like maximum hops and timeout:

pathping -h 20 -w 200 www.example.com

Network troubleshooting commands
Image by:https://blog.invgate.com/

4. Ipconfig (Windows) / Ifconfig (Linux): Network Configuration

Ipconfig (Windows) and ifconfig (Linux) display TCP/IP network configurations. These commands show IP addresses, subnet masks, and default gateways bound to each adapter.

On Windows, open the command prompt and type ipconfig. On Linux, use the terminal and type ifconfig.

Network troubleshooting commands
Image by:https://blog.invgate.com/

5. Nslookup: Diagnosing DNS Issues

Nslookup diagnoses DNS issues by looking up DNS records and their corresponding IP addresses. It’s useful for troubleshooting domain name resolution problems. To use nslookup, type the command followed by the domain name:

nslookup www.google.com

Network troubleshooting commands
Image by:https://blog.invgate.com/


6. Netstat: Network Statistics

Netstat provides network statistics for your infrastructure, displaying network connections, routing tables, and network protocols used. This command is available on various systems, including Windows, macOS, Linux, and IBM OS.

To use netstat, open the command prompt or terminal and type netstat.

Network troubleshooting commands
Image by:https://blog.invgate.com/

7. Route: Managing Routing Tables

The route command manages routing tables and is available on Windows, Linux, Unix-like systems, and more. It can clear routing tables, set network destinations, and configure IPv4 or IPv6 settings. In some Linux distros like Debian or Ubuntu, you might need to install it first:

arduino
sudo apt-get install net-tools

After installation, use the route command in the terminal or command prompt:

route -n

Conclusion

These seven network troubleshooting commands are valuable tools for network administrators. By mastering these commands, you can efficiently diagnose and fix network issues, ensuring smooth communication and connectivity across your network infrastructure.

Introduction:

Focus groups, a moderated conversation with a group of participants, are a valuable method for UX researchers to delve into attitudes, beliefs, and perceptions. Unlike interviews, the power of focus groups lies in group discussions and interactions among members. This article will explore the concept of focus groups, their applications in UX research, potential drawbacks, and how to mitigate common problems. Learn how to conduct effective focus groups, analyze the data, and share your findings to make informed decisions in product development.

What is a Focus Group?

A focus group involves 5 to 10 participants engaged in a conversation moderated by a researcher on a specific topic. It is an effective tool for learning about user attitudes, desires, and reactions to concepts or designs. The social dimension of focus groups often uncovers spontaneous reactions and ideas that might be missed in one-on-one interviews. Researchers use them to understand group dynamics and gain insights into product feedback or brand perceptions.

Why Some User Researchers Hate Focus Groups?

Focus groups have their detractors due to certain drawbacks and potential pitfalls:

  1. Focus groups reveal what people say, not what they do, leading to discrepancies between stated intent and actual behavior.
  2. Groupthink can arise in focus groups, as participants tend to conform to the opinions of the group, providing a skewed understanding of individual experiences.
  3. Dominant personalities in a group can overshadow others, inhibiting the contributions of quieter participants.
  4. Effective moderation requires skill and experience, as group dynamics can be unpredictable and challenging to manage.
focus group
Image by: https://productcoalition.com/

When to Use Focus Groups for UX Research:

Focus groups are best used to uncover perceptions, beliefs, and opinions rather than behaviors. They are valuable in the following scenarios:

  1. Identifying research questions during the early stages of a project.
  2. Exploring how people discuss problems, products, or shared experiences in a group setting.
  3. Gathering opinions, attitudes, and preferences after users interact with a prototype.

Conducting a Focus Group:

To conduct an effective focus group, follow these steps:

  1. Define your research goals and questions.
  2. Choose the location and decide on in-person or online focus groups.
  3. Select an experienced moderator to lead the discussions.
  4. Recruit participants who align with your research goals.
  5. Decide the number of groups and participants needed for your study.
  6. Obtain informed consent from participants.
  7. Offer appropriate incentives for participants’ time and expertise.
focus group
Image by: https://lucidspark.com/

Analyzing Focus Group Data:

Focus group data analysis involves reviewing session notes, recordings, and artifacts. Use qualitative coding to tag and organize data into themes or categories. Analyze patterns and key insights to create a report focused on meeting the study’s research goals.

Sharing Your Findings:

When sharing your focus group findings, keep the deliverables focused on key insights, themes, and takeaways relevant to the research goals. Use video clips, key quotes, and participant-made artifacts to contextualize the information for stakeholders.

Conclusion:

Mastering focus groups in UX research requires careful planning, skilled moderation, and thoughtful analysis. By understanding their strengths and limitations, researchers can harness the power of focus groups to gain valuable insights into user perceptions and inform product development decisions. With the right approach, focus groups become an indispensable tool in the UX researcher’s toolkit.

Introduction

In the fast-paced world of software development, the pressure to deliver products quickly can sometimes lead to the oversight of potential bugs and stability issues. Failing to address these concerns adequately can have severe consequences for both developers and end-users. In this article, we will explore the common risks associated with software bugs and stability issues, along with strategies to mitigate them and enhance the overall reliability of software products.

Understanding Software Bugs

Software bugs are flaws or errors in code that can cause unexpected behavior or even complete system failure. They can emerge due to various reasons, such as programming mistakes, incorrect data processing, or inadequate testing. Identifying and understanding the types of bugs that can occur is crucial for implementing effective prevention and resolution measures.

APPLE IPHONE
Photo by Shawn Rain on Unsplash

Exploring Stability Issues Software

stability refers to the ability of an application to perform consistently under various conditions without crashing or causing errors. Stability issues often arise when software interacts with different environments, hardware configurations, or other software components. These challenges can be particularly prevalent in complex systems, where managing stability becomes a critical concern.

Managing Risks in Software Development

To minimize the impact of potential bugs and stability issues, developers must adopt a proactive risk management approach. This includes thorough code reviews, automated testing, and continuous monitoring of applications in real-world scenarios. Identifying and addressing risks early in the development cycle can save significant time and resources in the long run.

Best Practices for Bug Prevention and Stability

Enhancement a. Comprehensive Testing: Implement rigorous testing procedures to identify bugs and stability issues in different stages of the development process. Automated testing frameworks can streamline this process and provide faster feedback on code changes. b. Code Reviews: Encourage regular code reviews among development teams to spot potential issues, improve code quality, and share knowledge. c. Version Control: Utilize version control systems to track changes and roll back to stable states if necessary, minimizing the impact of unforeseen bugs. d. Monitor and Analyze: Continuously monitor software performance in real-world environments, collect user feedback, and analyze application crashes to identify and address stability issues promptly. e. Continuous Updates: Keep software and dependencies up-to-date to leverage bug fixes and stability improvements provided by vendors and open-source communities.

Conclusion

Prioritizing the detection and resolution of potential bugs and stability issues is paramount in software development. By understanding the risks involved and adopting best practices for prevention and resolution, developers can deliver more reliable and robust software products. Remember, investing time and effort into bug prevention and stability enhancement not only improves user satisfaction but also saves valuable time and resources in the long run.

The Importance of Backing Up Before Installing Beta Software

Are you excited about trying out the latest beta version of your favorite operating system or applications? Beta software provides users with the opportunity to explore upcoming features and functionalities before the official release. However, it’s crucial to be cautious when installing beta software, as it may contain bugs and unexpected issues that could potentially harm your device or cause data loss. One of the best precautions you can take is to create a backup of your device before diving into the world of beta testing. In this article, we will discuss why backing up before installing beta software is vital and provide you with essential tips to ensure a smooth testing experience.

Why Backing Up Before Beta Software Installation is Vital

Beta software is still in development, which means it may not be as stable as the final release. It can contain bugs, compatibility issues, and performance problems that could lead to crashes or data corruption. By creating a backup of your device before installing the beta software, you can safeguard your data and have a safety net in case something goes wrong during the testing phase.

Imagine spending hours customizing your device, organizing files, and setting up apps only to have all of it wiped out due to a critical bug in the beta software. Without a backup, recovering your lost data could be a time-consuming and sometimes impossible task. Having a recent backup ensures that you can revert to a stable state with ease if anything undesirable happens during beta testing.

APPLE IPHONE
Photo by Lucas Hoang on Unsplash

How to Create a Full Backup of Your Device

Creating a full backup of your device is a straightforward process, and there are multiple methods to achieve this. Here are some common ways to back up your data:

  1. Using Cloud Backup Services: Many cloud storage providers offer automatic backup services for your devices. Services like Google Drive, iCloud, and OneDrive allow you to store your data securely in the cloud. Before installing the beta software, ensure that your device is set to automatically back up its data to the cloud.
  2. Local Backup with Computer: Connect your device to a computer and use software like iTunes (for iOS devices) or Android File Transfer (for Android devices) to create a complete backup of your device’s data on your computer. Make sure you have enough free space on your computer to store the backup.
  3. External Storage: You can also back up your data to an external hard drive or a USB flash drive. This method is useful if you prefer to have physical control over your backup and want to keep it separate from the internet.
  4. Third-Party Backup Apps: There are numerous third-party backup apps available for both mobile and desktop devices. These apps often provide additional features and customization options for your backups.

Tips for a Successful Beta Software Installation

Now that you have your backup ready, it’s time to install the beta software. Here are some tips to ensure a smooth installation process:

  1. Choose Reliable Sources: Only download beta software from official sources or reputable developers. Avoid downloading from unofficial websites or forums, as they may distribute modified versions that could harm your device.
  2. Read Release Notes: Always read the release notes and known issues for the beta software you’re installing. This information will give you insights into potential problems and help you make an informed decision about installing the beta.
  3. Use a Secondary Device (if possible): If you have a spare device, consider installing the beta software on it first to test its stability and compatibility. This way, you can avoid risking your primary device until you are confident about the beta’s performance.
  4. Keep Your Device Updated: Throughout the beta testing period, developers release updates to address bugs and improve stability. Always keep your device up-to-date with the latest beta updates for the best experience.

Restoring Your Device from Backup After Beta Testing

Once the beta testing period is over, or if you encounter significant issues during testing, you may decide to revert to the stable version of your software. Restoring your device from the backup you created earlier is a straightforward process:

  1. Locate Your Backup: Depending on the method you used to back up your data, connect your device to the cloud service, computer, or external storage containing the backup.
  2. Follow the Restore Process: For cloud backups, sign in to your account and choose the backup you want to restore from. For local backups, use the appropriate software to initiate the restore process.
  3. Patience is Key: Restoring your device from a backup can take some time, so be patient and let the process complete without interruptions.
  4. Verify the Restored Data: After the restore process is finished, double-check that all your data, settings, and apps are correctly restored.

Conclusion

Beta software can be an exciting opportunity to explore new features and functionalities before the official release. However, it comes with potential risks to your device and data. By creating a backup before installing beta software and following the tips provided, you can enjoy the benefits of beta testing without the fear of losing valuable information. Remember, being prepared with a backup is a small but crucial step that can save you from significant headaches and frustrations down the road.

What is the Apple Beta Software Program?

The Apple Beta Software Program allows users to test pre-release versions of iOS and macOS. By enrolling in this program, you get exclusive access to the latest features, enhancements, and improvements before they are officially released to the public. Apple encourages users to participate in the beta program to provide valuable feedback and report any issues they encounter during testing.

APPLE IPHONE
Photo by Yunus Yildiz on Unsplash

Benefits of Enrolling in the Beta Software Program

Enrolling in the Apple Beta Software Program offers several advantages for tech enthusiasts and developers alike. First and foremost, it grants early access to upcoming features, giving you a sneak peek into the future of Apple’s operating systems. You can explore new functionalities, user interface changes, and system improvements before anyone else.

Additionally, being a part of the beta program allows you to contribute to the development process. By providing feedback through the dedicated feedback app, you can help Apple identify and fix potential bugs, improve performance, and enhance overall stability. Your input can play a vital role in shaping the final version that millions of users will eventually use.

How to Enroll Your Device in the Apple Beta Software Program

Enrolling your device in the Apple Beta Software Program is a straightforward process:

  1. Backup Your Device: Before you begin, it’s essential to create a complete backup of your iPhone, iPad, or Mac. Beta versions may contain bugs that could lead to data loss, so having a backup ensures you can revert to a stable version if needed.
  2. Visit the Apple Beta Software Program Website: Go to the official Apple Beta Software Program website on your device’s Safari browser.
  3. Sign In or Create an Apple ID: If you don’t have an Apple ID, you’ll need to create one. If you already have one, sign in using your credentials.
  4. Enroll Your Device: Once signed in, enroll your device by clicking the “Enroll Your Devices” link and follow the on-screen instructions.
  5. Download the Beta Profile: After enrolling, you’ll be prompted to download a beta profile on your device. This profile contains the necessary configurations to receive beta software updates.
  6. Install the Beta Software: Once the beta profile is downloaded, head to your device’s “Settings,” navigate to “General,” then “Software Update.” You’ll find the latest beta version available for installation. Tap “Download and Install” to initiate the process.
  7. Provide Feedback: Throughout your usage of the beta software, if you encounter any issues or have feedback, use the dedicated feedback app to report them to Apple.

Important Considerations and Precautions

Before you decide to enroll your device in the Apple Beta Software Program, there are a few critical points to keep in mind:

  1. Beta Software May Be Unstable: Beta versions are intended for testing purposes and may contain bugs or stability issues that could impact your device’s performance.
  2. Backup Your Data: As mentioned earlier, always back up your device before installing beta software to safeguard your data.
  3. Battery and Performance Impact: Beta software can drain the battery faster and may affect the overall performance of your device.
  4. App Compatibility: Some third-party apps may not function correctly on beta versions. Developers might need time to update their apps for compatibility.
  5. Leave the Beta Program: If you encounter severe issues or decide you no longer want to participate, you can opt-out of the beta program. However, doing so requires restoring your device to the latest stable version, which may result in data loss.

In conclusion, enrolling your device in the Apple Beta Software Program can be an exciting opportunity to experience the latest iOS and macOS features before anyone else. By providing valuable feedback, you contribute to the improvement of the operating systems. Just remember to take the necessary precautions and be aware of the potential risks associated with beta software. Enjoy exploring the cutting-edge features and helping shape the future of Apple’s software!

Introduction

In the ever-evolving world of technology, software development remains at the forefront, driving innovation across industries. At the core of this dynamic process lies the Software Release Life Cycle (SRLC) – a crucial framework that determines how software is conceptualized, developed, tested, and eventually released to end-users. As a curious journalist, I take you on a deep dive into the six main stages that constitute this intricate journey, shedding light on the significance and challenges that developers face.

APPLE IPHONE
Photo by Thai Nguyen on Unsplash

Requirements Gathering and Analysis

The SRLC commences with the crucial stage of requirements gathering and analysis. Here, developers work closely with stakeholders to define and comprehend the software’s objectives, functionalities, and intended users. Clear communication and documentation are vital to ensure that all parties involved share a common understanding. This phase sets the foundation for the entire development process and shapes the software’s ultimate success.

Design and Planning

Once the requirements are established, the design and planning stage take center stage. Architects and developers collaborate to create a blueprint for the software solution, encompassing the system architecture, database design, and user interface. Careful consideration is given to factors like scalability, security, and usability. Thorough planning at this stage is pivotal to prevent costly rework in subsequent phases.

Implementation and Coding

With the blueprint in hand, developers roll up their sleeves and embark on the coding phase. Writing code is where the software takes shape, and developers diligently translate the design into a functional product. This phase involves adhering to coding standards, version control, and continuous integration to maintain code integrity and facilitate collaboration among team members.

Testing and Quality Assurance

As the saying goes, “To err is human,” but in the realm of software development, the margin for error is slim. In the testing and quality assurance stage, dedicated testers put the software through rigorous tests to identify bugs, defects, and potential issues. Automated and manual testing methodologies are employed to ensure that the software meets the defined requirements and functions as intended.

Deployment and Release

The moment of truth arrives in the deployment and release stage. After successful testing and quality assurance, the software is ready to see the light of day. Depending on the scale and complexity of the project, deployment can be done in stages or through a full-fledged release. Thorough planning and execution are essential to ensure a smooth transition from development to production environments.

Maintenance and Updates

Software development doesn’t end with its release; it’s an ongoing journey. The maintenance and updates stage is a continuous process to address bugs, introduce new features, and improve overall performance based on user feedback and changing requirements. The software must adapt to the evolving needs of its users and the technological landscape.

Conclusion

The Software Release Life Cycle is akin to a symphony, orchestrated by talented developers, designers, testers, and project managers. Each stage plays a vital role in shaping the final product and ensuring it meets user expectations and business objectives. As the world becomes increasingly reliant on technology, understanding the SRLC helps us appreciate the dedication and complexity that goes into every piece of software that powers our lives. As a journalist, I stand committed to delivering accurate insights into the tech world, empowering readers to stay informed and navigate the digital age with confidence.

Introduction to Windows AutoPlay

Windows AutoPlay is a convenient feature that automatically detects and performs actions when you insert new media or attach hot-plug devices to your computer. Based on the current settings, AutoPlay can perform various actions, such as playing content automatically, displaying a dialog box for selecting a default handler, launching applications for mixed content, or simply showing files in a standard folder view. This article will guide you through the process of setting up and using AutoPlay efficiently.

Preparing Hardware and Software for AutoPlay

Before you can use AutoPlay, certain information needs to be registered in the Windows registry. These pieces of information interact and reference each other to create the full AutoPlay environment. To ensure AutoPlay functions correctly, follow these individual stand-alone procedures:

  1. How To Assign a Device Handler to a Device
  2. How To Specify an Icon, Label, or Device Handler for a Device Using a Device Group
  3. How To Specify an Icon, Label, or Device Handler for a Device Using a Device Class
  4. How To Prevent AutoPlay for a Component
  5. How To Register a Handler for a Device Event
  6. How To Use AutoPlay Events in Running Applications
  7. How To Register an Event Handler

    Windows Event Viewer
    Image by https://www.google.com/

How AutoPlay Searches and Identifies Media

AutoPlay searches for media files up to four directory levels below the root directory to find known file types. It uses the PerceivedType value associated with a file name extension in the registry to determine the file’s category, whether it is an image, an audio file, or a video file. This information helps AutoPlay launch the appropriate handler for that device and file type. To understand more about Perceived Types and Application Registration, refer to the relevant documentation.

Understanding Single and Mixed Content Types

AutoPlay categorizes media into three main content types: Pictures, Music, and Video. A medium is considered to contain a single content type if all the files on the medium fall into one of these categories. For example, a medium containing .jpg, .gif, and .bmp files will be classified as having a single content type – “Pictures.”

On the other hand, if the medium contains different supported content types without any single content type accounting for 100 percent of the total, it is considered to have mixed content. Handling mixed content requires user input, and AutoPlay presents a dialog box with a filtered list of registered applications relevant to the content types present on the media.

Sample Scenarios for AutoPlay Usage

Let’s explore a few scenarios to better understand AutoPlay’s behavior:

  1. AutoPlay for Storage Devices with Picture Media:
    • When a USB SanDisk CompactFlash reader device with .jpg files is connected, AutoPlay launches the appropriate image application.
    • Users have the option to change the default action to another registered AutoPlay application, such as the Scanner and Camera Wizard or Picture It!.
  2. AutoPlay for Music File Playback Devices and Storage Devices:
    • When a USB Diamond Rio MP3 Player is attached, AutoPlay plays the files using its registered default handler, such as Windows Media Player.
    • Users can access the property sheet of the storage device and change the default action to another registered AutoPlay application, like WinAmp or Real Player.
  3. AutoPlay for Video Playback on First Presentation:
    • When a 1394 digital video camera is connected for the first time, a dialog box prompts the user to choose an application to run.
    • The user can set the selected behavior as the default action for later digital video camera hot-plug events.

Assigning Default Handler Applications

By default, a fresh installation of Windows comes with registered handler applications for different media types, including Pictures, Music, and Video. For non-supported types, users are prompted to assign the default AutoPlay action for each storage device upon its first introduction to the system. Users can always change the default AutoPlay handler for any storage device or content type using the AutoPlay property page accessible from My Computer.

Handling Mixed Content Types with AutoPlay

When AutoPlay detects mixed content media, it requires user input to take action. A dialog box presents a filtered list of registered applications relevant to all content types present on the media. Users can choose an application to AutoPlay that particular content type, while the rest remain untouched. The choice made for mixed content types cannot be saved as a default due to the unpredictable nature of mixed content media compositions.

Exploring AutoPlay User Interfaces

AutoPlay offers three user interfaces:

  1. Single Content Type Dialog Box:
    • Displayed when any supported media without a default AutoPlay action is presented.
    • Users can choose an action from the list of registered applications, list files in a folder view, or take no action.
    • Users can save a choice as the default action for the medium.
  2. Mixed Media Dialog Box:
    • Displayed when a medium contains a mix of supported file types.
    • Presents a filtered list of applications relevant to all content types on the media.
    • No option to choose a permanent default action due to the unpredictable nature of mixed content media.
  3. Property Page:
    • Provides AutoPlay configuration options for a specific DVD/CD-ROM device or content type.
    • Users can choose different actions for each content type.

Conclusion

Windows AutoPlay simplifies and streamlines the process of interacting with media devices on your computer. By understanding its functionalities, defining content types, and managing default handler applications, you can tailor AutoPlay to suit your needs and preferences. Experiment with different scenarios and make the most of this powerful feature for seamless media interactions on your Windows system.

Introduction

Reading PDF files can be challenging for individuals with visual impairments or learning disabilities. Fortunately, technology has made it possible to access digital content in a way that suits their needs. One such feature is the ability to read PDFs aloud, which benefits students, professionals, and anyone who wants to multitask while consuming content. In this article, we will explore how to enable this feature on Windows and present seven user-friendly apps for reading PDFs aloud.

Built-in Narrator Tool

Windows offers a built-in tool called Narrator for reading text aloud. To use it:

  • Open the PDF in your default PDF reader (e.g., Microsoft Edge or Adobe Reader).
  • Right-click the PDF and select “Read Aloud” or “Listen” from the menu.
  • The Narrator tool will start reading the PDF aloud.

Speechify

Speechify is a powerful text-to-speech app that aims to make reading and learning more accessible for people with dyslexia, ADHD, and other reading difficulties. It uses advanced AI and machine learning to provide a natural and engaging reading experience. With Speechify, you can listen to pretty much any document online. Some unique features include personalized speech, support for multiple languages, real-time highlighting, and advanced playback controls.

PDFs read
Image by: https://lachief.io/speechify/

Read Aloud

Read Aloud is a feature available in some text-to-speech apps. It allows the software to read text out loud, making it easier for people with reading difficulties to comprehend the content. You can control the speed, volume, and other listening settings according to your preference. Read Aloud can be accessed as a Microsoft Edge plugin and is compatible with Windows 10 and other platforms like macOS and Android.

PDFs read
Image by: http://celebratescience.blogspot.com/2019/10/reading-nonfiction-aloud-tips-and-tricks.html

Natural Reader

Natural Reader is another text-to-speech software that converts written text into spoken words. It provides an enjoyable reading experience for people with reading difficulties and allows you to listen to online content while on the move. The software supports various text formats, including Word documents, PDFs, and e-books. Simply load the text into the software, and it will read it out loud.

PDFs read
Image by: https://scarfedigitalsandbox.teach.educ.ubc.ca/naturalreader-speech-to-text-tool/

Adobe Acrobat Reader

Adobe Acrobat Reader is a widely used software for viewing, annotating, and printing PDF files. While it’s primarily known as a PDF viewer, it also offers a feature for reading text aloud. This tool provides various features to enhance the PDF reading experience, such as text highlighting, note-taking, and collaboration tools.

PDFs read
Image by: https://get.adobe.com/reader/

Balabolka

Balabolka is a flexible text-to-speech software that reads text out loud using synthetic speech. It supports multiple languages and reads text from various sources, including word processing documents, PDFs, and HTML pages. You can adjust the speed, volume, and other settings to customize the reading experience, and even save the speech output as an audio file.

PDFs read
Image by: https://whysurfswim.com/2020/07/01/japanese-text-to-speech-converter-software-open-source/

TTS Reader

TTS Reader is a simple and user-friendly text-to-speech software that reads text out loud. It’s easy to use, even for those with little technical knowledge. The software supports multiple languages and can read text from various sources, such as word-processing documents, PDFs, and web pages. Customize the reading experience by adjusting the speed, volume, and other settings.

PDFs read
Image by: https://www.amazon.com/WellSource-Empowering-You-TTSReader/dp/B071WKF1W6

Choose the Best PDF Reader for Windows

Whether you prefer using Windows’ native Narrator tool or a third-party app like Speechify, the key is to select the one that offers the most optimal listening experience. With a wide range of dialects, accents, and natural-sounding voices, Speechify provides a best-in-class listening experience for all readers. Listen to your PDF documents with ease by downloading the Speechify app or using the Chrome extension on your computer!

Reference

For more details click here

For more details click here

Introduction

In today’s digital world, where we constantly switch between our Mac, iPhone, iPad, and Apple Watch, it can be frustrating to lose track of tasks and work progress. Thankfully, Apple’s Handoff feature comes to the rescue. Handoff allows users to seamlessly continue tasks from one Apple device to another, making it a powerful tool for enhancing productivity and maintaining a smooth workflow. In this article, we will explore how to use Handoff effectively and make the most of this seamless workflow feature.

Understanding Handoff and its Functionality

Handoff is a part of Apple’s Continuity feature, which bridges the gap between different Apple devices. With Handoff, you can start a task on one device and easily continue it on another without missing a beat. This feature is supported by various Apple apps such as Calendar, Contacts, Pages, and Safari, enabling a wide range of tasks to be handed off smoothly.

For Handoff to work seamlessly, your Apple devices must meet the Continuity system requirements, have Wi-Fi and Bluetooth turned on, and Handoff enabled in the device settings. Furthermore, all devices must be signed in with the same Apple ID to ensure synchronization across platforms.

Enabling Handoff on Your Apple Devices

To get started with Handoff, you need to ensure that the feature is enabled on all your Apple devices. Here’s a step-by-step guide to enable Handoff on each device:

On Mac:

    • Click on the Apple menu in the top-left corner and select “System Preferences.”
    • Click on “General” in the sidebar, then navigate to “AirDrop & Handoff” on the right.
    • Turn on the toggle for “Allow Handoff between this Mac and your iCloud devices.”iPhone, iPad, or iPod touch:
      • Open the “Settings” app.
      • Go to “General” and then select “AirPlay & Handoff.”
      • Toggle the switch for Handoff to enable or disable the feature.On Apple Watch:
        • Open the “Apple Watch” app on your paired iPhone.
        • Tap on “My Watch” and then select “General.”
        • Toggle the switch for “Enable Handoff” to turn the feature on or off.

          Handoff on Apple Devices
          Image by https://www.bing.com/

Handing Off Tasks Between Devices

Once Handoff is enabled on your devices, you can easily hand off tasks between them. Here’s how to do it:

From your Mac to an iOS/iPadOS Device:

    • While working on your Mac, you’ll notice the Handoff icon of the app you’re using appear on your iPhone, iPad, or iPod touch. It will be located at the bottom of the app switcher or the end of the Dock.
    • Simply tap the Handoff icon on your iOS device to continue working in the app seamlessly.From an iOS/iPadOS Device or Apple Watch to Your Mac:
      • When using an app on your iPhone, iPad, iPod touch, or Apple Watch, the Handoff icon for that app will appear on your Mac’s Dock (or the bottom, depending on the Dock position).
      • Click the Handoff icon on your Mac to pick up where you left off and continue working in the app effortlessly.

Pro Tips for Maximizing Handoff’s Potential

Utilize Universal Clipboard:

When Handoff is enabled, you can also use Universal Clipboard to copy and paste text, images, photos, and videos across your Apple devices. This feature is a time-saver, especially when working on multiple devices simultaneously.

Explore Third-Party App Compatibility:

In addition to Apple apps, some third-party apps also support Handoff. Check with your favorite apps to see if they offer this functionality, allowing you to switch between them effortlessly.

Troubleshooting and Enhancing Handoff

To ensure a smooth Handoff experience, keep your devices updated with the latest software versions. If you encounter any issues, try the following troubleshooting steps:

Check Connectivity:

Verify that Wi-Fi and Bluetooth are both turned on, as Handoff requires these connections to work seamlessly.

Sign in with the Same Apple ID:

Make sure all your devices are signed in with the same Apple ID for proper synchronization.

Conclusion

Apple’s Handoff feature is a game-changer when it comes to seamlessly continuing tasks across your Apple devices. By enabling Handoff and ensuring all devices are connected to the same Apple ID, you can take full advantage of this powerful tool. Whether you’re working on an important document, browsing the web, or managing your schedule, Handoff streamlines your multitasking and enhances your overall productivity. Embrace the convenience of Handoff and experience a seamless workflow across your Apple devices.