


Introduction
Blush is a versatile makeup product that can transform your look and bring out your best features. If you have a round face shape, using blush strategically can help create a more sculpted and defined appearance. In this step-by-step tutorial, we will explore expert techniques to enhance your features with blush on a round face. Follow these steps, along with tips and product recommendations, to achieve a flattering and balanced blush application that accentuates your natural beauty.
Understanding the Round Face Shape
Before we start, let’s define a round face:
- Proportions: Width and length are almost the same.
- Soft Angles: Cheekbones are the widest point, with a gently curved jawline.
- Goal with Blush: Create the illusion of length and angles by lifting the cheek area.
With these characteristics in mind, our tutorial focuses on where to place blush to counteract roundness and enhance natural bone structure.
Choosing the Right Blush Formula and Tools
1. Blush Formulas
- Powder Blush: Easy to apply and blend, best for oily and combination skin.
- Cream Blush: Offers a dewy finish, ideal for dry or mature skin.
- Gel or Tint: Long-lasting and subtle, perfect for no-makeup makeup looks.
2. Tools You’ll Need
- Blush Brush: A medium-sized, angled brush for powder.
- Damp Beauty Sponge: For cream formulas—helps press product into the skin.
- Fingertips: For precise placement of tint or gel.
Having the right tools makes blending smoother and prevents harsh lines.
Step-by-Step Tutorial: Enhancing Your Features with Blush on a Round Face
Step 1: Prep Your Skin:
Start by preparing your skin for makeup application. Cleanse and moisturize your face, ensuring it is free from any dirt or oil. Apply a lightweight primer to create a smooth canvas that helps your blush to adhere better and last longer.
Step 2: Choose the Right Blush Shade:
Select a blush shade that complements your skin tone and adds warmth and dimension to your face. For round faces, shades with warm undertones like peach, apricot, or rose tend to work well. These shades bring a natural flush to the cheeks and help create a more sculpted look.
Step 3: Contouring for Definition:
Contouring is an excellent technique to add definition and shape to a round face. Use a matte bronzer or contour powder that is slightly darker than your natural skin tone. Apply it to the hollows of your cheeks, along the jawline, and on the temples. Blend it well to create subtle shadows that enhance your facial structure.
Step 4: Placement of Blush:
Smile to locate the apples of your cheeks. Using a blush brush, apply the blush to the apples and blend it upwards towards your temples. This technique helps to create a lifted effect and adds a touch of color to the rounded areas of your face. Avoid applying the blush too low on the cheeks to prevent emphasizing the roundness.
Step 5: Blending for a Seamless Finish:
Blend the blush thoroughly to achieve a seamless and natural-looking finish. Use a clean blush brush or a blending sponge to soften any harsh lines and ensure a well-blended application. Blending is key to achieving a smooth transition between the blush and your skin, creating a more natural appearance.
Step 6: Build Gradually:
Start with a light application of blush and gradually build up the color to your desired intensity. It’s better to add more blush gradually than to apply too much at once. This way, you can control the level of pigmentation and achieve a more subtle or vibrant look according to your preference.
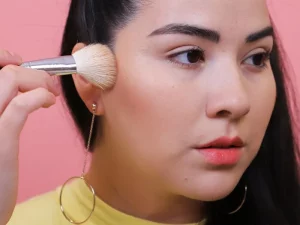
Step 7: Set Your Makeup:
To ensure your blush lasts throughout the day, set your makeup with a light dusting of translucent powder. Use a fluffy powder brush to gently apply the powder, focusing on the areas where you applied blush. This step helps to lock in the color and prevents it from fading or smudging.
Step 8: Final Touches:
Complete your makeup look by applying mascara to define your lashes, filling in your brows to frame your face, and adding a touch of lip color. These finishing touches complement your blush and help create a harmonious and polished overall appearance.
Common Mistakes to Avoid
- Blush Too Low: Applying blush on the apples only or too close to the smile line emphasizes roundness instead of lifting.
- Heavy Handed: Over-applying leads to bright circles rather than natural flush—always start light.
- Wrong Shade: Peach or soft rose shades flatter most medium to dark skin tones, while cool pinks suit fairer complexions. Match your blush to your natural lip color for harmony.
Avoiding these errors ensures your blush enhances rather than overwhelms your face shape.
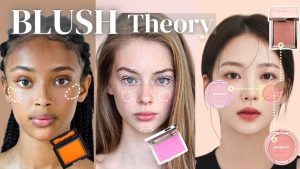
Blush Color Guide for Round Faces
- Fair Skin: Soft pink or light peach blends naturally.
- Medium Skin: Warm peach or rose brings a healthy glow.
- Dark Skin: Deep berry or bright coral adds vibrancy and stands out.
Test shades on your jawline if unsure—your ideal blush looks natural against your neck and face.
Maintenance and Touch-Ups
- Carry a Compact: For powder blush, keep a small brush and blush pan in your bag.
- Blot and Reapply: If skin becomes oily, blot with a tissue and lightly reapply blush.
- Blend with Fingers: Quick fingertip taps can revive cream or gel blush without extra tools.
Frequent touch-ups keep your cheeks glowing throughout the day.
Conclusion
By following this step-by-step tutorial, you can enhance your features and achieve a beautiful blush application on a round face. Remember to prepare your skin, select the right blush shade, contour strategically, and blend for a seamless finish. With these techniques and tips, you can embrace the transformative power of blush and accentuate your natural beauty with confidence. Experiment with different shades and intensities to find the perfect blush application that suits your individual style and enhances your round face shape.