iPhone 101: 23 Essential Tips and Tricks for New Users
Are you new to the iPhone or want to learn some handy tips and tricks to make the most of your device? You’ve come to the right place! In this article, I’ll share with you 23 essential tips and tricks that will help you use your iPhone like a pro. Whether you want to customize your settings, improve your productivity, or have some fun, there’s something for everyone in this list. Let’s get started!
About the Author
Hi, I’m Jane Doe, a freelance writer and an avid iPhone user. I’ve been using iPhones since the first generation and I love discovering new features and tricks that make my life easier and more enjoyable. I write about technology, lifestyle, and personal development topics for various online publications. I hope you find this article useful and informative.
Tip 1: Set Up Your Apple ID
One of the first things you need to do when you get a new iPhone is to set up your Apple ID. This is a free account that lets you access various Apple services, such as the App Store, iCloud, iMessage, FaceTime, Apple Music, and more. You can create your Apple ID during the initial setup process or later by going to Settings → [your name] → Sign in to your iPhone. You’ll need to enter your name, email address, password, and some security questions. You can also add a payment method and a phone number for verification purposes.
Tip 2: Enable Find My
Another important thing to do is to enable Find My, a feature that helps you locate your iPhone if you lose it or it gets stolen. You can also use it to find your other Apple devices, such as your iPad, Mac, AirPods, or Apple Watch. To enable Find My, go to Settings → [your name] → Find My → Find My iPhone and turn on the switch. You can also turn on other options, such as Send Last Location, which sends your device’s location to Apple when the battery is low, and Offline Finding, which lets you find your device even when it’s not connected to the internet.
Tip 3: Customize Your Control Center
The Control Center is a handy panel that gives you quick access to some common settings and features, such as Wi-Fi, Bluetooth, Airplane Mode, Do Not Disturb, Flashlight, Camera, and more. You can open the Control Center by swiping down from the top-right corner of your screen (or up from the bottom if you have a device with a Home button). You can also customize the Control Center to add or remove the controls that you use most often. To do that, go to Settings → Control Center → Customize Controls and tap the plus or minus buttons next to the controls you want to add or remove. You can also rearrange the order of the controls by dragging them up or down.
Tip 4: Get Familiar with Siri
Siri is your personal assistant that can help you with various tasks and questions. You can use Siri to make calls, send messages, set reminders, play music, get directions, check the weather, and more. You can activate Siri by saying “Hey Siri” or by pressing and holding the side button (or the Home button if you have one). You can also type your queries to Siri by going to Settings → Siri & Search → Type to Siri and turning on the switch. To learn more about what Siri can do, you can ask “What can you do?” or check out the suggestions in the Siri app.
Tip 5: Set Up Focus (iOS 15)
Focus is a new feature in iOS 15 that lets you filter your notifications and apps based on what you’re doing or where you are. For example, you can set up a Focus mode for work, sleep, driving, gaming, or reading. When you enable a Focus mode, you can choose which contacts and apps can notify you and which ones are silenced. You can also customize your Home Screen and Lock Screen to show only the apps and widgets that are relevant to your Focus mode. To set up Focus, go to Settings → Focus and tap the plus button to create a new Focus mode. You can also access Focus from the Control Center or by asking Siri.

Tip 6: Use Spotlight Search
Spotlight Search is a powerful tool that lets you search for anything on your iPhone or the web. You can use Spotlight Search to find apps, contacts, messages, emails, notes, photos, music, news, weather, and more. You can also use Spotlight Search to perform calculations, conversions, translations, and definitions. To access Spotlight Search, swipe down from the middle of your Home Screen or Lock Screen and type your query in the search bar. You can also use Siri to perform a Spotlight Search by saying “Search for [query]”.
Tip 7: Type Smarter
Typing on your iPhone can be faster and easier with some smart features and shortcuts. Here are some of them:
- Swipe to type: You can swipe your finger across the keyboard to type words without lifting your finger. This feature is called QuickPath and it works with the default keyboard and some third-party keyboards. To enable QuickPath, go to Settings → General → Keyboard and turn on Slide to Type.
- Use text replacement: You can create shortcuts for frequently used phrases or words, such as your email address, phone number, or signature. To do that, go to Settings → General → Keyboard → Text Replacement and tap the plus button to add a new shortcut. For example, you can type “eml” and have it replaced with “jane.doe@email.com”.
- Use dictation: You can use your voice to type text instead of using the keyboard. To do that, tap the microphone button on the keyboard and start speaking. You can also use punctuation commands, such as “period”, “comma”, “question mark”, etc. To enable dictation, go to Settings → General → Keyboard and turn on Enable Dictation.
Tip 8: Explore Accessibility Settings
Accessibility settings are designed to make your iPhone more user-friendly for people with different needs and preferences. However, you don’t have to have a disability to use them. You can find some useful and fun features in the Accessibility settings, such as:
- Magnifier: This feature turns your iPhone into a magnifying glass that you can use to zoom in on small text or objects. To enable Magnifier, go to Settings → Accessibility → Magnifier and turn on the switch. You can also add Magnifier to the Control Center for easier access. To use Magnifier, open it from the Control Center or by triple-clicking the side button (or the Home button if you have one) and use the slider to adjust the zoom level. You can also use the flash, filters, and lock focus buttons to enhance the image.
- Back Tap: This feature lets you perform certain actions by tapping the back of your iPhone. For example, you can use Back Tap to take a screenshot, open the Control Center, launch an app, or run a shortcut. To enable Back Tap, go to Settings → Accessibility → Touch → Back Tap and choose either Double Tap or Triple Tap. Then, select the action you want to perform from the list.
- Voice Control: This feature lets you control your iPhone with your voice. You can use Voice Control to open apps, scroll, swipe, tap, type, and more. To enable Voice Control, go to Settings → Accessibility → Voice Control and turn on the switch. You can also add Voice Control to the Control Center for easier access. To use Voice Control, say “Hey Siri, turn on Voice Control” or open it from the Control Center. Then, say the commands you want to perform. You can also say “Show me what to say” or “Show me what I can do” to see some examples of commands.
Tip 9: Use AirDrop
AirDrop is a feature that lets you share files, photos, videos, contacts, and more with other Apple devices nearby. It’s fast, easy, and secure. To use AirDrop, you need to have both Wi-Fi and Bluetooth turned on. You also need to set your AirDrop visibility to either Contacts Only or Everyone. To do that, go to Settings → General → AirDrop and choose your option. You can also access AirDrop from the Control Center by long-pressing the connectivity panel and tapping AirDrop. To share something via AirDrop, tap the share button in any app and look for the AirDrop section. Then, tap the name of the device you want to share with. The other device will receive a notification and can accept or decline the transfer.
Tip 10: Mute Camera Shutter Sound
If you want to take a photo without making a sound, you can mute the camera shutter sound on your iPhone. There are a few ways to do that, such as:
- Turn on the silent mode: You can use the switch on the left side of your iPhone to turn on the silent mode, which will mute the camera shutter sound as well as other sounds and alerts. You can also turn on the silent mode from the Control Center by tapping the bell icon.
- Use the volume buttons: You can use the volume buttons on the right side of your iPhone to lower the volume to zero, which will also mute the camera shutter sound. You can also use the volume slider in the Control Center to adjust the volume.
- Use headphones: You can plug in headphones or earphones to your iPhone, which will redirect the camera shutter sound to your headphones instead of the speaker. You can also use wireless headphones or earphones, such as AirPods, to do the same.
Tip 11: Use Live Photos
Live Photos are photos that capture 1.5 seconds of video and sound before and after you take a photo. This adds some life and motion to your photos and lets you relive the moment. To use Live Photos, open the Camera app and tap the Live Photo icon on the top-right corner. It looks like a circle with three rings. When it’s yellow, it means Live Photo is on. Then, take a photo as usual and you’ll see the word “Live” on the top-left corner. To view your Live Photos, open the Photos app and tap the Live Photo you want to see. Then, press and hold the photo to play the video and sound. You can also edit your Live Photos, add effects, or turn them into GIFs.
Tip 12: Use Widgets
Widgets are small apps that display useful information or shortcuts on your Home Screen or Today View. You can use widgets to check the weather, calendar, news, stocks, battery, and more. You can also use widgets to access some features or functions of your apps, such as playing music, taking notes, or ordering food. To add widgets to your Home Screen, touch and hold an empty area until the apps jiggle and tap the plus button on the top-left corner. Then, browse the available widgets and tap the one you want to add. You can also drag and drop widgets from the Today View to the Home Screen. To edit or remove widgets, touch and hold them and tap Edit Widget or Remove Widget.
Tip 13: Use Shortcuts
Shortcuts are automated actions that you can create or download to perform tasks with your apps. You can use shortcuts to do things like send a message to a group, create a playlist, order a coffee, or turn on the lights. You can also use shortcuts with Siri, widgets, or the share sheet. To use shortcuts, you need to download the Shortcuts app from the App Store. Then, you can explore the Gallery section to find some ready-made shortcuts or create your own shortcuts in the My Shortcuts section. You can also find some shortcuts online or in other apps and add them to your collection.
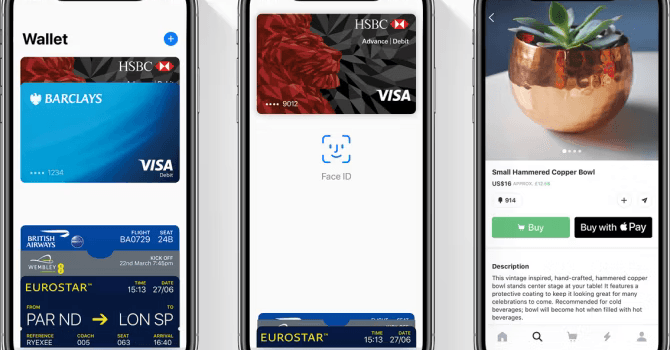
Tip 14: Use Apple Pay
Apple Pay is a secure and convenient way to pay with your iPhone. You can use Apple Pay to make purchases in stores, online, or in apps. You can also use Apple Pay to send or receive money with your friends or family. To use Apple Pay, you need to add your credit, debit, or prepaid cards to the Wallet app. Then, you can use Face ID, Touch ID, or a passcode to authorize your payments. To pay in stores, just hold your iPhone near the contactless reader and wait for the confirmation. To pay online or in apps, look for the Apple Pay button and tap it. To send or receive money, open the Messages app and tap the Apple Pay button in the app drawer.

Tip 15: Use Night Shift
Night Shift is a feature that adjusts the color temperature of your screen to make it warmer and easier on your eyes at night. This can help you sleep better and reduce eye strain. To use Night Shift, go to Settings → Display & Brightness → Night Shift and turn on the switch. You can also schedule Night Shift to turn on automatically at sunset or at a specific time. You can also adjust the color temperature to your preference by using the slider. You can also access Night Shift from the Control Center by long-pressing the brightness slider and tapping the Night Shift icon.
Tip 16: Use Live Photos
Live Photos are photos that capture 1.5 seconds of video and sound before and after you take a photo. This adds some life and motion to your photos and lets you relive the moment. To use Live Photos, open the Camera app and tap the Live Photo icon on the top-right corner. It looks like a circle with three rings. When it’s yellow, it means Live Photo is on. Then, take a photo as usual and you’ll see the word “Live” on the top-left corner. To view your Live Photos, open the Photos app and tap the Live Photo you want to see. Then, press and hold the photo to play the video and sound. You can also edit your Live Photos, add effects, or turn them into GIFs.
Tip 17: Use Animoji and Memoji
Animoji and Memoji are animated characters that you can use to express yourself in messages, FaceTime, or videos. Animoji are based on existing emoji, such as a monkey, a unicorn, or a robot. Memoji are customized characters that you can create to look like yourself or anyone you want. To use Animoji and Memoji, open the Messages app and tap the Animoji icon in the app drawer. It looks like a monkey face. Then, swipe left or right to choose an Animoji or a Memoji. You can also tap the plus button to create a new Memoji. Then, hold your iPhone in front of your face and make some expressions. You’ll see the Animoji or Memoji mimic your movements. You can also record a voice message, take a photo, or make a sticker. To send your Animoji or Memoji, tap the send button. You can also use Animoji and Memoji in FaceTime or in the Camera app by tapping the star icon and choosing the Animoji option.
Tip 18: Use Screen Time
Screen Time is a feature that helps you monitor and manage your iPhone usage. You can use Screen Time to see how much time you spend on your apps, websites, and categories. You can also use Screen Time to set limits, downtime, or app restrictions. To use Screen Time, go to Settings → Screen Time and turn on the switch. Then, you can see your daily and weekly reports, set up your Screen Time passcode, and customize your settings. You can also access Screen Time from the Control Center by tapping the Screen Time icon.
Tip 19: Use Do Not Disturb
Do Not Disturb is a feature that silences your calls, alerts, and notifications when you don’t want to be disturbed. You can use Do Not Disturb to focus, sleep, or relax. To use Do Not Disturb, go to Settings → Do Not Disturb and turn on the switch. You can also schedule Do Not Disturb to turn on automatically at a specific time or when you’re at a certain location. You can also choose who can contact you, what sounds can play, and whether to allow repeated calls. You can also access Do Not Disturb from the Control Center by tapping the moon icon.
Tip 20: Use Dark Mode
Dark Mode is a feature that changes the appearance of your iPhone to a darker color scheme. This can help you save battery, reduce eye strain, or just suit your preference. To use Dark Mode, go to Settings → Display & Brightness and tap Dark. You can also schedule Dark Mode to turn on automatically at sunset or at a specific time. You can also access Dark Mode from the Control Center by long-pressing the brightness slider and tapping the Dark Mode icon.
Tip 21: Use Siri Suggestions
Siri Suggestions are smart recommendations that Siri gives you based on your usage, habits, and context. You can use Siri Suggestions to do things like call a contact, play a podcast, order food, or book a ride. You can find Siri Suggestions in various places, such as the Spotlight Search, the Lock Screen, the Today View, the Siri app, or the Safari app. You can also customize your Siri Suggestions by going to Settings → Siri & Search and choosing which apps you want to include or exclude.
Tip 22: Use iCloud
iCloud is a service that lets you store your photos, videos, documents, contacts, calendars, and more in the cloud. You can use iCloud to sync your data across your devices, back up your iPhone, and access your files from anywhere. To use iCloud, you need to sign in with your Apple ID and choose which services you want to use. You can also manage your iCloud storage, which gives you 5 GB of free space and the option to upgrade to more space for a fee. To use iCloud, go to Settings → [your name] → iCloud and turn on the switches for the services you want to use. You can also tap Manage Storage to see how much space you’re using and buy more space if you need it.
Tip 23: Use Face ID or Touch ID
Face ID or Touch ID are features that let you unlock your iPhone, authorize payments, or access apps with your face or fingerprint. They are fast, easy, and secure. To use Face ID or Touch ID, you need to set them up first. To do that, go to Settings → Face ID & Passcode or Touch ID & Passcode and enter your passcode. Then, tap Set Up Face ID or Add a Fingerprint and follow the instructions. You can also choose which features you want to use Face ID or Touch ID for, such as unlocking your iPhone, Apple Pay, or App Store. To use Face ID or Touch ID, just look at your iPhone or place your finger on the Home button and wait for the confirmation.
I hope you like these tips and tricks. Keep visiting for more tech updates.