PayPal Alternatives for Friends and Family Payments

In a world where digital payments have become the norm, finding the right platform to send money to friends and family can make a world of difference. While PayPal is a widely-used option, it’s not the only one available. In this article, we’ll explore some fantastic alternatives to PayPal that make sending money to your loved ones quick and hassle-free.

1. Google Pay

PayPal
Image by https://www.makeuseof.com/

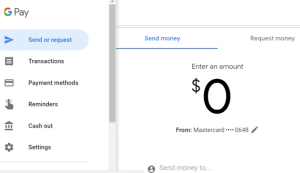
Google Pay, formerly known as Android Pay and Google Wallet, is Google’s mobile payment processing option. This platform has evolved over time to become an all-in-one mobile payment system. It’s not just about tapping and paying; it’s also an excellent choice for peer-to-peer (P2P) payments.

Advantages of Google Pay:

  • Accepts payments from anyone with an email address or phone number, whether they use Google Pay or not.
  • Instant cash-out to a bank account or debit card for recipients.
  • Available to Gmail users, making transactions even more convenient.
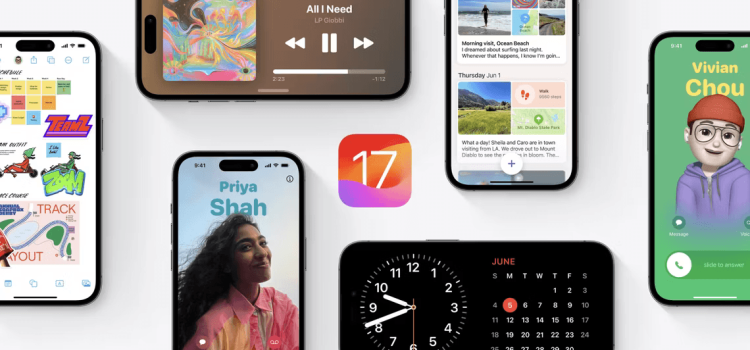
2. Apple Pay

PayPal
Image by https://www.makeuseof.com/

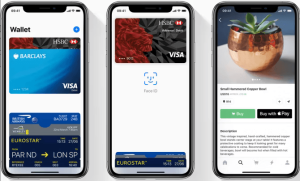
Apple Pay, available on iPhones, iPads, and Apple Watches, offers a seamless payment experience. You can upload credit, debit, and loyalty cards for easy use with NFC payment terminals. While it’s a great choice, note that the recipient must also use Apple Pay to access funds sent to them.

Advantages of Apple Pay:

  • Convenient payment of bills or sending money to family and friends.
  • Compatible with a wide range of Apple devices.

Note: Recipients can receive money without Apple Pay, but the app is required to access and cash out the funds.

3. WeChat Pay

PayPal
Image by https://www.makeuseof.com/

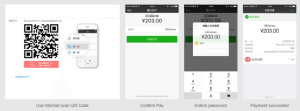
WeChat Pay, part of the WeChat messaging app, is a digital wallet and payment service. With over 1.1 billion users globally, it’s a prevalent choice. Even though it’s particularly popular in China, its growth worldwide is undeniable.

Advantages of WeChat Pay:

  • Massive user base for easy transactions.
  • Integrations with various Tencent services, expanding its utility.

4. Facebook Messenger Payments

PayPal
Image by https://www.makeuseof.com/

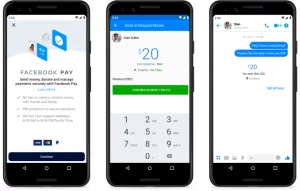
Despite privacy concerns, Facebook Messenger Payments are incredibly convenient. You can send and receive money from friends and family without incurring fees. Most importantly, it’s likely your friends already have Facebook accounts, simplifying the payment process.

Advantages of Facebook Messenger Payments:

  • Seamless integration within Messenger for easy transactions.
  • No fees for sending money to friends and family.
PayPal Alternative Availability Key Features Integration with Other Services Fees for Sending Money
Google Pay Android & iOS Send money to anyone with an email or phone number Integrates with Gmail Free
Apple Pay iOS & iPadOS Easily send money to friends and family Seamless integration with Apple devices Free
WeChat Pay Android & iOS Huge user base globally Integrations with Tencent services May vary by region
Facebook Messenger Payments Android & iOS Send and receive money within Messenger Integration within Messenger Free

This table provides a quick overview of these PayPal alternatives, helping you choose the one that best suits your needs for sending money to friends and family.

What Is the Best PayPal Alternative for Online Payments?

When it comes to sending money to friends and family, these PayPal alternatives offer diverse options to suit your needs. Apple users may prefer the integration of Apple Pay, while Android users can enjoy the convenience of Google Pay. WeChat Pay’s widespread popularity and Facebook Messenger Payments’ simplicity also make them excellent choices.

If you frequently use mobile payment apps like Google Pay or Apple Pay, it’s essential to prioritize security. Additionally, understanding the differences between PayPal and Venmo can help you make informed choices for your transactions.

In this digital age, choosing the right payment platform ensures that you can share moments and support loved ones, no matter where they are in the world.

How to Undo in Notes on an iPhone

The Notes app on your iPhone or iPad is a versatile tool, perfect for jotting down your thoughts, important reminders, or crucial information. However, we’ve all been there – that moment when you make a mistake, accidentally delete something important, or simply need to undo an edit. Fortunately, this article is here to help you navigate those situations with ease.

Meet Your Lifesaver: Shake to Undo

Method 1: Shake Your Way to Redemption

One of the quickest and most straightforward methods to undo a mistake in the Notes app is by using the Shake to Undo feature. Here’s how:

  1. Type Away: Begin by typing your note or making edits in the app.
  2. Give It a Shake: After you’ve realized your mistake, simply give your iPhone or iPad a quick shake.
  3. Undo in a Snap: Watch as the “Undo Typing” popup appears. Tap on “Undo” to delete the text you just typed or undo the recent change.

But what if you accidentally undid something you didn’t mean to? Don’t fret!

  1. Shake Again: To restore your text or redo your last edit, give your device another quick shake.

Pro Tip: Ensure Shake to Undo is enabled in your settings. You can find it in Settings > Accessibility > Touch > Shake to Undo.

A Polished Alternative: The Undo Button

Method 2: Precise Undoing with the Undo Button

Shake to Undo can be handy but might not suit every situation, especially if you’re in a quiet setting. Enter the Undo button:

  1. Locate the Markup Icon: While typing, you’ll find the Markup icon in the toolbar above your keyboard. When not typing, it sits at the bottom of your screen.
  2. Tap for Control: Tapping the Markup icon reveals the Undo and Redo arrow buttons at the top of the screen.
  3. Undo with Precision: Tap the “Undo” arrow to correct any mistakes you’ve made.

Finger Magic: Undo with Gestures

Method 3: Swift Corrections with Finger Gestures

Finger gestures offer a tactile way to undo mistakes, and they work on both iPhones and iPads. Here’s how:

  1. Double-Tap for Redemption: On your iPhone, simply double-tap with three fingers anywhere on the screen to undo your last typed text. A notification at the top confirms your action.
  2. Swipe Left for a Second Chance: Another gesture is to swipe left with three fingers within the Notes app. This too undoes your last change.
  3. Redo with a Swipe: To redo something after undoing it, swipe right with three fingers on your screen.
  4. Access Action Buttons: Tap using three fingers to bring up action buttons, including undo and redo. This is especially handy when working with tables or formatting in Notes.

Keyboard Shortcuts for Pros

Method 4: Effortless Undoing with an External Keyboard

If you’re using an external keyboard with your iPhone or iPad, you’re in luck. You can use keyboard shortcuts, just like on a Mac:

  • Cmd + Z: Press these keys to undo.
  • Shift + Cmd + Z: Use this combination to redo.

Mastering these shortcuts can streamline your note-taking process and boost your productivity.

[Table 1: A Quick Comparison]

Method Suitable For Ease of Use Pros Cons
Shake to Undo Quick, on-the-go fixes Easy Instant undo/redo Not ideal in quiet settings
Undo Button Precise corrections Moderate Offers control Requires locating button
Finger Gestures Tactile, versatile Easy Multiple gestures available Learning curve for some
Keyboard Shortcuts External keyboard users Effortless Familiar shortcuts External keyboard required

[Table 2: Applicable Devices]

Method iPhone iPad
Shake to Undo
Undo Button
Finger Gestures
Keyboard Shortcuts

Conclusion

The Notes app is a versatile tool, and knowing how to undo mistakes swiftly can make your experience even more enjoyable. Whether you prefer the simplicity of Shake to Undo, the precision of the Undo button, or the finesse of finger gestures, the choice is yours. And if you’re using an external keyboard, those keyboard shortcuts will make you a true Notes app pro. Happy note-taking!

Unleash Your Creativity: 5 Free AI Text-to-Image Generators

Is there anything artificial intelligence can’t do? It seems like there’s a mesmerizing new technological breakthrough every month. The trending breakthrough is how AI can now take a sentence you type and turn it into a painting or an image. And you can try it right now.

If you want to create AI art from your writing, here are some of the best free AI text-to-image generators.

1. Nightcafe (Web): One of the Simplest Free Text-to-Image AI Converters

Image by https://www.makeuseof.com/

Nightcafe is the perfect example of these text-to-image apps to make your jaw drop by seeing the kind of mind-blowing creations AI can do. Type any simple English sentence, and Nightcafe will use AI to turn it into a painting. You’ll have to log in, which is completely free, to start using it.

When creating a new image, you can choose from various artistic styles, including cubist, oil painting, matte, surreal, steampunk, etc. You can also choose which algorithm and model to use, including the popular Stable Diffusion and DALL-E 2, among others.

To use Nightcafe completely free of charge, choose to generate 1 Image under the Number of Images. And in More Settings, select Thumbnail under Output Resolution, Short under Runtime, and any option under Aspect Ratio.

Nightcafe is a great free Midjourney alternative, one of the most popular text-to-image generators with paid subscriptions.

2. Starry AI (Web, Android, iOS): Text-to-Image AI Art With Granular Control

AI
Image by https://www.makeuseof.com/

Starry AI turns text into AI artwork images like the other apps on this list. But unlike many others, it offers granular control over certain aspects that make the results a lot more personal. You’ll have to create an account to use it.

You’ll start by selecting the AI image type: Art or Photo. For generating Art, enter your prompt, choose the Styles, Canvas Size, and Runtime, and optionally add your own Start Image to use as a base. The process is the same for generating a Photo, except there are no styles to choose from.

Once you’ve selected the required options, click on Generate, and Starry AI will do its magic. Each image you generate consumes one of the five free credits. However, you don’t always have to pay for these credits, as it lets you earn free credits every day or week by watching ads or sharing your creations on different social media.

3. Craiyon (Web): Get a Taste of the Famous OpenAI DALL-E

AI
Image by https://www.makeuseof.com/

AI research lab OpenAI created the original and most popular version of an AI text-to-image generator, DALL-E. Netizens are wowed by DALL-E 2’s ability to turn natural language into images.

If you don’t want to sign up, you can use Craiyon (formerly DALL-E Mini), an open-source version of the original AI model available for public use. Its team members were part of the DALL-E Mini project.

The machine learns descriptions by reading captions of other images on the internet and applying them to whatever phrase you type. You don’t need to register for an account, and you get unlimited tries for your images.

Type your sentence (and be as specific as possible), enter the Negative words (things you don’t want in your image), and hit Draw. It’ll take some time, but Craiyon will soon give you nine different images made from your sentence. You can save any or all images to your hard drive.

Unlike other apps, there are no further enhancements or customizations in Craiyon, but it is the simplest text-to-image AI generator and offers unlimited tries for free.

4. Dream by Wombo (Web, Android, iOS): Simple, Partially Free AI Text-to-Image Art Generator

AI
Image by https://www.makeuseof.com/

With Dream by Wombo, you can start creating art without signing up. Just write a sentence, select a style, add an Input Image (optional), and hit Create. Current free styles include, among others, Ghibli, Unrealistic, Anime, Line-Art, and Surreal. Let Wombo generate the image, and you can immediately ask it to develop another or download the one you liked.

You can use either the web app or the mobile app. Both types of apps have almost a similar set of features on offer. You can refer to our Dream by Wombo guide to learn more about how to use the mobile app.

5. Pixray (Web): Free AI Art Generator for Geeks

AI
Image by https://www.makeuseof.com/

Pixray‘s extensive documentation lets geeks add filters and parameters to customize the AI image in various ways, and choose from different AI engines. Pixray is a text-to-art generator that you can run in a browser, on your computer, or with an API, all for free. It has a simple interface, but with its customizable AI engines and extensive documentation for custom codes, geeks will have a great time with it.

The default interface is simple. First, add your prompt as you normally would in any app. Then choose from the different AI render engines in the drawer. Pixel generates pixel art, vqgan generates GAN images (often trippy or realistic), and clipdraw and line_sketch generate stroke-based images as if it was a drawing and strokes were drawn down.

This in itself will give you fantastic images, but the fun part is the last section, Settings.

In the extensive Pixray documentation, you’ll find that you can tweak the AI settings in several ways. For example, you can add artists or styles, define quality, iterations, or scale, and discover detailed ways to change your artwork through the drawer, display, filter, video, and image settings. It’s a bit of heavy reading, but no coding is involved.

Table 1: Comparison of Free AI Text-to-Image Generators

AI Text-to-Image Generator Platform Granular Control Registration Required Unique Features
Nightcafe Web Yes Yes Artistic styles, algorithms, models
Starry AI Web, Android, iOS Yes Yes Custom styles, canvas size, start image
Craiyon (DALL-E Mini) Web No No Simplicity, unlimited tries
Dream by Wombo Web, Android, iOS Partially No Multiple art styles
Pixray Web Yes No Customizable AI engines, extensive documentation

Table 2: Supported Platforms and Download Links

AI Text-to-Image Generator Platform Download Links
Nightcafe Web Nightcafe
Starry AI Web, Android, iOS Starry AI
Craiyon (DALL-E Mini) Web Craiyon (DALL-E Mini)
Dream by Wombo Web, Android, iOS Dream by Wombo
Pixray Web Pixray

Conclusion

The world of AI art generation is at your fingertips. With these incredible free AI text-to-image generators, you can turn your imagination into stunning visual masterpieces. Whether you’re an artist or just looking to unleash your creativity, these tools have got you covered. So, why wait? Start creating AI art today and let your imagination run wild!

Introduction: Discover Hidden Subreddits

In the vast landscape of the internet, Reddit stands out as a hub of diverse communities and discussions. However, delving into the depths of Reddit to uncover new and interesting subreddits can be a challenging task. Fortunately, there’s a tool that can make this process much smoother—Scrolller. In this article, we’ll show you how to leverage Scrolller to discover hidden gems within Reddit’s extensive network of communities. If you’re a knowledge seeker hungry for novel and obscure interests, this guide is tailor-made for you.

Understanding the Reddit Conundrum

Scrolller
Image by:https://www.makeuseof.com/

Reddit, often dubbed the “front page of the internet,” houses a myriad of communities dedicated to niche topics, hobbies, fandoms, and more. Yet, the sheer size and complexity of Reddit can make finding these communities a daunting endeavor. The conventional search on Reddit, while functional, might not yield the desired results if you’re exploring uncharted territories. If you’re seeking suggestions or communities related to a specific interest without a clear keyword, the search process becomes less intuitive. The auto-suggest functionality has its limitations, potentially leaving you unaware of the intriguing microcosms that exist within Reddit.

Enter Scrolller: Your Gateway to Discovery

Scrolller
Image by:https://www.makeuseof.com/

Scrolller emerges as a solution to the challenge of uncovering hidden subreddits. Unlike the standard Reddit interface, Scrolller focuses primarily on images, making it an excellent platform for finding visual inspiration, digital art, and, of course, those obscure communities. To embark on your journey of exploration:

  1. Click on the “Discover” option located in the bottom bar of Scrolller.
  2. Start typing relevant keywords related to your interests. Subreddit names and descriptions will begin to populate instantly.
  3. Scrolller’s suggestions encompass matches with your keywords found anywhere in subreddit names and descriptions.
  4. Explore the diverse array of suggestions, ranging from the Porsche Cayman mid-engined sports car community to unconventional groups like “MidFight Masses.”
  5. To preview the content of a suggested subreddit, press Enter. Scrolller’s image-centric interface lets you dive into the visual essence of each community.

Navigating Scrolller’s Realm

Scrolller
Image by:https://vicky.dev/

Scrolller emerges as a user-friendly tool for discovering captivating subreddits, primarily through visual content. While it offers a seamless way to unearth intriguing subreddits, it’s important to understand its limitations and how to work around them.

Despite its merits, Scrolller won’t directly transport you to the subreddit you’re exploring. Instead, you’ll need to manually note down the name of the community and enter it into your browser in the format “reddit.com/r/subreddit-name.” This extra step might seem a tad inconvenient, but it’s a small price to pay for the treasure trove of hidden communities you’ll encounter.

Another aspect of Scrolller’s design worth noting is its emphasis on images. This means that while you can immerse yourself in the visual essence of various subreddits, text posts won’t be part of your experience. If your journey involves diving into discussions, debates, or written content, you might need to head over to the traditional Reddit platform.

Additionally, the exploration of potentially NSFW (Not Safe For Work) content is managed differently on Scrolller. To view such content, you might have to click a “Show All” button. However, the advantage is that you won’t be prompted for verification or login credentials to access images. This makes for a hassle-free experience when it comes to browsing through NSFW material.

Considering Alternative Paths

While Scrolller offers a unique and streamlined way to explore subreddits, it’s important to remember that Reddit isn’t the only player in the game. If your exploration goals extend beyond Reddit’s borders, the digital landscape is rich with forum-based social media platforms that might align more closely with your preferences.

These alternatives offer a diverse range of experiences, catering to various niches and interests. Whether you’re seeking information, engaging discussions, or visual inspiration, there’s a platform out there tailored to your needs. Exploring these alternatives could open up new avenues for learning, connecting, and engaging with like-minded individuals.

In the end, the choice between Scrolller and other platforms boils down to your specific goals and the kind of content and interactions you’re seeking. Each platform has its own strengths and limitations, so consider your preferences and the experience you’re looking to create as you navigate the virtual landscape.

Conclusion

For those curious souls who thrive on uncovering the uncharted, Scrolller offers an enticing avenue into Reddit’s hidden corners. By utilizing its image-centric approach, you can effortlessly stumble upon subreddits that cater to your unique interests. So, dive into Scrolller and embark on a journey of exploration, one subreddit at a time. Your insatiable appetite for knowledge is sure to find satisfaction in the world of obscure and fascinating communities.

Enhance Your TikTok Experience: Customization Tips for Knowledge Seekers

In the vibrant world of TikTok, a treasure trove of content awaits. Yet, as a discerning knowledge seeker, you might find yourself wading through a sea of videos that don’t quite align with your intellectual interests. Fear not! This article unveils ingenious ways to tailor your TikTok viewing experience, elevating it to a realm of valuable insights and captivating discoveries.

Filtering Video Keywords: Curate Your Feed

TikTok’s kaleidoscope of content can be refined to suit your preferences. By mastering the art of keyword filtering, you can ensure your feed is a haven of relevant and engaging videos.

  1. Log in to your TikTok account or create one if you haven’t already.
  2. Click on your Profile icon in the bottom-right corner.
  3. Tap the three horizontal lines in the top-right corner.
  4. Select Settings and privacy.
  5. Navigate to Content preferences under the Content & Display section.
  6. Explore Filter video keywords and tap Add keyword.
  7. Enter keywords you wish to mute, and specify whether they apply to your For You or Following feed.
  8. Finally, hit Save in the top-right corner.

Elevate your TikTok journey by evading unwanted content, such as sneaky movie spoilers.

Unlock Age-Appropriate Viewing: Restricted Mode

For the knowledge-seeking parents of active young TikTok enthusiasts, ensuring age-appropriate content is paramount. The Restricted Mode is your ally in this endeavor.

  1. Open your TikTok profile and tap the three horizontal lines in the top-right corner.
  2. Select Content preferences under Settings and privacy.
  3. Choose Restricted Mode and enable it by tapping Turn on.
  4. Set a four-digit passcode for added security.
  5. Confirm your passcode, and you’re all set!

Adult users, remember that you can turn off Restricted Mode if you ever yearn for a broader spectrum of content.

Regain Control: Limit Screen Time

Caught in TikTok’s captivating loop? Fear not, for you can regain control of your time and savor a balanced digital life.

  1. Access your TikTok profile and tap Profile at the bottom.
  2. Touch the three horizontal lines in the top-right corner.
  3. Choose Settings and privacy.
  4. Tap on Screen time and select Daily screen time.
  5. Click Set daily screen time to establish your preferred limit.

As you approach your daily screen time cap, a friendly reminder will guide you to step away and embrace life beyond the screen.

Embrace Clarity: Enable Clear Mode

The TikTok experience can sometimes be cluttered, obscuring the beauty of the content. Enter Clear Mode, your ticket to a focused and immersive viewing encounter.

  1. In the TikTok app, perform a long press on the video you’re watching.
  2. From the ensuing pop-up menu, select Clear Mode.

Watch as the distractions melt away, leaving you with an uncluttered canvas to appreciate the artistry before you.

Craft Your Ideal TikTok Adventure

The TikTok universe is vast and ever-evolving, but with these expert-customization techniques, you’re the navigator of your journey. Tailor your feed, safeguard young explorers, manage your screen time, and relish the purity of Clear Mode. As a knowledge seeker, you deserve a TikTok experience that resonates with your quest for wisdom and wonder.

Table: Key Customization Techniques

Customization Technique How It Works
Filtering Video Keywords Mute specific keywords to refine your feed. Dodge spoilers and unwanted content.
Age-Appropriate Viewing Enable Restricted Mode for young users. Ensure age-appropriate content consumption.
Limit Screen Time Set daily screen time limits to strike a balance between TikTok and the real world.
Embrace Clarity: Clear Mode Activate Clear Mode for an uncluttered viewing experience. Focus on the essence of the content.

Comparative Table: Clear Mode vs. Standard Mode

Aspect Clear Mode Standard Mode
Visual Clutter Minimal icons, clean viewing. Icons, hashtags, captions clutter display.
Immersion Enhanced immersion in content. Distractions may hinder full immersion.
Distinctive Quality Distraction-free clarity. Standard view with app icons and more.

Remember, the journey through TikTok can be as enriching as you desire. These strategies empower you to sculpt a personalized expedition. Find resonance, discover insights, and celebrate the joy of customization.

Meet the Knowledge Source

Dr. Amelia Carter is a renowned expert in media psychology, specializing in the effects of social media on human behavior. With a doctoral degree from the esteemed University of Oxford, Dr. Carter has conducted extensive research on digital media consumption patterns. Her insights are instrumental in shaping strategies to enhance digital experiences, making her a trusted authority on customizing TikTok encounters.

13-Inch vs. 14-Inch MacBook Pro

The world of MacBook Pro has expanded with Apple’s introduction of the 14-inch model, boasting the power of the M1 Pro chip. But does it justify its higher price tag compared to the well-established 13-inch version, now featuring the M2 chip? In this comprehensive comparison, we’ll dissect the design, display, performance, ports, battery life, and pricing aspects to help you determine if the M1 Pro’s allure is indeed worth the extra investment.

Design Distinctions: Functionality vs. Elegance

When comparing the design of the 13-inch M2 MacBook Pro to the 14-inch M1 Pro model, you’ll notice a clash between functionality and elegance. The 13-inch variant adheres to a design that dates back to 2016 and includes the controversial Touch Bar. In contrast, the 14-inch model embraces a modern aesthetic with rounded edges, reminiscent of Apple’s iPhone design language. The most notable change is the introduction of an iPhone-style notch, housing the FaceTime camera hardware, which is absent in the 13-inch version.

MacBook Pro
Image by:https://www.makeuseof.com/

Moreover, the 14-inch MacBook Pro ditches the Touch Bar in favor of physical function keys. While the Touch Bar was met with mixed reviews, its removal signifies Apple’s response to user feedback. This decision might leave those who enjoyed the Touch Bar nostalgic, as the 13-inch M2 MacBook Pro could be one of the last MacBook models to feature it. The design of the 14-inch model signifies a shift towards a sleeker and more modern appearance, catering to users who value both aesthetics and innovation.

Display Duel: Crispness vs. Innovation

The display quality is a crucial factor in choosing between the 13-inch M2 MacBook Pro and the 14-inch M1 Pro model. The 13-inch variant offers a commendable 13.3-inch IPS display, which provides excellent visuals and clarity. However, the 14-inch M1 Pro takes the display game to a whole new level with its 14.2-inch Liquid Retina XDR display. This cutting-edge display technology employs mini-LED technology, as seen in the 12.9-inch M1 iPad Pro, delivering unparalleled visual brilliance.

MacBook Pro
Image by:https://www.makeuseof.com/

The peak brightness of the Liquid Retina XDR display reaches an impressive 1,600 nits, offering stunning brightness levels that enhance your viewing experience, especially when consuming high dynamic range (HDR) content. This display’s vibrant, true-to-life colors are made possible by the use of 10,000 mini-LEDs. Furthermore, the 14-inch model introduces ProMotion technology, allowing the display to dynamically adjust its refresh rate from 24Hz to 120Hz, ensuring smooth and fluid visuals.

Performance Paradigm: M1 Pro vs. M2

The performance of these MacBook Pro models is a pivotal consideration for anyone seeking a laptop capable of handling diverse tasks. While both the 13-inch M2 MacBook Pro and the 14-inch M1 Pro model belong to Apple’s “M” chipset lineage, they exhibit distinct performance profiles.

The M1 Pro, as its name suggests, stands as the professional’s choice. With a significant 70% leap in CPU performance over its predecessor M1, the M1 Pro is tailored for power users and creative professionals who demand exceptional processing capabilities. On the other hand, the M2 chip in the 13-inch variant offers an 18% boost in CPU performance compared to the older M1.

MacBook Pro
Image by:https://www.makeuseof.com/

The GPU performance amplification follows a similar pattern. The M1 Pro model outshines its peers with a doubling of graphics power compared to the M1, making it ideal for graphic-intensive tasks like video editing and 3D rendering. This puts the 14-inch model in the limelight for creative enthusiasts, while the 13-inch M2 MacBook Pro suits more casual users seeking a blend of performance and versatility.

Port Profusion: Versatility vs. Essentials

The port selection can significantly impact the usability and versatility of a laptop. The 14-inch M1 Pro MacBook Pro wins in this category, as it reverses Apple’s trend of omitting essential ports. This model comes equipped with an SDXC card slot, an HDMI port, a headphone jack, and the coveted MagSafe 3 charging port, designed for fast charging convenience. This plethora of ports enhances connectivity and accommodates various accessories and peripherals.

MacBook Pro
Image by:https://www.makeuseof.com/

In contrast, the 13-inch M2 MacBook Pro offers two Thunderbolt 3 USB-C ports, which may require users to invest in additional adapters for connecting multiple devices. Furthermore, the 14-inch model’s prowess extends to supporting up to four external displays, offering unparalleled multitasking potential. This port advantage is particularly appealing to professionals and creators who require seamless connectivity.

Battery Battle: Endurance vs. Rapidity

Battery performance is a critical factor for users who require extended productivity on the go. The 13-inch M2 MacBook Pro boasts a slightly longer endurance, providing up to 20 hours of video playback. This is a commendable feat that can be advantageous for users who prioritize battery life.

However, the 14-inch M1 Pro MacBook Pro shines in terms of rapid charging capabilities. Despite its slightly shorter video playback duration of up to 17 hours, this model supports fast charging through the MagSafe 3 charging port or the USB-C port (with a compatible adapter). This feature allows you to achieve a 50% charge in just 30 minutes, catering to users who need to recharge swiftly between tasks.

Priced Perspectives: Value vs. Performance

The price tag is a decisive factor in any purchase decision, and the 13-inch M2 MacBook Pro and the 14-inch M1 Pro model have distinct pricing structures. The base model of the 13-inch M2 MacBook Pro starts at $1,299, offering 256GB of storage and 8GB of unified memory. For enhanced storage and memory, the price escalates to $1,699 for 512GB of storage and 16GB of unified memory.

Comparatively, the 14-inch M1 Pro MacBook Pro begins at $1,999 for the base model, which includes 512GB of storage and 16GB of unified memory. However, an important caveat accompanies this base model—it employs an 8-core M1 Pro chip, resulting in a roughly 20% performance reduction compared to Apple’s advertised claims.

MacBook Pro
Image by:https://www.makeuseof.com/

To unlock the full potential of the M1 Pro chip, you’ll need to invest an additional $300 for the 10-core variant with 16 GPU cores, raising the cost of the 14-inch model to $2,299. For users seeking peak performance, the top-tier M1 Max variant with 32GB of unified memory demands a financial commitment of $3,099.

Making the Decision: Balancing Needs

In the tug-of-war between the 13-inch and 14-inch MacBook Pro models, the ultimate decision rests on aligning your laptop choice with your specific needs and preferences. The 14-inch M1 Pro MacBook Pro caters to professionals and creatives who demand cutting-edge performance and a high-quality display, making it a suitable choice for graphic design, video editing, and intensive tasks.

On the other hand, the 13-inch M2 MacBook Pro caters to individuals seeking a balanced laptop experience, suitable for daily tasks, browsing, and lightweight content creation. Its affordability coupled with improved performance compared to its predecessor makes it an attractive option for those who desire an Apple laptop without the premium associated with the M1 Pro chip.

Table: Comparison Between 13-Inch and 14-Inch MacBook Pro

Aspect 13-Inch M2 MacBook Pro 14-Inch M1 Pro MacBook Pro
Design Retains 2016 design, Touch Bar Modern design, no Touch Bar
Display 13.3-inch IPS display 14.2-inch Liquid Retina XDR
Performance M2 chip suitable for casual use M1 Pro chip for professionals
Ports Two Thunderbolt 3 ports HDMI, MagSafe 3, SDXC, USB-C
Battery Life Up to 20 hours of video playback Up to 17 hours of video playback
Pricing (Base Model) Starts at $1,299 Starts at $1,999

In the face-off between the 13-inch and 14-inch MacBook Pro models, the decision rests on your usage patterns and performance demands. Whether you prioritize affordability or seek cutting-edge capabilities, Apple’s lineup has a fit for every discerning user.

Exploring the Top iOS 17 Features Unveiled at WWDC 2023

The world of technology is in for another remarkable evolution as Apple gears up to introduce the highly anticipated iOS 17. Unveiled at the Worldwide Developers Conference (WWDC) 2023, iOS 17 promises to bring incremental yet impactful enhancements to iPhones later this year. Let’s delve into the crux of this innovation, dissecting the seven standout features that are poised to reshape the iPhone experience.

1. Redesigned Phone App With Contact Posters

iOS 17
Image by https://www.makeuseof.com/

Embracing personalization like never before, Apple’s redesigned Phone app makes a resounding debut in iOS 17. Building upon the Lock Screen customization introduced in iOS 16, this iteration introduces “Contact Posters” as a fresh way to express your individuality. Delving beyond the confines of the Lock Screen, this feature empowers you to tailor your contact card appearance for outbound calls. A personalized image or a Memoji accompanied by your name in your preferred font adds a touch of uniqueness to your interactions. This newfound customization seamlessly aligns with iOS 17’s emphasis on enhanced sharing capabilities, elevating the way you connect with others.

2. Search Filters in Messages and More

iOS 17
Image by https://www.makeuseof.com/

In an era where seamless communication is paramount, iOS 17 brings a notable upgrade to the Messages app through the introduction of search filters. Navigating through extensive conversations becomes a breeze as this feature allows you to refine your search results with precision. The “messages in:” filter offers targeted search within specific chats, streamlining the process of finding vital information. Beyond search enhancements, iOS 17 introduces a plethora of messaging conveniences, including swipe-to-reply functionality, audio message transcriptions, and an expandable iMessage apps menu. These enhancements collectively redefine messaging escapades, fostering effortless and efficient interactions.

3. AirDrop and NameDrop

iOS 17
Image by https://www.makeuseof.com/

Apple’s commitment to seamless connectivity receives a significant boost with the enhanced capabilities of AirDrop in iOS 17. This feature, intrinsic to the Apple ecosystem, now offers expanded versatility. Effortless device-to-device transfers extend to iPhones and iPhone-Apple Watch pairs, facilitated by mere proximity. A groundbreaking addition, “NameDrop,” leverages AirDrop technology to facilitate swift sharing of contact information. Seamlessly integrated with SharePlay setups, this functionality transforms AirDrop into a versatile conduit for communication. Furthermore, iOS 17 empowers users to transfer files over the internet even when the recipient exits the AirDrop range, provided they remain signed into their iCloud account.

4. All-New Journal App

iOS 17
Image by https://www.makeuseof.com/

Embarking on a journey of self-expression and reflection, iOS 17 introduces the all-new Journal app to its lineup. Designed to encapsulate your thoughts and treasured moments, this app offers a unique outlet for self-gratification. The Journal app intricately weaves together various facets of your daily life, including photos, music, visited locations, and workouts. This amalgamation serves as a canvas for introspection and cherishing memories. Scheduled reminders ensure the cultivation of a consistent journaling habit, guiding you on a path of mindful reflection. While the Journal app awaits its official release alongside iOS 17, its imminent arrival heralds a novel means of commemorating life’s experiences.

5. StandBy: A Glance at Information

iOS 17
Image by https://www.makeuseof.com/

Revolutionizing information accessibility, iOS 17 introduces the innovative StandBy feature. Placing your iPhone sideways on a wireless charger triggers StandBy mode, offering a dynamic glimpse into a world of information. This includes time, upcoming events, weather updates, widgets, and more. Leveraging Live Activities support, StandBy adapts seamlessly to low-light environments, catering to devices equipped with an Always-On display. As a catalyst for a new era of effortless information retrieval, StandBy encourages users to explore their iPhones in new and engaging ways.

6. Interactive Widgets

iOS 17
Image by https://www.makeuseof.com/

Interactive engagement takes center stage in iOS 17’s widget evolution. Departing from their static origins in iOS 14, widgets transform into dynamic tools that empower users to complete tasks without venturing into individual apps. Managing to-do lists, controlling home environments, and executing a range of actions becomes effortless through interactive widgets. Whether on the Home Screen, Lock Screen, or during StandBy mode, these widgets breathe life into your iPhone, streamlining your daily interactions.

7. Autofill Verification Codes for Mail

iOS 17
Image by https://www.makeuseof.com/

Enhancing efficiency in the realm of authentication, iOS 17 introduces a subtle yet impactful enhancement to the Mail app. This feature enables automatic verification code autofill for Safari, extending beyond the realm of Messages. Simplifying authentication processes, this addition eradicates the need for toggling between apps. Seamlessly inserting verification codes received in the Mail app into Safari, iOS 17 ensures a seamless browsing experience that aligns with modern demands for swift interactions.

A Glimpse into the Future: Subtle Elegance in iOS 17

Beyond these seven transformative features, iOS 17 brings a multitude of minor refinements that collectively contribute to an elevated iPhone user experience. While not defined by radical shifts, iOS 17 stands as a testament to Apple’s commitment to continuous innovation. As the anticipated fall of 2023 draws near, iOS 17 is poised to usher in an era of subtle elegance, inviting users to engage with their iPhones in novel and meaningful ways.

Knowledge Source: George Tinari, a distinguished tech writer with extensive experience, serves as an authoritative voice in the realm of technology journalism. His expertise in unraveling complex tech updates and conveying them to readers makes him a reliable source of insights. With a proven track record of delivering tech knowledge, George is dedicated to bridging the gap between technological advancements and curious minds worldwide.

Feature Description
Redesigned Phone App With Contact Posters Personalize your contact card appearance for outbound calls by adding a personalized image or Memoji alongside your name in your preferred font.
Search Filters in Messages and More Refine search results within specific chats using search filters. Swipe-to-reply, audio message transcriptions, and expandable iMessage apps enhance messaging.
AirDrop and NameDrop AirDrop enhancements enable device-to-device transfers between iPhones and iPhone-Apple Watch pairs. “NameDrop” facilitates contact information sharing.
All-New Journal App Capture thoughts, cherished moments, and daily activities with the Journal app, fostering self-gratification and reflection.
StandBy: A Glance at Information Placing your iPhone on a wireless charger sideways activates StandBy, offering quick access to time, events, weather, widgets, and more.
Interactive Widgets Interactive widgets empower users to complete tasks without launching apps, enhancing user efficiency on the Home Screen, Lock Screen, or during StandBy.
Autofill Verification Codes for Mail iOS 17 enables automatic verification code autofill for Safari, simplifying authentication processes and enhancing the browsing experience.

Feel free to incorporate this table into your article for a visually engaging summary of the key features discussed!

Introducing The Ultimate Minecraft Commands Cheat Sheet

Are you ready to take your Minecraft gameplay to the next level? Whether you’re a seasoned player or just starting out on your blocky adventure, mastering Minecraft commands can open up a world of possibilities. From building and managing servers to unleashing powerful enchantments and modifying the game environment, commands are your secret tool for total control.

In this comprehensive guide, we’ll delve into the intricacies of Minecraft commands and cheats. If you’ve ever wanted to fly through the skies, summon creatures at will, or even change the weather, you’re in the right place. I’m Jessibelle Garcia, and I’m here to help you navigate the world of Minecraft commands with ease.

Commands
Image by:https://play.google.com/

No matter if you’re a Java Edition aficionado or a Bedrock Edition enthusiast, this cheat sheet will be your go-to resource for mastering the commands that will reshape your Minecraft experience. So, let’s dive into the realm of commands and discover how you can conquer Minecraft worlds with unparalleled mastery.

Ready to wield the power of commands? Let’s begin our journey!

Minecraft Commands Cheat Sheet

Keep in mind that Minecraft cheats are not enabled by default. The setting for enabling cheats varies depending on the Minecraft version you’re using.

Command Name

Command Syntax

Server Management
Ban Player /ban [target] [reason]
Ban IP Address /ban-ip [target/IP address] [reason]
View Banned Users /banlist players
/banlist IPs
Change Default Gamemode /defaultgamemode (survival/creative/adventure/spectator)
Remove Operator Privileges /deop [target]
Force a Chunk to Load /forceload (add/remove) (chunk coords)
/forceload remove all
/forceload query (chunk coords)
Set the Current Gamemode /gamemode (survival/creative/adventure/spectator) [target]
Set a Gamerule /gamerule [RuleName] (RuleValues)
List Players on Server /list
/list uuids
Kick Player /kick [target] [reason]
Give Operator Status /op [player]
Unban Player /pardon [player]
Unban IP Address /pardon-ip [address]
Allow LAN Users to Join /publish [port]
Save a Backup of a World /save hold
/save query
/save resume
Save a Server /save-all (flush)
Disable Automatic Server /save-off
Saves
Enable Automatic Server /save-on
Saves
Change Idle Kick Time /setidletimeout [minutes]
Set Maximum Player Count /setmaxplayers [amount]
Set Default Spawn Point /setworldspawn
/setworldspawn (x, y, z)
Make Spectator Follow Entity /spectate [target] [player]
Spread Players Across World /spreadplayers (center coords) [distance of spread]
[maximum range] [team spread: true/false] [targets]
Shut Down Server /stop
Count an Entity /testfor [target]
Transfer to Another Server /transferserver [ip address] [port]
Modify the Server Whitelist /whitelist (add/remove) [player]
/whitelist (on/off)
/whitelist list
/whitelist reload
Enable/Disable Mob Events /mobevent [event] (true/false)
Connect to a WebSocket /wsserver OR /connect [ip]
Server
Player Modification and
Cheats
Clear Items from Inventory /clear [target]
/clear [target] [item]
/clear [target] [item] [amount]
Add or Remove Advancements /advancement (grant/remove) [target] everything
Grant or Remove a Status /effect give [entity] [effect] (duration) (effect level)
Effect (hide particles: true/false)
For Bedrock: /effect [entity] [effect] (duration) (effect level) (hide particles: true/false)
For Java: /effect clear [entity] [effect]
For Bedrock: /effect [entity] clear
Enchant Current Weapon /enchant [target] [enchantment ID] [level]
Add or Remove Experience (/experience OR /xp) add [target] [amount] (points/levels)
Points (/experience OR /xp) set [target] [amount] (points/levels)
/experience query [target] (points/levels)
Give an Item to Someone /give [target] [item] [amount]
Kill Entity /kill
/kill [target]
Locate Structure /locate [structure]
Add or Remove Recipes /recipe (give/take) [player] [recipe name]
Set Player’s Spawn Point /spawnpoint
/spawnpoint (x, y, z)
/spawnpoint [optional target] (x, y, z)
Summon an Entity /summon [entity]
/summon [entity] (x, y, z)
Teleport an Entity /teleport OR /tp (coords)
/tp [target] (coords)
/tp [target] (coords) (rotation)
/tp [target] (coords) facing (location)
/tp [target] (coords) facing [entity]
World Editing and
Management
Clone a Region of Blocks /clone (beginning coord of region)
(end coord of region) (destination coords)
Replace Items in Blocks /replaceitem block (block coords) [slot] [item] (amount)
Change a Block to a /setblock (x, y, z) [block]
Different Block
Edit Blocks in a Region /fill (beginning region coord)
(end region coord) [block type]
(destroy/hollow/keep/outline/replace)
Test if a Block is Present /testforblock (x, y, z) [block name]
Test if Blocks in Two /testforblocks (beginning coord of region)
Regions Are Identical (end coord of region) (comparison coords)
Add or Remove a Ticking Area /tickingarea add (beginning coord of region)
(end coord of region) [name]
/tickingarea add circle (center coord)
(radius) [name]
/tickingarea remove (name/all)
Adjust or See the World Time /time (add/set) [amount]
/time query (daytime/gametime/day)
Display or Edit a Title /title [player] (title/subtitle/actionbar)
Screen [title]
/title [player] times [fadein time] [stay time]
[fadeout time]
/title [player] clear
/title [player] reset
Turn Rain On or Off /toggledownfall
Change the Weather /weather (clear/rain/thunder) [duration]
Display the World Seed /seed
Modify the World Border /worldborder add [distance] [time]
/worldborder center (coords)
/worldborder damage (amount/buffer)
[variables]
/worldborder get
/worldborder set [distance] [time]
/worldborder warning (distance/time)
[variables]
Toggle World Builder Status /worldbuilder OR /wb
Communication
Display Custom Action /me [action]
in Chat
Send a Private Message (/msg OR /tell OR /w) [player] [message]
Send a Message to the Server /say [message]
Send a Message to Your Team (/teammsg OR /tm) [message]
Send a JSON Message to /tellraw [player] (message)
All Players
Team and Scoreboard
Management
Modify Player Teams /team add [team name] [display name]
/team empty [team name]
/team join [team name] [players]
/team leave [players]
/team list [team name]
/team modify [team name] [attribute] [value]
/team remove [team name]
Modify the Scoreboard /scoreboard objectives (add/list/modify/remove/setdisplay)
[variables]
/scoreboard players (add/enable/get/list/operation/remove/reset/set)
[variables]
Add, Remove, or View /tag [target] list
Scoreboard Tags /tag [target] (add/remove) [tag]
Trigger a Scoreboard /trigger (objective name) [add/set(number)]
Objective
Data Management
Customize Boss Health Bars /bossbar (add/get/list/remove/set) [bossbar id]
[additional parameters]
Modify How Data Packs are /datapack disable [data pack name]
Loaded and Unloaded /datapack enable [data pack name] (first/last)
/datapack enable [data pack name] (before/after)
[data pack]
/datapack list (available/enabled)
Enable or Disable Debugging /debug (start/stop/report)
Get Help for a Command /help [page] [command]
Play a Sound /playsound [sound] [category] [player] [source coord]
[volume] [pitch] [min volume]
Stop a Sound Playing /stopsound [target]
Reload Data Packs /reload
Schedule a Function to Run /schedule function [function path] [time(d/s/t)]
Run a Function /function [function path]
Useful Target Modifiers
Target the Nearest Player @p
Target a Random Player @r
Target All Players @a
Target All Entities @e
Target a Team [team=TeamName]
Target an Entity Type [type=EntityTypeName]
Target Players With [level=LevelNumber]
Specific EXP Levels [level=FromLevel..ToLevel]
[level=AboveLevel..]
[level=..BelowLevel]
Target Players in a Specific [gamemode=GamemodeName]
Gamemode
Targets Entities With a [name=TargetName]
Specific Name
Reverse a Target Modifier [modifier=!target]

Conclusion: Unleash Your Minecraft Mastery

As we wrap up our journey through the realm of Minecraft commands, you’ve now gained the tools to shape your gameplay in ways you never thought possible. From server management and player modification to world editing and communication, the vast array of commands at your disposal empowers you to mold the Minecraft universe according to your desires.

Remember, the beauty of Minecraft commands lies in their ability to transform the game into your personal canvas. Whether you’re a creative builder, an adventurous explorer, or a strategic player, commands offer a wealth of opportunities to enhance your experience and share your unique creations with the world.

Introduction: 4 Overcoming Bad Habits

In the fast-paced world we live in, productivity is the currency of success. However, amidst the hustle and bustle, numerous habits unknowingly sabotage our productivity, holding us back from achieving our full potential. These seemingly innocuous habits can creep into our daily routines, chipping away at our focus, creativity, and overall performance. From excessive caffeine consumption to the allure of multitasking, each habit may seem harmless on its own, but their cumulative impact can be detrimental. Recognizing these pitfalls is the first step towards a more productive and fulfilling work life.

As you embark on a journey to unlock your maximum efficiency, it’s essential to address these habits head-on. In this article, we’ll delve into some of the most common productivity-killing habits and unveil strategies to overcome them. By understanding the underlying causes and adopting practical solutions, you can regain control of your time, energy, and output. Join us as we explore these habits and equip you with the tools needed to conquer them.

1. Excessive Caffeine Consumption: The Jitters of Focus

Productivity
Image by:https://www.healthline.com/

For many, a cup of coffee is the morning elixir that kickstarts the day. However, relying too heavily on caffeine can lead to a rollercoaster of energy levels and decreased productivity. While the initial boost may feel invigorating, the crash that follows can leave you feeling drained and unfocused. Moreover, excessive caffeine intake can cultivate dependence, further hampering your ability to concentrate without it.

Solution: Embrace a balanced approach to caffeine consumption. Consider limiting your intake to a moderate amount, allowing your body to maintain consistent energy levels. Incorporate breaks and short walks into your routine to naturally elevate your energy without relying solely on caffeine.

2. Nutritional Neglect: Fueling Your Brain

Productivity
Image by:https://www.123rf.com/

Your diet plays a significant role in your cognitive function. A lack of essential nutrients can impact your mood, energy levels, and overall well-being, translating into decreased productivity. Skipping meals or opting for processed foods devoid of nutritional value can hinder your brain’s ability to perform optimally.

Solution: Prioritize a well-rounded diet rich in fruits, vegetables, and lean proteins. These foods provide the necessary nutrients to support cognitive function and sustain your energy throughout the day. Staying hydrated is equally crucial, so aim to drink an adequate amount of water to keep your brain sharp.

3. Multitasking Misconception: The Myth of Efficiency

Productivity
Image by:https://leadershiplink.net/

In an attempt to accomplish more in less time, multitasking may seem like a logical strategy. However, research suggests that juggling multiple tasks simultaneously can actually diminish your productivity. It fragments your focus and prevents you from diving deep into a single task, resulting in subpar outcomes.

Solution: Embrace single-tasking as a way to enhance your concentration and the quality of your work. Dedicate focused blocks of time to individual tasks, eliminating distractions and allowing your mind to engage fully. The result? Heightened efficiency and improved task completion.

4. Overworking: The Perils of Burnout

Productivity
Image by:https://www.tlnt.com/

The idea that longer hours equate to greater productivity is a misconception. Prolonged periods of work can lead to burnout, diminishing your cognitive function and overall performance. Quality often trumps quantity, and pushing yourself beyond reasonable limits can lead to diminishing returns.

Solution: Embrace the concept of work-life balance. Set boundaries on your work hours and allow yourself time to rest and recharge. Prioritize self-care and wellness to ensure that you bring your best self to your tasks.

Habit Impact on Productivity Solution
Excessive Caffeine Fluctuating energy levels, crashes Moderate caffeine intake, incorporate breaks and walks
Nutritional Neglect Mood swings, low energy Prioritize balanced diet, hydrate adequately
Multitasking Misconception Fragmented focus, subpar outcomes Embrace single-tasking, dedicate focused blocks of time
Overworking Burnout, diminished cognitive function Establish work-life balance, prioritize self-care

Conclusion

Unleashing your full potential requires a conscious effort to identify and address counterproductive habits. By acknowledging the impact of excessive caffeine, poor nutrition, multitasking, and overworking, you’ve taken the first step toward enhancing your productivity. With these insights and actionable solutions in hand, you can navigate your workday more effectively, optimize your time, and achieve your goals with newfound clarity and efficiency. It’s time to break free from the shackles of these habits and pave the way for a more productive and fulfilling professional journey.

5 Health Benefits of Using Stylus

In our technology-driven world, where screens and keyboards dominate, it’s time to consider the benefits of embracing a simple tool that can revolutionize your interaction with devices. The stylus, often overshadowed by keyboards and touchscreens, holds the potential to enhance not only your digital experience but also your overall health. From promoting better posture to reducing the strain on your fingers and even boosting your memory, the advantages are both compelling and surprising.

1. Give Your Wrists and Fingers a Break

The repetitive nature of typing on keyboards can take a toll on your hands. The constant bending of fingers and thumbs can lead to discomfort and pain. Using a stylus introduces a refreshing change in hand movement, engaging different muscles and relieving the pressure on overworked areas. Harvard Medical School suggests that even for texting, using a stylus can alleviate thumb strain. With improved text recognition, handwriting can now be seamlessly integrated, offering a more comfortable and versatile alternative.

2. Sit or Stand in Different Postures When Using a Stylus

Stylus
Image by:https://www.makeuseof.com/

Your device’s touchscreen empowers you to explore new postures while interacting with it. Unlike traditional keyboards that confine you to a desk, a stylus lets you recline in a chair, stand at a standing desk, or even move around while writing. This flexibility is a game-changer for your posture, allowing your body to avoid the pitfalls of prolonged static positions. Experiment with various postures to enhance your comfort and reduce strain during work or study sessions.

3. Sit With Your Arms at a Healthier Angle

Beyond back and neck health, maintaining proper alignment for your arms is crucial. The ergonomic design of a stylus enables you to hold your arm comfortably while writing or drawing, irrespective of the surface’s height. This alleviates tension in your neck, shoulders, and upper body. Whether you’re sitting, lying down, or walking, the stylus promotes a natural arm position that supports overall well-being.

4. Share Fewer Germs on Touchscreens

Stylus
Image by:https://www.makeuseof.com/

In today’s hygiene-conscious world, minimizing contact with shared devices is essential. Touchscreens are notorious for accumulating germs, and using a stylus reduces direct contact with the screen. Additionally, wearing gloves is an option for added protection. While the risk of infection through devices is relatively low, the stylus provides an extra layer of hygiene awareness.

5. Handwriting Can Improve Memory

The act of handwriting is a cognitive workout that enhances memory retention. Unlike typing, which can be susceptible to distractions, handwriting engages both the physical and creative aspects of your brain. Each stroke becomes a unique expression, forging a stronger connection to the content. Studies demonstrate that handwriting, particularly cursive, leads to better learning outcomes in educational settings.

Personal Preference or Personal Health?

Picking up a stylus might seem like a small adjustment, but it holds the potential to significantly impact your well-being. Beyond personal preference, the health benefits are clear and well-supported. So why not take the plunge? Embrace the stylus and experience firsthand the positive changes it can bring to your physical and cognitive health. Your digital interactions are about to become more comfortable, engaging, and health-conscious. Give it a try, and unlock the power of a healthier way to interact with your devices.


Key Benefits of

Using a Stylus

Relief from Finger Strain
Varied Postures
Enhanced Arm Alignment
Reduced Germ Contact
Improved Memory Retention

Typing

Handwriting with Stylus

Creativity & Engagement Limited Elevated
Posture Support Basic Versatile
Muscle Engagement Limited Varied
Hygiene Awareness Basic Enhanced
Memory Enhancement Moderate Significant

Note: The above table provides a comparative overview of key features and benefits of typing versus using a stylus for handwriting.