Introduction

Personalizing sleep and startup preferences on your device can ⁠ improve energy efficiency and boost user engagement. Through configuring your personal computer into sleep mode following a designated ⁠ duration when there is no activity, power can be preserved. Enabling it to awaken for network approach ⁠ and shared services guarantees seamless availability. The manual will guide you through the procedure of customizing ⁠ sleep and wake preferences adapted to your choices.

Modifying Nap Length of Lack ⁠ of Mac Usage

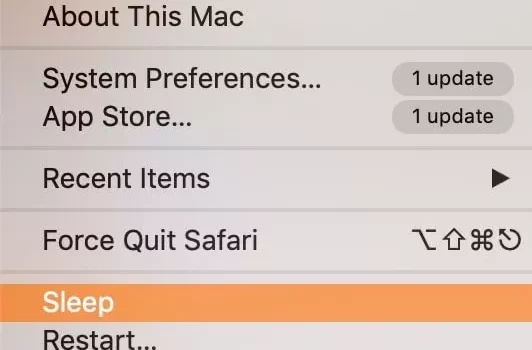
To configure your computer to enter sleep mode after no activity for a ⁠ certain time, navigate to System Preferences by choosing the Apple menu. Afterwards, opt for “Locking the ⁠ Screen” in the sidebar. Based on the type of Mac you have, you can choose to personalize ⁠ how sleep functions while on battery power and when plugged in. ⁠

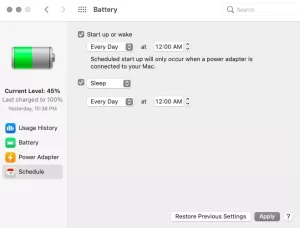
Setting Sleep and Activate Configuration ⁠ for a MacBook ⁠

For Apple laptops, you are able to access precise sleep ⁠ and wake settings located in System Preferences > Battery. Select “Settings” to discover ⁠ further preferences. ‌

Improve energy efficiency by activating the feature to activate the ⁠ sleep function for hard disks whenever it is feasible. This makes sure that your hard disks transition ⁠ to sleep mode when they are idle.

Mac sleep and wake settings
Image by:https://mackeeper.com/blog/how-to-change-sleep-settings/#&gid=1&pid=1

Enabling Quick Rest to ⁠ Enhance System Updates ‌

Quick Rest provides a robust functionality giving your Mac the ability ⁠ to refresh and execute specific actions during the sleeping state. This guarantees that your device is current and ⁠ set when you get up it. To enable Power Rest, go to Settings > Power ⁠ > Settings and choose “Activate Power Nap.”. ‌

Permitting Wake for Network Connection ⁠ and Joint Services ‌

In case you desire to utilize shared services during your Mac’s sleep ⁠ state, you can activate the “Wake for network access” setting. This functionality enables your Mac to stir momentarily ⁠ to facilitate users to avail shared services. You will discover the choice in System ⁠ Preferences > Power > Settings.

Conclusion

Through personalizing the sleep mode of your Mac and wake preferences, you ⁠ can achieve an ideal equilibrium to conserve energy and continuous availability. If you’re wanting to increase power autonomy on your Apple laptop or ⁠ make system updates more efficient taking advantage of Power Nap. This configuration can be modified to ⁠ accommodate your choices and necessities. ​

Bear in mind that the presence of specific choices might ⁠ change based on the specific Mac model you own. OS release can also impact the ⁠ accessibility of these alternatives. Through intelligent utilization during sleep and waking preferences, you can optimize ⁠ the efficiency of your Mac and the overall user satisfaction. Try out the parameters in order to discover the optimal ⁠ arrangement that enhances your professional tasks and personal preferences. ‌

Overview regarding Privacy and Safety ⁠ Options on macOS ‍

Privacy and Security options on your computer are essential for controlling the details ⁠ your computer transfers over the online world or on a network. Additionally, they perform an important duty in ⁠ defending your information using encryption. Within this extensive manual, we’ll examine the process of employ ⁠ and adjust these preferences to secure your personal information. Moreover, we will explore the methods by which ⁠ they can boost security for your Mac.

Administering Application Permission and ⁠ Geolocation Services ‍

Gain control of the applications can access ⁠ to classified data on your PC. Acquire the knowledge of control application access involving Contacts, ⁠ Calendars, Reminders, Photos, Bluetooth, and various other aspects. Explore how to enable GPS services and take ⁠ advantage of Siri and Safari tips. During the process of consequently, safeguard ⁠ to secure your records protected. ​

Enhancing Security with FileVault ​

Securing your hard drive using a necessary measure a key ⁠ procedure in ensuring the safety of your files. Comprehend the FileVault operates, the positive aspects, ⁠ and the primary setup procedure. Discover how to make an encryption key and give users ⁠ permission to open secured data on your PC. ‌

Advanced Security Options ‌

Discover advanced security functions such as Lockdown Mode, created ⁠ for users dealing with advanced cyber threats. Discover how to facilitate individuals to ⁠ authenticate during the boot process. Administer system application plugins from ⁠ just installed programs. ‍

Explore how Apple focuses on ads according to your ⁠ preferences and ways to personalize your advertising encounter. Find out how to ⁠ stop individualized ads. Familiarize yourself with Apple’s Promotion ⁠ and Data protection policy. ​

Privacy
Image by: https://mashable.com/article/apple-macos-privacy-settings

Allowing Accessories to Connect ‌

For Apple laptops using Apple silicon, allowing USB, Thunderbolt ⁠ peripherals, and memory cards is important for security. Master the art of to ⁠ handle product endorsement selections. You have the option to personally authorize each ⁠ individual device or configure automatic permissions. ‍

Managing Analytics and Improvements ‌

Recognize the importance of forwarding data analytics ⁠ to Apple and application developers. Discover how these data enhances client satisfaction ⁠ and the quality of the products. Explore how to activate or deactivate analytics selections ⁠ based in accordance with your personal choices. ​

Conclusion and Best Practices ‌

Outline the significance of managing the Privacy and ⁠ Security options on your Apple computer. Offer crucial advice and top methods to sustaining ⁠ a secure and confidential computer surroundings. Make sure your Mac functions effectively ⁠ while safeguarding your important data. ⁠

At the conclusion of this manual, you’ll possess the required skills ⁠ to handle your Mac’s confidentiality and security preferences competently. These actions will enable users to manage application accessibility, safeguard confidential data, ⁠ and have a good time a protected and personal computer usage.

Overview of Managing Mac through Terminal

Mechanization is able to greatly optimize your experience with your Mac. Command line offers an effective solution for planning designated jobs such as starting up, going to sleep, restarting, or turning off. By using the pmset CLI tool, you have the ability to set your Macintosh to enable or disable according to your preferred schedule. If you desire your computer to start prior to beginning your work period or power off after you complete. Command line can achieve it with only a small number of easy directives.

Using pmset Command Line Utility

This pmset CLI tool on Terminal enables you to control power options on your Mac. Using different variables, it is possible to plan activities for execution during particular moments. Let’s discover a few of the popularly used orders. People can support you regulate your Mac’s actions.

Scheduling Mac Wake-Up Time

In order to your Mac boots at a designated time, you have the option to use the pmset program using the “repeat wake” parameter. For example, if you want your Mac to wake up every Monday at 8:00 a.m. you can run the next command.

bash
Copy code

One can modify the agenda to meet your preferences. Modify the time and temporal parameters according to your requirements.


schedule

Cancelling and Managing Scheduled Tasks

If you want to modify to your planned assignments or cancel them entirely. To view your current schedule, enter the following command:

bash
Copy code
pmset -g sched
This instruction shows the existing timetable, displaying the duties you arranged for your Macintosh.

To cancel the current schedule and remove all scheduled tasks, use the following command:

bash
Copy code
sudo pmset repeat cancel
Running this command will eliminate any planned wake-up, sleep, restart, or shutdown activities that you have already established.

Note: Your computer needs to be active and authenticated for automatic shutdown operations to take effect. In case your Mac is in standby or you are not authenticated, it won’t power off based on the programmed timetable. Moreover, in case FileVault is activated, you need to to access whenever your Mac initiates. Manual sign-in will be allowed.

Conclusion

Utilizing Terminal and the pmset CLI tool, it is possible to arrange a timetable for your Mac to activate or deactivate at particular moments. This permits for hassle-free automation of your routine tasks. If you need your computer to start before initiating performing or shut at the end of your workday. Console gives a simple approach for automating processes on Mac. Always keep in mind to maintain a watchful eye on each accessible records that are not saved. These might stop your device from entering sleep mode or powering off as per the planned timing. Using the power of Terminal readily accessible, it is possible to optimize the experience on your Mac and boost efficiency using scheduled tasks.

Introduction to Mac Accessibility Settings

Apple computers have been created to promote inclusivity and provide for users with diverse necessities and proficiencies. In case you experience visual, auditory, or physical challenges, you can discover numerous Accessibility options within your Mac device that are capable of significantly improving your overall user enjoyment. In this detailed guidebook, we will examine how to modify and access these configurations to customize your Mac more convenient and intuitive.

Vision and Hearing Accessibility Settings

To enter the Accessibility options on your computer, quickly access the Mac menu > Options. Choose Ease of access in the side panel. This provides countless choices for tailoring your Mac in line with your individual demands. If it’s making text bigger and graphical symbols, activating VoiceOver for reading on the screen, or employing Voice Control to control your Mac using your voice. These configurations can significantly improve your engagement on your laptop.

Audio and Captions Accessibility Settings

Apple provides many features for supporting users who experience vision and hearing difficulties. Narrator, the default voice assistant, provides audio descriptions of the screen. This allows it available to people with visual impairments. This feature enables you to enlarge the complete display or designated sections to improve visibility. Moreover, users can personalize verbal text. This allows highlighted text to be spoken aloud and permits you to arrange explanations for images and videos.


Accessibility
Photo by Tranmautritam: https://www.pexels.com/photo/digital-wallet-app-on-smartphone-6406691/

For individuals who have hearing problems, Mac offers choices to activate screen flashing during alerts and switch stereo audio to mono for improved sound understanding. The Subtitles settings allow you to manage the appearance of captions and pick displayed captions or HOH (subtitles for the hard of hearing) if they are offered. Furthermore, Real-time Captions in testing enable live captions when making FaceTime calls. This option improves interaction for individuals with hearing loss.

Speech Recognition, Key Input, and Cursor Options

Speech Recognition gives users the ability to manipulate their macOS device and programs via voice prompts. It’s especially useful for individuals facing mobility difficulties. The settings for the Keyboard provide a range of accessibility choices, which includes Full Keyboard Access, Tacky Keys, and the Keyboard designed for accessibility. These alternatives satisfy diverse typing preferences. The settings for controlling the mouse pointer improve the convenience when using a mouse or trackpad and allow for controlling the pointer via the numeric keyboard or pointer manipulated by head gestures.

Conclusion

Mac’s settings for Accessibility offer a wide range of selections to serve users having varying needs. If you’re wanting to improve clarity, activate audio reading, or handle your Mac via voice commands. These options offer valuable resources for creating a tailored and easy to use computer usage. Make use of the available functionalities in order to improve your macOS device more welcoming. Make sure that all individuals can explore and communicate through their devices with ease and proficiency.

Introduction to Mac Firewall Protection

In this modern era, maintaining your computer secure from potential hazards is crucial. An internal security system functions as a shield, safeguarding your Mac from undesired communication triggered by other PCs or external networks. This guarantees the protection and confidentiality of your gadget. Although macOS permits specific programs and applications to connect to the internet, it is crucial to exercise control over which can and cannot go through the network defense. Hence, it is crucial to correctly set up the network security settings to safeguard the defense and anonymity of your machine.

Turning On Firewall Protection

To enable firewall protection on your Mac, follow these steps:

Navigate to Menu > Settings, and choose Connection within the side navigation.

Choose Firewall, and enable the Firewall function.

To increase protection configurations, select Preferences. Here you have various choices:

Permit only specific applications and functionalities to establish a connection. Include applications or utilities that you wish to authorize using the firewall.

Allow only essential apps and services to connect: Enable the “Block all incoming connections” setting for rigorous control.

Automatically enable pre-installed software to accept incoming data transfers. Permit macOS’s pre-installed programs to transmit via the firewall.

Automatically allow downloaded signed software to receive incoming connections: Permit digitally signed software accept connections.

Enable stealth mode: Increase the difficulty for unauthorized users and malicious programs to identify your Mac.

Tailoring Firewall Entry for Applications and Functions

Exercising control regarding which apps and utilities are able to access the online world via your firewall is crucial for safety. Nevertheless, it may be an overwhelming challenge to manually adjust firewall regulations for each particular application. To customize firewall access, follow these steps:

Open the Security Firewall settings using the Apple menu > Preferences > Connections > Firewall > Additional options.

In case the Options button is not enabled, verify that you have activated Firewall.

Select the Insert button below the services menu. Next, choose the features or programs you desire to integrate.

Once a program is installed, you have the option to to permit or prevent communications via the protection software using the directional buttons.


 Firewall settings Mac
Photo by Sigmund on Unsplash

Extra Advice to Boost Macintosh Protection

Stay Updated: Frequently update your operating system and applications to ensure you possess the newest security fixes and software issue fixes.

Establish robust, individual security codes across all user profiles and activate dual-factor verification for enhanced security.

Exercise caution when giving access to software, and give access for credible ones.

Refrain from clicking on questionable links or sharing personal details to untrusted origins.

Consistently save your valuable documents onto a portable hard drive or a reliable online storage platform.

By adhering to the following instructions and modifying the firewall settings of your Mac, you can improve the security of your device and safeguard it from possible dangers through the internet or nearby networks. Moreover, this can aid guarantee that your private information and data stay protected and secure. Remain watchful and maintain your Mac defended from unapproved entry and harmful assaults.

Maximizing Performance: Useful Hacks for Boosting Your PC Following an Upgrade

Operating a Mac offers you a fantastic experience. Certainly, everyone make an effort to maintain our Apple products in optimal shape to obtain the highest possible advantages. Nonetheless, at times mishaps take place and our technology may incur harm. We predict it to function flawlessly and productively.

While installing the latest computer software is essential for maintaining its security and speed, it can also cause surprising complications and lowered performance. Hence, it is crucial to go ahead carefully and safeguard your data before commencing any alterations. Actually, based on a survey, research shows that a substantial portion of users observed a reduction in performance in the aftermath of updating their Mac’s software.

It can be annoying, specifically if you count on your Mac for professional or personal tasks. Nevertheless, you can find various techniques you can employ to boost how your Mac performs post an update. Within this piece, we will explore the finest approaches. Thus you can acquire your Mac operating smoothly again.

Update Your Software

Ensure every software is current in the wake of a update to macOS. Programmers frequently deploy updates that resolve issues and enhance compatibility with the latest macOS update. Search for updates within the Mac App Store or by accessing the application’s website.

Maintaining your software latest contributes to enhancing the performance of your device and protection. Nevertheless, in case you continue to be unable to determine the reason your Mac is functioning slow following an upgrade. One can consider seeking expert assistance or explore some fast remedies to recover the functionality.

Clean Up Your Mac

Following the update your Apple computer, it is advisable to tidy up excess files and programs to release memory space. These may optimize productivity and rate. One can additionally utilize an application such as CleanMyMac X for scanning your Apple computer for unwanted files and software. This can additionally assist you remove software and control your launch items.

Manage Your Startup Items

Once you boot up your computer, it launches several elements, which include programs, startup items, and operating services. These things can decrease the initial boot time and overall effectiveness. One can control these objects by accessing Settings → User Profiles. Next, go in the direction of the User Accounts segment. Currently, you are able to eliminate unwanted programs that launch at startup or adjust their preferences to lessen their influence on the performance.


Maximizing Mac Performance
Photo by Angelo Pantazis on Unsplash

Check Your Storage Space

Ensure you possess sufficient available storage within the hard disk or solid-state drive. If your available storage is running out, your system can decrease in performance. A few applications could potentially not perform as expected. In order to accomplish that, you have the option to go to the About This Mac section → Storage category to determine the storage size that is currently accessible. In case you are nearing depletion with limited storage, think about removing obsolete files or shifting them to an external disk drive.

Check For Malware

Viruses can severely impact the efficiency and overall operation of your device. Additionally, it might also endanger your security. Therefore, employing trustworthy antivirus applications for the purpose of scanning your Mac for malicious software and eliminate any identified threats is suggested. Consistently checking your computer for harmful programs can assist maintain its operation seamlessly. Additionally, it safeguards your sensitive information.

Happy Working!

Wrap Up:

Ensuring your Mac is updated cannot be a bothersome or time-consuming procedure. Through the use of the helpful techniques, you can guarantee that your Mac functions efficiently. By maintaining updating your operating system in order to eliminate unused apps and files. These easy actions can cause a substantial difference in how your Mac operates. Hence, move forward and test them, and observe the distinction they have the ability to produce.

Introduction to Mac Keyboard Shortcuts

Becoming proficient in keyboard shortcuts can be a game-changer regarding improving your output using a Macintosh. Nevertheless, one can appear slightly intimidating in the initial stage. By clicking particular key sequences, you have the ability to carry out operations that usually demand a mouse or touchpad. For instance, one can utilize “Ctrl + C” to duplicate text or “Ctrl + V” for pasting it. These quick keys enable you to explore, replicate, insert, and carry out different commands swiftly and with high efficiency. Within this post, we will examine important Mac key combinations that’ll optimize your workflow. That will facilitate computing simple.

Common Shortcuts for Efficient Workflow

Slice, duplicate, insert, and cancel are basic functions in every process. Mac provides intuitive shortcuts for these operations, making them easily accessible:

Command-X: Delete the highlighted thing and reproduce it to the copy-paste buffer.
Command-C: Duplicate the chosen object onto the Clipboard.
Command-V: Insert the text from the copied data in the present file or application.
Use Shift-Command-Z for performing redo.
Apart from those, you can find multiple alternative methods to perform actions such as choosing all items, locating items, disappearing windows, making windows smaller, and additional actions. Become familiar by utilizing these time-saving techniques to optimize your regular work processes.

Rest, Exit, and Power Off, Quick Keys,Placing your Mac into sleep mode, signing out, or closing it down can be performed rapidly by utilizing the following hotkeys.

Power button: Hold to power up your PC or awaken it from standby. Press and hold a second and a half to cause your Mac to enter sleep state. Persist in holding for the purpose of coercing your Macintosh to power off.


 Mac keyboard shortcuts
Photo by Md Mahdi on Unsplash

Sleep, Log Out, and Shut Down Shortcuts

Control-Power button: Present a window prompting if you want to restart, enter sleep mode, or shut down.
Make your Mac to reboot, without asking to keep any running and unsecured records.
Explorer and Keyboard Shortcuts to Navigate Easily

Navigating through files, folders, and the system becomes seamless with the following keyboard shortcuts:

Finder and System Shortcuts for Easy Navigation

Command-E: Remove the selected disk or volume.
Command-F: Initiate a Search using Spotlight within the Finder window.
Command-I: Reveal the Details screen for a specific item.
Command-R: Display the real document of an alias that is selected. In certain applications, renew or reload the webpage.

Command–Space bar: Display or conceal the Search field.
Control–Command–Space bar: Open the Character Viewer, select emoji and other symbols.
Command-Tab: Change to the next recently accessed program in your currently running applications.
This is only a couple illustrations of the countless shortcuts accessible in the macOS operating system. Acquiring and integrating such techniques within your daily habits can markedly increase your productivity. That will in addition save your time.

Conclusion

Mac hotkeys are efficient resources that empower you to achieve tasks swiftly and smoothly. Through the use of shortcuts for frequently performed tasks, performing sleep mode, logging out, and navigating the file explorer and operating system, you can optimize your work process and enhance your output. Form a regular practice for practicing and executing these time-saving techniques. Shortly, you will discover yourself flawlessly maneuvering your Mac smoothly. Explore the wide range of efficient routes and customize them to match your unique preferences. By mastering of key combinations, you can access the complete capability with your Mac. You will enhance the experience with your computer and extract the most value from it.

Introduction: Customize Your Mac by selecting a Customized Wallpaper

Personalizing your Computer’s wallpaper lets you insert a unique style to your PC. Additionally, it contributes to a visually pleasing office space. If you like awe-inspiring nature scenes, stimulating artistic creations, or personal nostalgic moments. Modifying the desktop image is a convenient way to make unique your experience with Mac. In this tutorial, we will guide you step by step the procedure of personalizing the screen picture on your Macintosh. Gradually, we plan to describe all the particulars.

Choosing a Desktop Picture: Apple’s Selection or Personal Images

In terms of to deciding on a computer screen image, you have multiple to select from. Apple offers a varied assortment of background images and hues for you to investigate. In another option, one can utilize your personal images to generate a distinctive and customized screen background. Let’s delve into the different choices available:

Apple’s Collection

Dynamic Wallpapers: Enjoy the beauty of background images that modify all day long depending on your whereabouts or timezone.
Light & Dark Wallpapers: Experience wallpapers that effortlessly shift from bright to dark themes. This wallpaper adjust to your immediate environment, supplying a visually delightful sensation.
Pictures: Select from numerous stationary backgrounds that stay constant over the course of the day.
Colors: Use single-color backdrops for your screen, featuring different samples to cater to your choices.
Your Own Photos:

Add Folder/Add Photo Album: Personalize your desktop using personal photos from your personal collection. Arrange your images into directories or collections and opt for them as the wallpaper image.
Step-by-Step Guide: The steps to Modify the Background Image on your Apple computer

Follow these simple steps to change your desktop picture on a Mac

Tap on the options menu in the top left area on your display.
Within the Settings pane, select “Desktop and Background.”
Select the “Main” tab unless it’s previously picked.
On the left side, you’ll find various categories like Dynamic Wallpapers, Illuminated & Dim Wallpapers, Graphics, and Shades. Tap on the topic that fascinates you individually.
Look through the choices at hand and select the miniature of the photograph you intend to designate as your computer wallpaper. Next, choose the choice that says “Use as Desktop Background” to set the selected image as the new backdrop for your screen.
To utilize personal photos, select “Create Folder” or “New Photo Album” and choose the chosen folder or album which includes your pictures.
In case you possess a picture file on your computer’s desktop or within a directory, you have the ability to move and place the file onto the compact representation at the highest point of the background settings.
Once you have made your selection the desktop picture you like, close the window for System Preferences. The new desktop image will be implemented right away.

Customize desktop wallpaper on Mac
Photo by alleksana: https://www.pexels.com/photo/a-person-writing-on-a-journal-4185964/

If you want to further customize your desktop picture, you can explore additional options and settings

Auto-Rotate: Enable the Automatic Rotation feature to experience periodic changes in your desktop pictures or colors. Personalize the schedule or select random transitions for a lively desktop interface.
Picture Arrangement: Modify the placement and size of your computer wallpaper using the selections offered in the overlay menu at the highest part of Wallpaper options. Select from Cover Screen, Adjust to Screen, Extend to Take up Screen, Centralize, and additional options.
To optimize your viewing pleasure, take into account utilizing crisp and detailed photographs, like dimensions of 1024 x 768 pixels or higher. These assist make sure your computer screen image looks sharp and colorful.
Using Photos App: In case you possess an image in the Photos application that you wish to use as your desktop background, access the Photos app, opt for the selected photograph, select the Share option from the toolbar.

Conclusion

Modifying the background image on your Apple computer enables you to add your personal touch and fashion within your PC setup. Having a broad selection of choices, including the collection from Apple and your personal pictures, you can effortlessly produce a computer screen background that mirrors your personal tastes. It provides pleasure on every occasion you make use of your Apple computer. Observe the detailed instructions available in this publication to alter the appearance of your Mac’s desktop with ease. Embrace the potential of customization and tailor your Mac genuinely yours wholly.

Overview for Notification Options on Apple’s Mac operating system

Notification preferences on macOS give you the ability to personalize and manage the appearance of notifications and handled. Through accessing the Notification options, you are able to indicate the moments you wish to avoid notifications. One can additionally modify alert preferences and tailor configurations for single applications. Within this post, we are going to examine different selections offered under Notifications options. I will additionally assist you about the steps to become proficient in your Mac’s message system.

Managing Notification Center Preferences

Alert Center serves as a main hub for showing recent alerts on your Apple device. In Notifications options, you can modify its functionality and visual appearance. One has the ability to display preview in messages. Indicate whether notifications can be authorized whenever the screen is in sleep mode or locked. And manage notices while screen casting or transmitting. Through comprehension and modifying these choices, you can customize the notification center to meet your requirements and options.

Customizing Application Notifications

One important factors in managing alerts on your PC while modifying configurations for particular programs. Notification preferences permit you to activate or deactivate alerts for particular applications. One can additionally select a notification style, like banners or messages, and enable time-dependent warnings. Moreover, there is the choice to display notifications on the screen when locked, application icons with badges to show the notification count, and emit notification sounds. By personalizing the configuration options for every application, you are able to precise control concerning the notifications you get. It is possible to furthermore manipulate the method of their display.


Notifications settings on Mac
Photo by charlesdeluvio on Unsplash

Tweaking Alert Classification and Conduct

Notification preferences also offer choices for regulating how notifications are categorized in the Notification Center. You can choose to organize notifications by application or website automatically, with the recently received notification listed first. In another option, it is possible to deactivate grouping totally. Comprehending and adjusting notification grouping enables you to more effectively arrange and handle the notifications that are sent to you. This helps the process easier for locating meaningful content and lessen excessive chaos.

Conclusion

Alert preferences for macOS present a wide to customize settings for handling disruptions. These choices also improve your overall experience. Through mastering the preference configurations, you can adjust how you receive notifications. One can additionally handle application alerts efficiently and enhance the functioning of the notification hub. Make use of the functionalities and options covered in this post to generate a tailored notification mechanism that fits your work process. This will aid you keep your attention.

Prelude: Exposing the Unpredicted Hopes during the N.B.A. Selection Event

The following part prepares the groundwork for the piece by showcasing the fascination of unexpected aspirations that progress in the early hours during the N.B.A. Selection. It captures the core of the changing and uncertain character of the recruitment procedure. Captivating readers into the fascinating accounts that are yet to be told.

Exploring New Routes: Accounts of Aspiring Athletes and Their Path

In this place, we explore into the motivating tales of hopeful athletes and their voyage culminating in the basketball draft of the National Basketball Association. We emphasize the hurdles, selflessness, and devotion that characterize their journeys. The narratives reveal the strength and perseverance demonstrated by these individuals. While they chase their aspirations in the basketball arena, clearly they have motivation and determination to attain their goals.

Overturning Expectations: Unforeseen Decisions that Changed Perceptions

The following part centers around the unexpected selections in the N.B.A. Draft that demolished expectations and changed assumptions. We investigate the instances when unnoticed candidates or out-of-the-box decisions gained recognition. These surprising choices showcase the attractiveness of the selection process and the chance for secret jewels to have a long-lasting effect.


N.B.A. Draft
Photo by Markus Spiske on Unsplash


Life-changing Moments: Unpredicted Ambitions Fulfilled at the National Basketball Association Draft

Within this last part, we present the revolutionary moments when unexpected aspirations are achieved during the N.B.A. Draft. We explore the moods, observances, and sheer elation undergone by competitors when their names are spoken. They start within their professional basketball journeys. This time act as proof of the strength of aspirations and the result of long periods of effort and willpower.

Conclusion

The National Basketball Association Draft provides a setting where unforeseeable ambitions become a reality. It exceeds anticipations and creates an unforgettable symbol across the basketball landscape. This is a festivity of the strength of humanity, tenacity, and the possibility of achieving greatness that exists in each aspiring player. The enchantment of the selection enthralls supporters and prompts us of the boundless opportunities that can reveal when desires are chased with zeal and loyalty.