Siri Remote for Apple TV enables users to seamlessly manipulate their TV and streaming device with simple commands. Siri Remote configuration allows for basic control of TV functions such as turning it on/off, changing inputs, and adjusting volume., Arranging these controls enables an interruption-free TV and Apple TV experience.
Siri Remote configuration for TV power and input access
To enable your Siri Remote to turn on and off your TV and change its input to Apple TV, follow these steps:
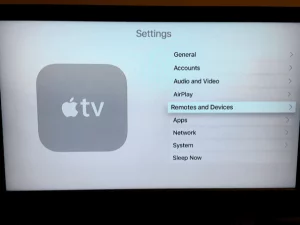
To reach the Settings menu on your Apple TV, proceed as follows.
Access the ‘Remote & Devices’ menu in the settings.,
Find the ‘On TV with Remote’ feature and activate it.
Activating this setting enables you to power on your TV using any button on the Siri Remote. The Apple TV will direct the signal to activate your TV and set the proper input. In this manner, the Siri Remote functions by turning off the TV when the Apple TV is in sleep or power-off modes.
Image by:https://www.iospirit.com/
Siri Remote enables volume adjustments on televisions.
Siri Remote functionality extends beyond simple power and input management to include volume adjustment. To set up this feature, follow these steps:
Find the Settings app on your television’s Apple TV.
Access ‘Remotes and Devices,’ then pick ‘Volume Control’.
Select ‘Automatic’ for volume regulation.
Activating this function allows the Siri Remote to control TV volume seamlessly. Navigating to the volume settings on the remote and making changes is a straightforward process.
Image by:https://www.guidingtech.com/
Compatibility and Additional Information
Some TV brands or devices might not support these Siri Remote settings. To find more detailed guidance on compatibility and troubleshooting, navigate to the Apple Support post labeled ‘Apple TV Remote and Siri Remote functionality’.
Individualized setup of TV and receiver may be necessary for proper Siri Remote functioning. Accessing the maker’s support resources or the user manual can offer customized instructions matching your TV make and model.
Conclusion
The Siri Remote grants users comprehensive mastery over their Apple TV experience, encompassing volume, input, and power controls. Apple TV settings offer practical tips for unlocking full Siri Remote potential. Happy viewing!
Have you encountered the frustrating “printer offline” error when you were all set to print an important document? Don’t worry; you’re not alone. Printer offline issues are quite common, but the good news is that they can be easily resolved with a few simple steps. In this guide, we’ll walk you through the troubleshooting process to get your printer back online and printing smoothly.
Restart Your Computer and Printer One of the easiest and most effective solutions is to restart both your computer and printer. Restarting both devices will refresh their connection and clear any temporary glitches. Always ensure that your printer is turned on and not displaying any error messages before proceeding.
Set Printer as Default If your print jobs fail, it’s possible that your printer is not set as the default printer. Follow these steps to set your printer as the default:
For Windows 10/11:
Go to the Start Menu > Settings > Devices/Bluetooth and Devices > Printers and Scanners.
Select your printer and click “Manage.”
Choose “Set as default.”
For MacOS:
Click the Apple menu and select “System Preferences.”
Choose “Printers & Scanners.”
Right-click on your printer and select “Set as default.”
Alternatively, you can select the default printer from the menu at the bottom or choose “Last printer used” as the default.
Image by:https://www.pttrns.com/
Check Cable and Wireless Connections Printer offline issues can also be caused by faulty cables or unstable wireless connections. Check the following:
Ensure that the cables connecting your printer to the computer have no physical damage and are securely plugged in on both ends.
If your printer is connected via Wi-Fi, test the cable connection first to rule out any issues with your wireless network.
Verify that your printer’s network settings show that it is connected to the wireless network.
Image by:https://www.pttrns.com/
Check If the Printer Is in Offline Mode Sometimes, printers may be set to offline mode, preventing them from functioning. Follow these steps to turn off offline mode:
For Windows 10/11:
Click the Start Menu > Settings > Devices (Bluetooth and Devices for Windows 11) > Printers and Scanners.
Select your printer and click “Open queue.”
Ensure that “Use printer Offline” is not selected.
For MacOS:
Click the Apple icon and select “System Preferences.”
Choose “Printers & Scanners.”
Select the printer and click “Open Print queue.”
Click “Resume” if the printing is paused.
Image by:https://www.pttrns.com/
Clear the Print Queue and Restart Print Spooler Stuck print jobs in the queue can also cause the printer to go offline. To clear the print queue and restart the print spooler:
For Windows 10/11:
Type “Command” in the search bar next to the Start menu.
Right-click on it and select “Run as administrator.”
Type “net stop spooler” and press Enter.
Type “del %systemroot%\System32\spool\printers* /Q” and press Enter.
Type “net start spooler” and press Enter.
For MacOS:
Click the Apple Menu and select “System Preferences.”
Choose “Printers and Scanners.”
Select your printer on the left side and click “Open print queue.
Image by:https://www.pttrns.com/
Clear out the print jobs by clicking the X button on the right side.
Image by:https://www.pttrns.com/
Remove and Re-add Printer If the printer still appears offline, try removing and reinstalling it:
For Windows 10/11:
Click the Start Menu > Settings > Devices (Bluetooth and Devices for Windows 11) > Printers and Scanners.
Select the printer and click “Remove Device.”
If the printer reappears after removal, go to Start menu > Settings > Apps.
Find the printer driver, click on it, and select “Uninstall.”
To re-install the printer, go back to Start Menu > Settings > Devices/Bluetooth and Devices > Printers & Scanners.
Select “Add a printer or scanner,” and your computer should automatically scan for connected printers.
If the printer doesn’t appear, choose “The printer that I want isn’t listed” and follow the appropriate steps for your printer type.
Run Software Updates Outdated operating systems or missing patches can sometimes lead to printer offline issues. Ensure your operating system is up to date:
For Windows 10/11:
Type “Windows update” in the Start menu search box.
Select “Windows update settings.”
Click “Check for updates.”
Check for optional updates for your printer software if needed.
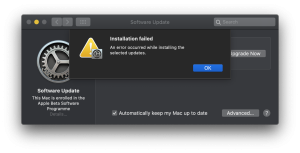
For MacOS:
Go to the Apple menu and select “System Preferences” or “System settings” depending on the version.
Select “Software Update” to run the update.
Follow the on-screen instructions to install any available updates.
By following these troubleshooting steps, you should be able to resolve printer offline issues and get your printer back online. Remember to check for physical connections, set the printer as the default, clear the print queue, and keep your operating system up to date. Happy printing!
Having a stable internet connection is crucial for your Mac to function optimally. However, there may be times when you encounter connectivity issues. Don’t worry! In this comprehensive troubleshooting guide, we’ll walk you through various steps to resolve common internet connection problems on your Mac.
Wait and Retry:
Before diving into complex troubleshooting, it’s essential to give it a moment and try again. Sometimes, the issue could be temporary and related to your Internet Service Provider (ISP). If problems persist, it’s time to take further action.
image by:https://www.anyrecover.com/
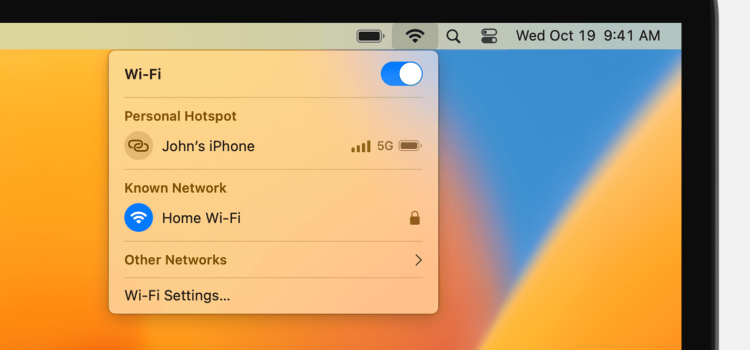
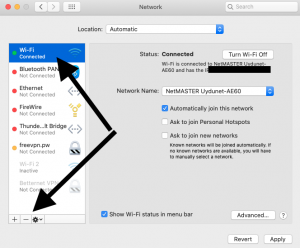
Check Network Connection Status:
Open the Network settings on your Mac and examine the status of your network connection services, such as Ethernet or Wi-Fi. A green indicator signifies an active and connected service, while yellow indicates an active but unconnected service. If the indicator is red, it means the service has not been set up correctly.
image by:https://austinmacworks.com/
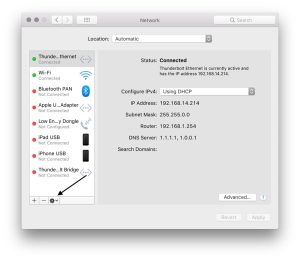
Compare Network Settings with ISP Recommendations:
Ensure your network settings align with the recommendations provided by your Internet Service Provider. Mismatched settings can cause connection problems. Verify that you have entered the latest and accurate information in the appropriate fields to establish a smooth connection.
Image by:https://thesweetsetup.com/
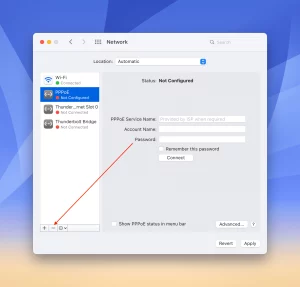
Troubleshooting PPPoE Connections:
If you are using PPPoE (Point-to-Point Protocol over Ethernet), check the PPPoE Service Name field in Network settings. It should ideally be left blank. However, some ISPs may require specific information in this field. Double-check with your ISP to ensure you have the correct settings for a successful PPPoE connection.
Image by:https://appletoolbox.com/
Conclusion:
By following the steps outlined in this troubleshooting guide, you can efficiently resolve internet connection issues on your Mac. Remember, sometimes the problem might be temporary and related to your ISP, so it’s good to be patient and try again later. If problems persist, the solutions provided here will help you identify and rectify the issue. Now, you can enjoy a stable and reliable internet connection on your Mac once more! If you still face problems, don’t hesitate to reach out to your ISP for further assistance. Stay connected and stay productive!
Rather than immediately immersing ourselves in all the troubleshooting recommendations, it’s advantageous to grasp why we encounter particular issues. So, let’s take a moment to look at why your trackpad is not working.
Check for Damage and Dirt
Before delving into the expert advice for fixing issues, let’s initiate by prioritizing the essential elements beforehand. Should your trackpad be harmed as a result of spilled liquids or an unintended drop, you’ll need a trip to your local official Apple repair center (or the Genius Bar). In contrast, uncomplicated dirt and oily fingerprints can create obstacles for the Mac’s trackpad in recognizing and comprehending gestures. Take a moment to clean your trackpad to determine if that resolves the problems you’re encountering.
Image by:https://www.maketecheasier.com/
Conflicting Peripherals
Occasionally, other connected devices like a Bluetooth mouse or USB keyboard can interfere with your trackpad. Try removing these devices and restarting your Mac to test if your trackpad will resume working.
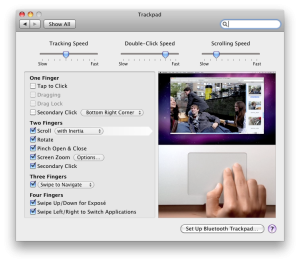
Mac Touchpad Not Clicking? Disable Force Click
Occasionally, our trackpads completely cease functioning, conversely, at times we experience a loss of clicking ability. In case you can still navigate the cursor, but your MacBook trackpad is not clicking. It’s possible that this single tip is all you require to resolve this problem. for resolving this issue that is severely impacting your productivity. Acquire knowledge on personalizing and fine-tuning your trackpad configurations, which includes activating force click.
Image by:https://apple.stackexchange.com/
Solved: MacBook Touchpad Not Working
Check for software updates: Updating your Mac regularly can help fix multiple software issues. Acquire the knowledge of how to verify for updates Additionally, adhere to the instructions displayed on your screen.
Image by:https://www.maketecheasier.com/
Run Maintenance Scripts: Running maintenance scripts on your Mac keeps your device running smoothly and glitch-free. Learn how to run maintenance scripts using CleanMyMac X.
Reset your SMC: Resetting your System Management Controller (SMC) can solve trackpad issues. Acquire knowledge on how to reset SMC for Intel-based Macs including M1 Macs.
Reset NVRAM or PRAM: In case the SMC reset proved to be unsuccessful, try resetting both of these memory components. Acquire knowledge on how to reset PRAM for Mac computers with Intel architecture.
Reset your trackpad: Resetting trackpad property files can possibly resolve the issue.
image by;https://superuser.com/
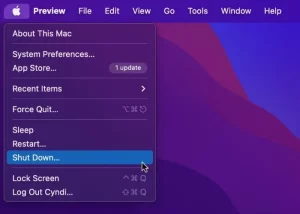
Restart your Mac: A quick restart can solve many errors and glitches, including issues like the trackpad not working on a Mac. Try restarting your Mac using the primary Apple menu to ascertain whether or not this fixes any trackpad-related difficulties.
Image by:https://www.maketecheasier.com/
Run Diagnostics
In case you have attempted all the solutions provided but are still wondering why your touchpad is not functioning, attempt running Apple Diagnostics as a means of detecting any underlying hardware issues. Acquire knowledge on how to execute Apple Diagnostics on both Intel-based and M1-powered Mac machines.
I acknowledge the limitations you perceive. when your trackpad is not working. We trust that these recommendations have guided you towards fixing the issue and give you the needed guidelines on what to do if the problem ever appears.
As the system administrator for your organization, utilize Mobile Device Management (MDM) to effectively handle updates for your Mac deployment. macOS Big Sur and later versions Introduce alternative methods for managing updates on the macOS operating system., offering more control to administrators while replacing options from earlier macOS versions.
In the past, macOS Catalina and earlier allowed custom configuration of a software update server URL to control the updates offered to clients. Moreover, the softwareupdate command was employed to disregard particular updates. Nonetheless, macOS Big Sur and subsequent releases supersede these techniques with MDM restrictions that provide the option to postpone updates for as long as 90 days.
Managing Update Delays:
To configure delayed software updates for macOS with MDM, The Restrictions payload can be utilized to achieve this. With macOS Big Sur and later, you can also delay updates for apps like Safari. By default, updates are delayed for 30 days when these options are enabled, Moreover, you have the option to stretch this duration up to as long as 90 days. After the delay period is over, The updates will be sent to macOS clients without manual intervention.
Image by:https://www.miradore.com/
Installing Updates on Demand:
In situations where updates must be deployed during a delay, Employing MDM commands is beneficial. These commands allow you to download and install specific updates on demand without altering the delay settings. With macOS Big Sur, new options provide even more control over installation actions.
Using MDM commands, instructing macOS clients to download updates inconspicuously is achievable, install previously downloaded updates. You can also provide a default instruction allowing the client to react accordingly considering its current state. For updates requiring a restart, there is a command available for enforcing a macOS restart without any need for user involvement. Notably, In macOS Monterey, there is now a choice to indicate how many prompts a device should display prior to making updates compulsory.
Image by:https://support.apple.com
Managing Client Settings:
The Software Update payload gives macOS clients more options for managing their systems. These options include controlling whether macOS clients check for and install updates automatically, It is possible to enable clients to install pre-release software, and additional features. Furthermore, this payload empowers you to specify client options and prohibit end users from editing the preferences.
Troubleshooting Mac Updates:
In spite of meticulous management, there can be situations where Mac devices come across problems after an update. If your Mac won’t start or restart after upgrading macOS to newer versions, try the following troubleshooting tips:
Inspect whether the issue lies with the power cord or power socket. Verify the power outlet’s functionality by inserting another electronic gadget into it. Examine the effectiveness of your power cable by using it with a working MacBook.
Activate your Mac by pressing and keeping the power button pressed for a period of 10 seconds. As an alternative, attempt holding down fn + ctrl + Command while simultaneously pressing the power button to see if your Mac boots up.
Image by:https://www.macworld.com/
If you recently upgraded your Mac’s RAM, attempt to remove the newly added RAM module and verify if your Mac starts properly.
Give some thought to performing a reset on your Mac’s System Management Controller (SMC). The procedures differ based on whether your Mac possesses a detachable or fixed battery.
Should the issue persist, seek assistance from either Apple Support or a licensed center for repairing Apple products for any additional aid needed.
Remember, troubleshooting serious hardware issues should be handled by professionals to avoid further damage.
Millions of Mac users trust and prefer Safari In widespread use by countless Mac users internationally At times, users may face difficulties with Safari’s inability to load webpages, freezing up, unexpectedly closing down, or not performing as anticipated. Should you come across any of these challenges, rest assured; we possess the necessary solutions to restore Safari’s functionality.
Restart the Page or Force Quit Safari
When encountering a webpage that is not loading or freezing, the primary step is to simply refresh the page. Simply go to the menu bar, click on “View,” and then select “Reload Page” or use the keyboard shortcut Command-R. In case the problem continues, consider closing Safari by pressing the red close button or pressing Option-Command-Esc to force quit if necessary. Afterwards, restart Safari and give loading the page another try. and try loading the page once more.
Install Software Updates and Reboot Your Mac
Maintaining an updated macOS is vital for achieving optimal Safari performance. for optimal Safari performance. Verify that your Mac has the most recent updates installed, including any available Safari updates. After installing updates, power cycle your Mac to make sure that all modifications come into effect. Some important background updates may only be applied after a system restart.
Image by;https://macreports.com/
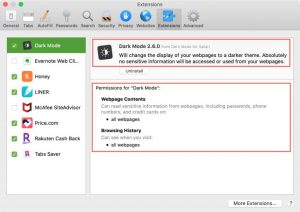
Verify Safari Extensions and Install the New Version
Enhancing Safari’s functionality is possible through extensions, nevertheless, they can also create complications. In order to temporarily disable every extension, access the menu bar at the top of your screen and locate “Safari.” Next, choose Preferences > Extensions. To proceed further, simply deselect each extension by unticking their respective boxes. If the issue disappears, that suggests an extension might be causing the problem. Update the problematic extension to its latest version or remove it altogether.
Image by:https://www.idownloadblog.com/
Give it a go with an Anonymous Window and Erase Website History
At times, conflicts can occur due to website data including cookies and caches. Try viewing the problematic webpage in a private window by selecting “File” and then “New Private Window” or employing the convenient keyboard combination of Shift-Command-N. Assuming that the website appears without issues in a private browsing session, proceed to clear the website’s data. Head to Safari preferences and locate the section named “Privacy.” From there, go to “Manage Website Data.” Delete any data linked to the impacted website. Afterward, give it another try by opening it in a regular Safari window.
Image by:https://macpaw.com/
Functionality issues may occur if certain Safari preferences do not match with specific websites, leading to functionality issues. Access Safari preferences and examine the configurations located in sections such as “Websites,” “Privacy,” and “Security.” Confirm that cross-site tracking, JavaScript functionality, as well as any other applicable selections, are appropriately activated or deactivated according to your desired website access.
If you’re using iCloud+ with the Private Relay feature, it may interfere with certain websites. For verification, access the menu bar, opt for “View,” and click on “Reload and Display IP Address.” Should the problem vanish upon deactivating Private Relay, take into account using Safari without it exclusively for those specific websites.
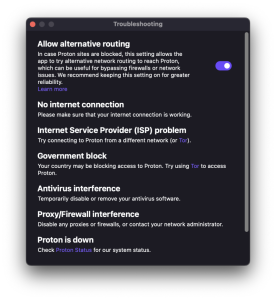
Inspect for any potential interference from a VPN or security software
Virtual Private Networks (VPNs) and other security software There are situations where Safari’s functionality might be impacted. In case you possess such software, Temporarily turn off the software and verify if Safari functions properly. If it does, contact the software provider for troubleshooting steps or consider using Safari without the software’s interference.
Image by:https://protonvpn.com/
Check Network Parameters and Reset if Needed
Possible alternatives: Other phrases to consider:. Check if Safari is functional using an alternate web browser or device on the identical network. In case the problem only occurs with Safari on your Mac, attempt to reset your network settings by configuring a new network location
In case the problem persists, contact the Website Developer if the Issue Persists
In case none of the previous solutions fix the problem and you experience it exclusively on certain websites, the problem may lie with the website itself. Contact the website developer or support team To seek further assistance and notify them about a specific concern, consider contacting either the website’s developer or their support team.
Image by;https://macreports.com/
Conclusion
Safari is a robust and credible browsing application, but occasional glitches can occur. By implementing the suggested troubleshooting solutions, you can resolve most issues and enjoy a smooth browsing experience on your Mac. Make sure you regularly update both your macOS and Safari for the best browsing experience in terms of performance and security For a smooth, secure internet experience, make sure you prioritize optimal performance and security.
Introduction: Understanding Disk Utility and its Benefits
macOS comes with a pre-installed powerful program called Disk Utility, efficiently managing and maintaining storage devices is made possible for users through this utility. Managing disks is one of its key features Moreover, it can handle numerous different tasks. Tasks encompass disk formatting, Included in the tasks is the creation of disk images, and, most importantly, ‘Running First Aid’ is a key step for repairing disks. Whilst First Aid can address several usual concerns, backing up your data is essential. Consider replacing the disk if Disk Utility warns of an upcoming failure.
Image by:https://support.apple.com/
To initiate the repair process with First Aid, follow these steps:
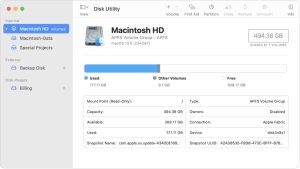
Launch Disk Utility: Open Disk Utility from the Applications > Utilities folder or search for it using the Launchpad.
Show All Devices: Selecting “Show All Devices” from the menu bar’s “View” dropdown will display all volumes and containers on your storage device to view all volumes and containers on your storage device.
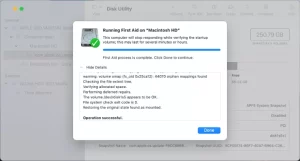
Running First Aid on Volumes: Pick a volume from the sidebar and proceed to click on the “First Aid” button. To confirm the action, simply click on “Run” and proceed with following the instructions that appear on-screen. After the process finishes, choose “Completed.”
Proceed to Containers: Follow the exact steps for every container mentioned in the sidebar.
Finally, Repair the Storage Device: Pick the storage device itself from the sidebar and initiate First Aid on it.
Image by:https://mackeeper.com/
Handling Errors: Dealing with Overlapped Extent Allocation Issues
Disk Utility could detect errors indicating overlapped extent allocation, implying that multiple files are taking up identical disk space, which may result in file corruption. To address this:
Check Affected Files: Check Affected Files: Reviewing the inventory of impacted files enlisted in the initial Medical Assistance document. Locate the DamagedFiles folder at the highest level of your disk for aliases of these files.
Replace or Examine Files: When possible, opt to replace or recreate the file.. In case there is critical data, verify that the data remains uncorrupted by opening and inspecting.
When Repairs Fail: Backing Up Data and Exploring Further Options
There are instances when Disk Utility cannot fix the disk or partition. A failed First Aid process report might be received by you as well. In such situations:
Backup Data: Give utmost importance to ensuring that you back up as much of your valuable datanby making it a priority. to prevent data loss.
Image by:https://www.stellarinfo.com/
Reformat and Reinstall: Begin with executing a formatting process on the disk drive in order to potentially fix any underlying problems., reinstall macOS, and then restore your backed-up data to potentially resolve the issue.
Consider Replacement: Should the disk persist in experiencing issues or fail to be fixed, it could potentially have physical damage and require a replacement.
Conclusion
Disk Utility’s First Aid feature Mac users can greatly benefit from using this indispensable tool to discover and resolve errors associated with their storage devices. By simply following the detailed guide and learning how to handle diverse issues, you can be certain that your storage device maintains its optimal state, Your storage device’s ideal performance can be guaranteed by utilizing this approach. This promotes smooth operation maintaining the trustworthiness of data. Prioritize backing up your data every time before trying any repairs or replacements as a precautionary measure against potential data loss. By having Disk Utility available to you, this resource offers a trustworthy solution for keeping your storage devices in good health and operating efficiently on macOS.
The powerful accessibility feature known as Voice Control providing the capability to interact with your Mac by just using your voice. It eliminates the need for traditional input devices. If you face difficulties with mobility or desire a hands-free experience, Voice Control unleashes numerous exciting possibilities. In the following instructions, we’ll explain the process of activating Voice Control and utilizing it on your Mac and accessing its diverse capabilities.
Turning On Voice Control for Your Mac
Prior to utilizing Voice Control, confirm that your operating system is macOS Catalina 10.15 or later. To turn on Voice Control, follow these steps:
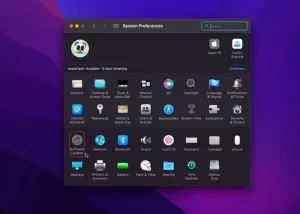
Click on the Apple menu () situated at the top left-hand side of your screen.
Select “System Preferences,” and then click on “Accessibility.”
In the Accessibility settings, Identify and choose “Voice Control.”
Activate Voice Control by switching the toggle to “On”.
When you first activate Voice Control, your Mac might initiate a singular download from Apple. Once activated, a visual representation of the chosen microphone will be visible on screen in Voice Control preferences.
To pause Voice Control temporarily, simply say “Send it to sleep,” or select “Sleep.” To resume Voice Control, say or click “Wake up.”
Image by:https://support.apple.com/
Navigating and Interacting with Voice Control
Now that Voice Control is activated, let’s explore some basic navigation commands:
Open Applications: Launch applications by stating their names, like “Open Pages” or “Open Mail.”
Creating Documents: Upon opening the app,, employ phrases like ‘Selecting New Document’ or ‘Commence with a fresh message.’
Performing Actions: Execute specific actions within apps, such as saving a document with “Save document” or addressing a new email with “John Appleseed.”
System Commands: Issue system-wide commands like “Click Apple menu” and “Click Restart” to restart your Mac.
The recognition capability of Voice Control extends to apps, labels, controls, and various on-screen elements, facilitating effortless movement through interfaces.
Image by:https://support.apple.com/
Enhancing Control with Number and Grid Overlays
Enhance your interaction speed with clickable items by utilizing number overlays. Here’s how you can enable and use them:
Say “Show numbers” to activate number overlays on clickable elements.
You can select the item by speaking its number, after which Voice Control will proceed with a click.
To achieve seamless interaction, number overlays can be implemented in more intricate interfaces like web pages, Number overlays enable seamless interaction For example, say “Find Apple store locations close to me.,” then select a result with “Display contact information..
Furthermore, Voice Control will display numbers in menus and parts where it’s important to differentiate similar names.
You can also use grid overlays for elements not recognized as clickable by Voice Control:
Say “Show grid” to display a numbered grid on your screen.
Utilize the numerical coordinates of the grid to partition the designated space and select items.
Say “Click” and the grid number to interact with the selected item.
Grid overlays prove to be extremely beneficial when particular aspects go unnoticed by the Voice Control feature.
Image by:https://support.apple.com/
Efficient Text Entry with Dictation
When working with documents, emails, or any text field, dictation can be a game-changer:
Keep speaking without interruption as Voice Control transforms your speech into written text., and changes your spoken words into written text using Voice Control.
Use commands like “Move up two sentences,” “Select previous word,” or “Format as bold” for easy text manipulation.
When inserting punctuation marks, symbols, or emojis, simply verbalize their names, like “question mark” or “happy emoji.”
Recognizing contextual cues is something that Voice Control can do, You can effortlessly switch between text dictation and commands. As an illustration, verbally compose a birthday message in Messages and transmit it by selecting Send. “Sending you warmest wishes on your special day. Simply click on Send.”
Image by:https://www.maciverse.com/
Creating Custom Voice Commands
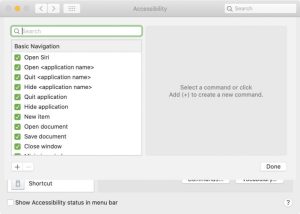
Voice Control allows you to create your own personalized commands for specific actions:
Open Voice Control preferences.
To see the full range of available commands, simply click on “Commands”.
Add a new command by clicking the (+) button or saying “Click add.”
Articulate the command by indicating the statement you desire to express, what app it applies to, and the function it executes.
Take complete charge of your Mac using custom commands simplifying repetitive tasks like never before.
Image by:https://www.idownloadblog.com/
Building Your Personalized Dictation Vocabulary
You can also enhance dictation by adding words or phrases to your personal vocabulary:
Open Voice Control preferences.
Click on “Vocabulary” to access your list of recognized words.
Add new words or phrases that you want to be recognized when spoken.
Voice Control can accurately transcribe your speech into text through the customization of your vocabulary, Even technical terminology or industry-specific jargon is effortlessly handled.
Conclusion
With Voice Control on your Mac, Access everything with ease through the power of speech. Beginning with basic navigation and extending to elaborate interactions, Voice Control enhances your overall user experience. Harness the power of its numerous features to enhance task efficiency and Indulge in a Mac environment that offers accessibility and improved efficiency. Bear in memory that Voice Control safeguards your personal information, resulting in it being perceived as a reliable and intuitive option for users who wish to navigate computers without using their hands.
If you are a Mac user, you might have heard the name “Gatekeeper” at least once in your life. Nonetheless, many Mac users lack knowledge regarding its true nature or functions. As indicated by its name, Gatekeeper functions as an app security guard. But before diving into the details about Gatekeeper, let’s understand what file quarantine means in Mac devices.
File Quarantine in macOS
Quarantine of apps, files or documents downloaded from the internet involves assigning tags. The assigned tag, which is alternatively referred to as the quarantine flag, is given to the files by the downloading application. Web browsers are part of this Mail apps also fall under this Notwithstanding that, it is not compulsory to mark files, plus, numerous third-party app stores and installers do not mark the files they download.
The primary objective of marking files aims to provide information to the device regarding the source of downloaded files, emphasizing potential harm. When an individual tries to access a quarantined file, an advisory message is given by the system regarding the unverified source of the file. User is required to acknowledge before opening the file on condition that the user accepts the warning
Introduced in 2007, file quarantine came alongside the update of OS X 10.5 Leopard. At the start, using only file quarantine wasn’t particularly effective, due to users being simply warned, and after confirming it, the files remained accessible. However, with subsequent updates, more features were introduced that utilized the file quarantine function, and among these features was Gatekeeper.
I’m curious about the functionality of macOS Gatekeeper on a Mac. and What Does It Do on Mac?
The OS X 10.8 Mountain Lion update brought about the introduction of Gatekeeper. On Mac devices, users can determine the specific categories of apps that are allowed to be installed. To illustrate, individuals are able to select between installing applications via the Mac App Store or obtaining them through third-party channels. There is a choice for users to either limit app installation solely to the Mac App Store or also involve identified developers.
The activation of Gatekeeper occurs when apps are authorized for download outside the Mac App Store. When downloading an app, plug-in, or installer package from a non-store source if someone attempts to launch it. There are two major settings for Gatekeeper:
1 Allow apps only via the official App Store only
2 Allow apps from the App Store and identified developers
In previous releases of macOS, “Allow apps from anywhere” was a setting that existed.
By default, the setting is usually “Allow apps from the App Store and identified developers.” Mac App Store apps are deemed safer because they go through rigorous testing conducted by Apple to detect malware and other harmful elements prior to being approved.
In contrast, this is inaccurate concerning apps created by external developers. Running possibly dangerous applications on their devices makes Apple cautious. To check third-party apps, the applications must have a valid code signature. To adhere to this condition, it is mandatory that the apps are endorsed with the developer’s identification and equipped with a certificate granted by Apple that specifically caters to reputable developers.
Once Mac devices open third-party apps, Verification of the app’s code signature by Gatekeeper results in execution being granted only when all details match. If Gatekeeper is unsuccessful in verifying the details, the system will display a cautionary message. As per the warning message, the app originates from an unreliable source therefore installation is not allowed.
Apple has now introduced notarization, giving users increased assurance, installing third-party applications can now evoke greater user confidence. Notarization is the process by which Apple checks an app for known malicious threats and verifies the code signature. If apps pass the notarization process, a notarized emblem is granted to them, assuring users of their safety when distributed.
Mac Notarization: Essential Information for Mac Administrators
To guarantee the absence of known threats, Mac notarization ensures that apps and other executables are safe. When initiating third-party apps, plug-ins, extensions, and similar software on a Mac, The notarization badge or ticket is validated by Gatekeeper. In case it exists, The app/file can be instantly opened by Gatekeeper with no warning messages displayed. Should the file be without a notarization ticket, Gatekeeper checks if the code signature maintains its integrity.
To configure Gatekeeper settings, follow these steps:
Access System Preferences → Privacy & Security is found under System Preferences. → Security & Privacy.
In the General tab, mouse over or press on the lock symbol at the bottom left part and input the required admin authentication.
Select an option from “Allow apps downloaded from: App Store” or “App Store and identified developers.”
How to Bypass Gatekeeper?
Although it is not recommended, Multiple ways exist to go around Gatekeeper. Bypassing Gatekeeper allows users to install apps downloaded from anywhere, and not even a warning message will be displayed if Gatekeeper is switched off.
Image by:https://www.hexnode.com/
1. Bypass Gatekeeper using right-click or control-click:
In case you prefer opening an app without disabling Gatekeeper, opening the app through Finder with a control-click offers the optimal solution. Discover the app in Finder, use a control-click method to bring up a contextual menu, and pick “open.” Once prompted with the warning message, proceed by clicking on “open”. In spite of applying highly restrictive settings, this will aid in accessing the app.
2. Bypass Gatekeeper using System Preferences:
Bypassing Gatekeeper is also possible by utilizing System Preferences. To begin with, you must determine the specifics of the blocked application within the “Enable apps from the App Store and verify developer” preferences. Afterwards, press the “Open Anyway” button to access the app without any disturbances.
3. Bypass Gatekeeper using Terminal:
By employing the Mac Terminal, you can switch off Gatekeeper completely. Even though Apple eliminated the “Anywhere” choice for Gatekeeper, Enforcing it using Terminal is still possible. To ensure this, Make certain that System Preferences is disabled.
Hit the return key, input the administrator login details if prompted, and hit return once more. Under the General tab of System Preferences, you will now find and select the “Anywhere” option under “Allow apps from”.
Is relying solely on macOS Gatekeeper effective in safeguarding your device from malware?
In the beginning of its introduction, Gatekeeper solely operated on files/executables with quarantine markers. The precautions in place were inadequate for maintaining device security, since a file lacking the quarantine flag could effortlessly bypass Gatekeeper Bypassing file quarantine is not really challenging is not much of a challenge, and Even taking away the quarantine flags isn’t too hard.
Gatekeeper, subsequently, underwent an upgrade that includes checking all applications regardless of their origin. Minor glitches and vulnerabilities were identified by cybersecurity professionals, creating an opportunity to manipulate malware into a system.
Gatekeeper doesn’t do runtime checks on apps. This might cause serious issues if a malicious app posing as an innocent one gets past the initial check. Furthermore, it merely watches for familiar dangers and disregards recent ones.
However, Apple doesn’t compromise on safety issues, and many Gatekeeper updates have been released to resolve existing bugs. Gatekeeper’s adoption as a standard for app-level security is Apple’s ongoing endeavor.
Remotely Modifying the Configuration of macOS Gatekeeper
In organizations with over 10-20 devices, manually configuring Gatekeeper on every individual device can be overwhelming. A UEM solution such as Hexnode proves to be useful in this situation. Setting up Gatekeeper settings for multiple devices becomes effortless when utilizing UEMs and a few mouse clicks. Switching on Gatekeeper is possible with a UEM, Alternatively, there exists the ability to disable it entirely. Using this can be highly advantageous if organizations heavily rely on proprietary software. In-house apps are those built for use inside the organization, Moreover, most of these applications do not necessitate code signing or notarization .
To be permitted by Apple, third-party kernel or system extensions usually need to undergo a process of notarization. Nevertheless, kernel and system extensions pushed to devices through a UEM do not require notarization. This has a positive impact because organizations can use necessary extensions within their organization without waiting for the notarization process. Time is saved abundantly.
Conclusion
To sum up, Gatekeeper may come across as bothersome occasionally, nevertheless, it is significant in its contribution to protect your Mac device from familiar threats. The prudent choice is to turn on Gatekeeper and refraining from attempting to bypass it except when absolutely needed. A safer computing experience and enhanced security for your Mac devices are guaranteed when you grasp the purpose of Gatekeeper and merge it with UEM.
Should you face any issues while connecting your Mac to the Magic Keyboard, Magic Mouse, or Magic Trackpad, Rest assured. To assist you better, we have compiled a set of uncomplicated guidelines that can help fix any usual difficulties that arise while using your Magic accessories, allowing them to function perfectly.
Turn Off and Switch on Your Supernatural Contraption
The first step in troubleshooting any connectivity issue attempt to restart your Magic accessory If you have a Magic Mouse, take note of the switch positioned at the device’s base. Concerning the Magic Keyboard and Magic Trackpad, you can find the switch at the back edge. Adjust the toggle to deactivate the device (green light not present). Afterwards, move it in the opposite direction to power up the equipment (green light becomes conspicuous). For those who possess a previous generation, locate the power button on the device’s right side. Continue to press and hold it until the green LED on the top stops shining, subsequently, apply pressure again to switch on the device.
Ensure Bluetooth is Turned On
In order to create a wireless link between your Magic accessory and Mac, you should check whether Bluetooth is activated. If your Mac is currently linked to a USB mouse, go to the Apple menu () > System Preferences, and click on “Bluetooth.” Ensure that Bluetooth has been activated. Should you be without a USB mouse but have your keyboard connected, Access Spotlight search by pressing Command-Space bar Input “Bluetooth File Exchange,” followed by pressing the Return or Enter key, and ultimately, hit Return or Enter one more time to activate Bluetooth.
In case you face any challenges while trying to activate Bluetooth, consider rebooting your computer and trying to enable Bluetooth once more.
Connect the Lightning Cable for Pairing and Charging
When using newer Magic accessories such as the Magic Keyboard and Magic Mouse, you can use the Lightning to USB Cable or USB-C to Lightning Cable enabling you effortless connectivity between them and your Mac. Connect the cable, Pause for approximately sixty seconds, afterwards, detach the connection. This action will pair the accessory with your Mac and while also recharging its built-in battery. To check the charge level of your accessory, Just press or click on the Control Center icon present in your menu bar, and then pick Bluetooth from there..
For earlier models that don’t utilize a Lightning cable for charging, replaceable batteries might be available. Look up Apple’s recommendations for steps on how to link these devices via your Mac device.
Image by:https://support.apple.com/
Check for Wireless Interference
If your Magic accessory still won’t maintain a stable wireless connection, interference from surrounding wireless devices may be the reason. To resolve this, inspect for any possible Wi-Fi and Bluetooth signal interferences. By simply relocating your Mac or Magic accessory, you may experience improved connectivity.
Conclusion
To summarize, resolving connectivity problems with your Magic devices shouldn’t seem overwhelming. By implementing these sequential directions, you can conveniently restore the link between your Mac and the Magic Keyboard, Magic Mouse, or Magic Trackpad. Remember to power cycle your device, verify that Bluetooth is activated, (when applicable) connect the Lightning cable for both pairing and charging. By following these troubleshooting tips, you can optimize your experience with Magic accessories on your Mac for a seamless and hassle-free usage.