Getting Started with the Movies & TV App on Windows 10
Even without any intentions of buying movies or TV shows from Microsoft’s online store. The Movies & TV app on Windows 10 It offers a lot of value and utility. Because of the Creators Update, this app received a refreshing new user interface. It also has several unique features that make it a worthwhile addition to your entertainment experience.
Free Movie Trailers and 360° Videos
In the Movies & TV app’s Explore view, a compilation of no-cost movie trailers can be found in your own time. In addition, the application furnishes a range of engrossing complimentary 360° videos. You can explore the content in real-time with these immersive videos, providing a distinctive and interactive viewing experience. You can use your mouse or finger on a touchscreen.
Movies & TV supports various video formats, including popular and esoteric ones. Noteworthy is its exceptional capability to provide top-notch assistance with subtitles and multiple audio tracks., enhancing your movie-watching experience. Moreover, the app enables you to add external subtitle files to videos acquired outside the Windows Store. For instance, if you download videos from services like Vimeo, you can include SRT (Subrip subtitle format) files to view subtitles alongside compatible videos.
Playback with Picture-in-Picture in Mini Mode
The Movies & TV app includes a useful feature called Mini Mode. In a miniature, Picture-in-Picture (PIP) type window, the video playback is located. Resizing and repositioning of this window are possible on any part of your screen. Even when in Mini Mode, the app will remain at the forefront of other on-screen windows, enabling you to multitask while enjoying your video content.
Casting to a Bigger Screen or Another PC
The Miracast technology is supported by Movies & TV. This enables you to wirelessly stream or “cast” content from your Windows PC to a compatible display, such as an HDTV. In case you possess an additional Windows 10 computer, casting your content onto that device is also feasible, thus providing convenience for viewing on a bigger display.
Movie Rentals and Configuration Options
The Movies & TV app by Microsoft provides captivating choices for renting movies. through the Movies & TV app. You can choose between HD and SD resolutions, Another option is to either stream or download the rental. On any Windows 10 PC, you can stream the rental and easily switch between devices. Alternatively, By downloading the video, you are restricting playback exclusively to one computer.. After renting, you have two weeks to begin watching, Furthermore, once initiated, there is a strict 24-hour limit to complete it.
Furthermore, Movies & TV provides unique configuration options. In spite of employing a light app theme all over Windows 10, The app can be switched to a dark mode. An entertainment-focused experience is best achieved with this mode. Additionally, you can configure the app to automatically switch to full-screen mode at the start of video playback, delivers a smooth and uninterrupted visual encounter..
Due to the user-friendly design and ample range of features it offers, this application has proven itself as an indispensable tool for enjoying media on Windows 10. Explore its offerings, and you might discover that it is the ideal answer to fulfill all of your video playback necessities.
Introduction to the Windows 10 Weather Widget:
For those who have been actively seeking a weather app or widget to use on their Windows 10 Taskbar, you are in good fortune! Microsoft has recently introduced a native Weather Widget on the Taskbar, doing away with the requirement to install any external applications., This eliminates the necessity of downloading and installing external apps.. Conveniently view daily weather updates directly from your Windows 10 PC’s Taskbar with this feature.
Adding and Showing Weather in the Taskbar on Windows 10:
For optimal use of the Weather Widget featured on your Taskbar, confirm that your Windows 10 PC is updated to the latest version. On Windows 10 versions 1909 and above, this feature is accessible, which also includes versions such as 2004, 20H2, and 21H1. For those who are still not using the latest version, to keep your PC up to date, access Settings > Update & security and look for available updates.
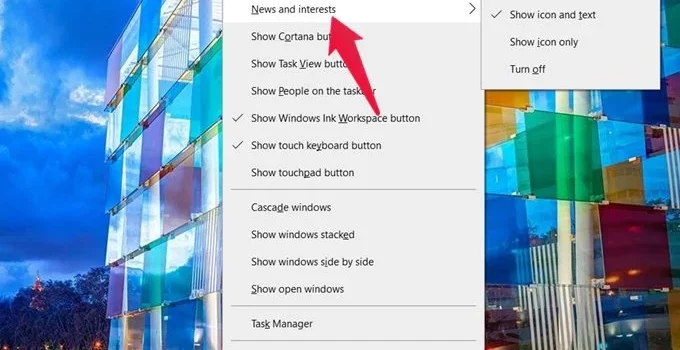
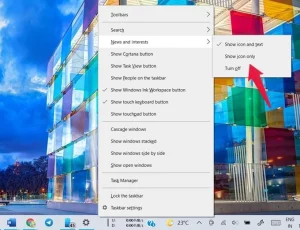
After updating your PC, the Taskbar will display the weather icon automatically. If it fails to, Access News & interests by right-clicking on the Taskbar. Select ‘Show icon and text’ from the available options to show the weather on the Taskbar. for displaying weather information on your Taskbar.
Changing Weather Location in the Taskbar Widget on Windows 10:
Upon enabling the Weather Widget on Windows 10 Taskbar, it might show an incorrect weather location. To customize the weather location, follow these steps:
Hover your mouse over the weather icon for accessing the News and interests panel.
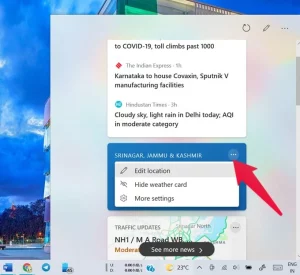
Scroll down until you see the Weather card and click on the three-dot icon.
Select “Edit location.”
Choose between “Choose based on your preference between automatically detecting the location” and “Enter manually” based on your preference.
If the automated feature doesn’t function, input the preferred location by hand afterward, click on “Save.”
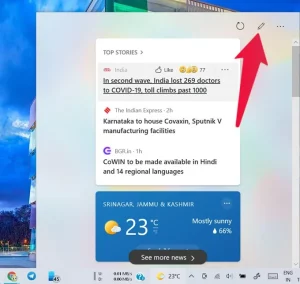
For accessing weather data for a different location, click on the Refresh icon positioned at the top of the panel. to check out current weather conditions in another geographical spot.
Disabling the Windows 10 Weather Widget in the Taskbar:
If you prefer not to see the weather icon in the Taskbar, you have two options:
Right-click on the Taskbar and select News and interests. Choose “Switch off” to entirely deactivate the weather widget, please take note that this will also cause the News feed to be hidden.
If you want to continue seeing the News feed but prefer not to display the temperature text,, opt for “Icon only” from the provided selection.
Removing Weather Card from News and Interests Panel:
Displays solely the present temperature. only indicates the current temperature. If you find that the Weather card takes up unnecessary space in the feed, you can hide it:
Tap the three-dot icon situated within the News and Interests panel, click on the Weather card.
Select “Hide weather card” to remove it from the panel.
Adding Weather Card to News and Interests Panel:
If you want to add the Windows 10 Weather widget card back to the News and Interests feed:
Access the News and Interests panel and Select the Edit/Manage interests option (pencil icon) located at the top.
A fresh browser tab will open up, where you should log in to your Microsoft account.
Click on “Experience settings” in the feed personalization window.
Find the Information cards section, then flip the switch under Weather for “Display weather in my feed.”
Customizing Windows 10 Taskbar Icons:
Besides modifying the Weather Widget, you can also center Windows 10 Taskbar icons to create a more structured appearance and ambiance.
Pinning Favorite Websites to Taskbar for Faster Access:
Maximize the utility of your Taskbar through pinning preferred websites for convenient and swift access.
Conclusion:
The Windows 10 Weather Widget is a handy feature for users who want quick weather updates right on their Taskbar. By implementing the directions outlined in this guide, you are capable of establishing, tailoring, and overseeing the weather widget to suit your individualized preferences. Moreover, take the initiative to discover different approaches in personalizing your Taskbar for a more optimized computing experience.
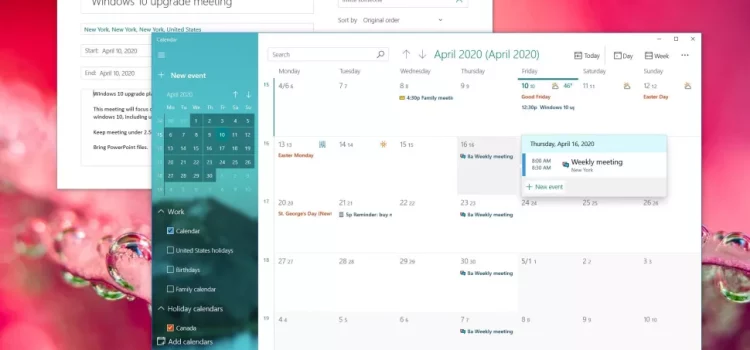
The powerful Calendar app on Windows 10 is specifically designed to assist with efficient schedule management. From the realm of meetings and reminders to the domain of appointments and diverse other events. All the necessary features for staying organized and managing your commitments are provided by this app. An added bonus is it has excellent compatibility with most popular external calendar providers and works offline. An excellent solution for both work and personal events is created by this.
Within this extensive tutorial, we will explain thoroughly everything that is required for your understanding for efficient utilization of the Windows 10 Calendar app.
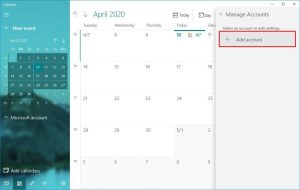
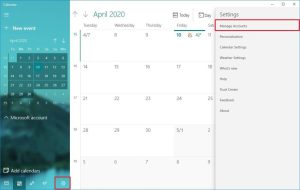
How to Add and Manage Accounts on the Calendar App
To maximize the benefits of using the Calendar app, consider integrating it with your established accounts.
Image by https://www.windowscentral.com/how-use-calendar-app-windows-10
Luckily, the application enables you to import and manage schedule events from different external platforms, which encompass Outlook.com, Microsoft 365 Suite (including Outlook), Google Calendar service provided by Google LLC., Yahoo Calendar service provided by Yahoo Inc., as well as Apple iCloud
Image by https://www.windowscentral.com/how-use-calendar-app-windows-10
Follow these steps to add an account to the Calendar app:
Open the Calendar app.
Locate and click on the gear-shaped Settings button positioned in the lower-left corner. in the bottom-left corner.
“Manage Accounts” can be found in the top-right corner. from the top-right corner.
For those who already utilize the Mail app, this list will contain your accounts.
Choose the service you use for calendar events (e.g., Outlook.com, Microsoft 365, Google, Yahoo, iCloud).
Follow the on-screen instructions to complete the setup using your account credentials.
Image by https://www.windowscentral.com/how-use-calendar-app-windows-10
Adding as many accounts as you require allows for seamless management of personal and work-related events.
Personalizing and Collaborating Schedules for Enhanced Efficiency
Image by https://www.windowscentral.com/how-use-calendar-app-windows-10
After successfully setting up your accounts, Let’s personalize and collaborate on calendars for better organization
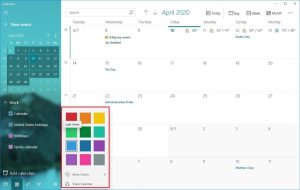
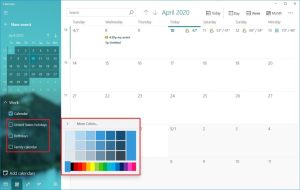
Customize Calendar Color and Visibility:
Open the Calendar app.
Click with your right mouse button on the calendar under the chosen account and pick a new color.
Image by https://www.windowscentral.com/how-use-calendar-app-windows-10
If desired, click “More colors” to generate a personalized color.
Deselect the checkbox if having a calendar is not your preference for the app.
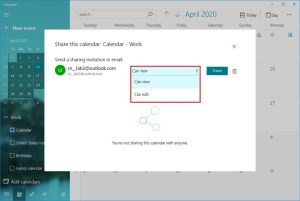
Sharing Calendars with Others:
Open the Calendar app.
Within the preferred account,, Click with your right mouse button on the calendar and select “Share calendar.”
When sharing your calendar, please enter an accurate email ID for sharing purposes and determine whether they should be granted viewing or editing privileges.
Click the “Share” button.
Image by https://www.windowscentral.com/how-use-calendar-app-windows-10
Creating and Tracking Working with the Calendar in Windows 10
With your calendars now established, let’s discover how to generate and handle events within the Calendar application.
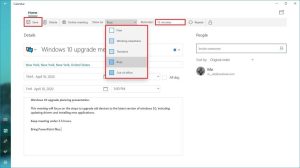
Adding Events with Detailed Information:
Open the Calendar app.
Click the “New event” button in the top-left corner or use the Ctrl + N keyboard shortcut.
Specify a descriptive title for the event.
Choose from the available dropdowns for choosing the date, commencement time, conclusion time, along with its designated place.
Add more specifics concerning the event. about the event.
Set a reminder for the event by making use of the provided choices in the drop-down menu named “Reminder”.
Press the “Save” button within the left topmost area.
Image by https://www.windowscentral.com/how-use-calendar-app-windows-10
Creating Repeating Events:
Open the Calendar app.
Choose the “Repeat” button situated at the corner on the right side at the top.
Utilize the “Start” option to indicate the event’s start date.
Specify the interval at which you want the event to repeat (like daily, weekly, monthly, yearly) (e.g., daily, weekly, monthly, yearly).
To determine when the event should stop repeating, utilize the “End” option.
Fill in the other event details as usual.
Click the “Save” button.
Image by https://www.windowscentral.com/how-use-calendar-app-windows-10
Scheduling Group Events:
Open the Calendar app.
Under the “People” section, Share/email invitations by entering their email addresses.
Fill in the event details, including date, start time, end time, and location.
Add any additional information.
Select the “Send” option for inviting the invited guests. to invite the attendees.
Quickly Creating Events from the Taskbar:
Tap on the taskbar button that displays time and date in the taskbar.
Pick a date for the event.
Click “Show agenda” situated at the lower right corner.
Enter the event details in the text box.
Choose the calendar to save the event.
Specify the beginning and conclusion of the planned gathering.
Click the “Save” button.
Integrating Recognized Calendars for Holidays, Sports, and TV Shows
Stay organized and updated by incorporating popular calendars into your schedule with The Calendar app to stay informed about holidays, sports events, or TV show airings. Here’s how:
Open the Calendar app.
Click on the button with the text “Add calendars” situated in the lower-left corner. situated in the lower left-hand corner.
Select a category for the calendar like Holiday calendars, Popular options, Sports-oriented themes or TV-inspired ones.
Decide on the specific calendars to be added.
The events will populate in your calendar.
Event Synchronization for Seamless Calendar Updates
In case you utilize several devices or modify events via the web edition of your calendar service, you’ll want to ensure your events sync across all platforms. Follow these steps to sync events in the Calendar app:
Open the Calendar app.
Click the menu (three-dotted) button in the top-right corner.
Personalizing Your Calendar Experience on your Windows 10 Device
To tailor the Calendar app to your preferences, it is possible to personalize both its appearance and settings.
Customizing Color Schemes and Themes:
Open the Calendar app.
Click the “Settings” (gear) button in the bottom-left corner.
Select “Personalization.”
Choose your preferred color scheme and theme (Light, Dark, or Use my Windows mode).
Setting Calendar Preferences and Work Hours:
Open the Calendar app.
Click the “Settings” (gear) button in the bottom-left corner.
Select “Calendar Settings.”
Tailor the beginning of your week to your liking, days you work, which includes setting up specific working hours.
Changing Weather Settings for Accurate Forecasts:
Open the Calendar app.
Locate and press on the gear-shaped button called “Settings” within the corner positioned at the bottom left.
Select “Weather Settings.”
Make a selection between Celsius and Fahrenheit as the scale for recording temperatures.
Conclusion
The Windows 10 Calendar app provides great assistance in efficiently organizing your schedule. for optimal scheduling management. By abiding by this thorough instruction, you can maximize its functionalities, stay organized, and seamlessly record all your essential gatherings. Irrespective of whether you’re employing it for work or personal utilization, the Calendar tool will support you in staying organized with all your appointments. You won’t miss any crucial occasion ever another time again.
Encountering an issue with the Windows 10 Action Center not opening can cause frustration and disrupt normal functioning. In this guide for resolving issues, we will examine different strategies for resolving the issue and ensuring optimal performance of your Action Center.
Restart Windows Explorer
Access Task Manager by pressing Ctrl+Shift+Esc.
Right-click the Windows Explorer process, then select “Restart.”
Reboot Your Computer
Sometimes a simple reboot can resolve Problems related to the Action Center. Restart your computer for verifying whether or not the problem has been resolved.
Perform a Disk Cleanup
To create more room on your hard drive, carry out a Disk Cleanup Furthermore, delete any temporary files.
In the event that Windows 10 experiences low memory and disk space, thus possibly leading to slowdowns in the system operation and various glitches.
Disable and Turn on Action Center once more
Access the Settings > Modify > Taskbar > Enable or disable system icons.
Toggle the Action Center off and on.
Scan the Drive
Start Command Prompt with elevated privileges.
Image by: https://pressmaverick.com/
Run the following commands:
Check Disk (chkdsk)
Deployment Image Servicing and Management (DISM /online /cleanup-image /restorehealth)
Rename the Usrclass File
Launch File Explorer and navigate to either of the following paths:
%localappdata%\Microsoft\Windows
C:\Users[username]\AppData\Local\Microsoft\Windows
Locate the Usrclass.dat file afterwards, modify its name to UsrClass.old.dat.
Restart your PC.
Image by: https://pressmaverick.com/
Re-register the Action Center
Press Win+S and search for Windows PowerShell.
Launch PowerShell as an administrator and Carry out the given command.
Restart Windows in Safe Mode
Access Safe Mode through the Advanced Startup Options and reboot your system.
Try a System Restore
Should the prior solutions prove ineffective, execute a System Restore by selecting an appropriate restore point created before the Action Center issue occurred.
Reset Your PC
As a final option, contemplate performing a system reset on your computer. This will wipe the entire device, but Windows 10 offers options to keep your files, remove everything, or perform a Factory Reset.
By practicing these suggested troubleshooting strategies, you will be capable of resolving the concern regarding the unresponsiveness of the Windows 10 Action Center and recover its normal operation. Should the issue continue, reflect on seeking additional support from Microsoft Support or IT experts or technology experts.
The media player known as Windows Media Player 12 is filled with features Catering to those who are passionate about music and videos is its main goal. Providing effortless playback for multiple media formats, it is included as part of the package with both Microsoft’s operating systems -Windows 7 and Windows 8.1- as well as their latest version -Windows 10*. Included in this are Flip Video and songs from your iTunes library that are not protected. Whether it’s about organizing your digital media collection, synchronizing files with a portable device, or browsing for digital content online, You can rely on Windows Media Player 12.
Introducing Windows Media Player 12: Designed for Media Lovers
Windows Media Player 12 exemplifies Microsoft’s determination to offer a formidable media player experience. Through a seamless interface and upgraded features, it offers a delightful experience when enjoying your favorite music or videos. The Now Playing mode exemplifies minimalism, displaying only the essential controls, guaranteeing a media experience free from interruptions. In addition, the enhanced taskbar thumbnail equipped with playback controls simplifies the ability to preview media files and introduces an aspect of entertainment to the overall user experience.
Image by https://pressmaverick.com/
Simplified Playback Options for Nonstop Enjoyment
The design of Windows Media Player 12 highlights its versatility, Effortless playback of different audio and video formats is made possible. For those who enjoy music or are avid movie fans, it can play a diverse selection of multimedia formats seamlessly. Your diverse digital media collection will be compatible. Additionally, the option to sync music, videos, and photos empowers you to transport your media library wherever life leads. Whether you’re at your residence or on a journey.
Playing More Media in More Places: Formats and Syncing
Windows Media Player 12 excels in supporting a wide range of popular audio and video formats. From MP3s to popular video file formats, this media player can handle them all, eliminating the need for additional software installations. Furthermore, the convenient synchronization functionality enables you to effortlessly move your multimedia files across different gadgets, guaranteeing that you can relish your library regardless of your location.
Diagnosing and Enhancing Windows Media Player 12
Should you face any difficulties with Windows Media Player 12 or desire to update it to the most recent version,, simply follow these straightforward guidelines. First, click on the Start button and type “features.” Afterward, opt for “Turn Windows features on or off.” “Media Features” should be located; make sure to confirm if the Windows Media Player box is selected. If so, deselect the checkbox and hit OK, afterwards, reboot your computer to uninstall the existing version.
After the restart, repeat the steps, but be sure to pick out the Windows Media Player box on this occasion. Press OK and perform a PC restart in order to install again the newest release of Windows Media Player (version 12, excluding certain cases). Note that Windows Media Player 12 cannot be accessed on Windows RT 8.1.
In conclusion,
A powerful media player, Windows Media Player 12 tailored for the preferences of media enthusiasts. Due to its robust support for various file formats, seamless syncing features, and intuitive interface, it is still considered a trustworthy solution for playing music and videos on Windows operating systems.
Windows Media Player 12 is included in clean installs of Windows 10 Moreover, when upgrading from either the previous versions like 7. DVD playback isn’t included within the confines of either Windows 10 or Windows 8.1. Check out the DVD playback for Windows page to discover how to incorporate DVD playback.
Getting familiar with the Windows Exploring the features of the Master Control Panel Shortcut
The Windows Master Control Panel shortcut, also informally known as “Windows God Mode,” is a powerful feature that allows users to access various control settings in Windows operating systems. This includes Windows Vista, 10, and 11. Providing a handy solution for accessing all control panels within a sole directory, streamlining the management of system settings.
Deploying the Master Control Panel – Understanding its Operation
Designed as the main directory for locating control panel options through the search function of the updated start menu. It implies that users can effortlessly express their intentions through typing. Such as “Change screen resolution,” At that point, the suitable control panel choices will be displayed as your search results.
Creating a folder with the specific extension of .{ED7BA470-8E54-465E-825C 99712043 E01 C} is necessary for users to unlock and utilize the capabilities offered by the Master Control Panel. Even though it gained popularity as “GodMode,” any name is acceptable for the folder. They can also create a Desktop.ini file in a folder that includes the extension’s CLSID (Class ID).
Windows 11 introduces a slight change, after creating the shortcut, its name will vanish. Nonetheless, the core functions stay consistent, providing access to all control panels within one centralized location., granting access to all control panels in one place.
Image by: https://pressmaverick.com/
Investigating the All-Powerful Windows Master Control Panel Shortcut
Microsoft has documented the general method of creating these shortcuts. is documented by Microsoft. Regardless, Microsoft chose not to make the specific GUID ED7BA470-8E54-465E-825C-99712043E01C for the Master Control Panel public. This method was already published by third parties in 2007, Those who mentioned this method called it “[Registry Hack] VISTA – All Control Panel & Setting tasks at one place.”
In subsequent years, numerous blogs and tweets emerged, naming it “Windows 7 Godmode.” The technique became widely recognized and commonly utilized. Many sites provided the same information on how to access the Master Control Panel.
Image by: https://pressmaverick.com/
Related Shortcuts and Known Issues
The general folder shortcut format, <FolderDisplayName>.{<GUID>}, enables access to various Windows settings. Access to numerous Windows settings is granted by the CLSID {ED7BA470-8E54-465E-825C-99712043E01C}, which is especially intriguing for users., This factor adds to its appeal for users.
Pre-Java 8 applications using Swing’s Windows look-and-feel, including those compiled by Excelsior JET, may crash on Windows 10 Creators Update. This can happen when a “God” folder exists. Avoiding the crash can be achieved by nesting the “God” folder within a separate directory. In addition, placing “God” directly into a “virtual” directory like desktop or documents could potentially create problems for outdated .jar applications.
Furthermore, Windows 10 version 1703 (April 2017) broke the display of a “God Mode” folder in File Explorer. Despite the proposal of a workaround, its performance is inconsistent, and the issue continues in later releases.
Conclusion
As a final point, “God Mode” shortcut in the Windows Master Control Panel offers immense usefulness. Facilitates simple access to all control panels across different iterations of the Windows OS. By making a specific folder, managing different system preferences becomes convenient for users. That being said, it’s crucial that users acknowledge the existing issues and follow suitable actions to prevent potential crashes or display abnormalities. A popular and powerful feature, The Master Control Panel still holds its ground, enabling users to conveniently handle various Windows settings.
Ways to Modify Windows 10 System Sounds - Personalize the Audio on Your Computer
Windows 10 offers a variety of default system sounds that accompany various actions and notifications. If, however, you discover the default sounds to be dull or desire to customize your PC with a personal flair. A great thing to note is it is possible to conveniently alter and tailor the system sounds as per your preference to your liking. Let’s dive into discovering different methods to access sound settings and customize the audio output on your Windows 10 personal computer.
Windows 10 allows customization of which sounds? In the latest version of Windows?
Customizing the sound configurations for diverse system notifications and sound effects is possible on Windows 10. These include events such as battery notifications, Other examples include instant messages and moving menu items The sound settings menu categorizes them into the following groups:
Windows (system): Sounds related to battery notifications and instant messages. File Explorer: Sounds that correspond to activities like moving menu items and resolving issues with blocked pop-up windows. Windows Speech Recognition: Audio cues for enabling and disabling the speech recognition functionality.
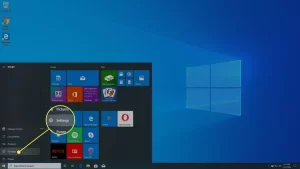
Give a tap to the icon that represents Windows found in the lower section of your monitor.
Click the gear icon to open Windows Settings.
Select “System” from the Settings menu.
Choose “Sound” in the left pane.
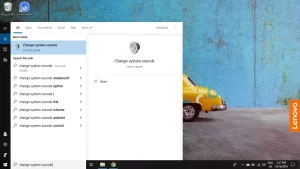
Select “Sound Control Panel” found under the Related Settings category in the top-right corner.
Access the “Sounds” tab within the appearing window.
How to Customize Windows 10 Audio Settings:
Once you have accessed the sound settings, you have two main options to customize your Windows 10 system sounds:
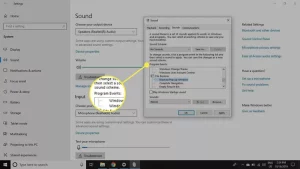
Change Sound Effects for an Event in Windows 10:
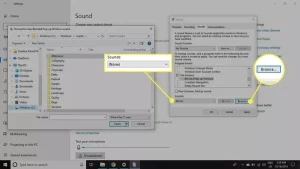
Select an event under “Program Events.”
Select a sound from the provided options If desired, you can explore your computer for WAV format sound effects
Preview the sound effect with the “Test” button, Finally, press both “Apply” and then confirm by clicking on “OK”.
If you prefer to disable sound for individual events:
Opt for one of the options under “Program Events.”
Choose “None” from the list that appears under “Sounds.”
Using this straightforward method, you can customize your Windows 10 system sounds to be in line with your specific choices. Whether you’re interested in adding a personalized touch or enhancing the immersion of the audio. The versatility provided by Windows 10 to make your PC sound based on your personal liking. Have fun customizing your audio Also, relish in the benefits of a highly personalized computing experience!
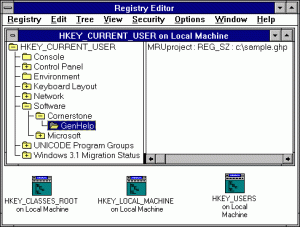
In the initial years of Windows, The storage of application-specific details was done using .INI files. Nevertheless, considering the constraints of .INI files and the rising intricacy of Windows software, With Windows 3.1, Microsoft implemented the Registry. A hierarchical database called The Registry for storing configuration information and settings related to the operating system and applications.
The Structure of the Registry in Windows
The Windows Registry organized hierarchically, showing resemblance to a file system that includes directories and files. The representation of directories is done through keys, Files are represented by values. Holding multiple values and sub-keys is achievable for each key. The registry values contain strings and binary data are among the different formats of information contained within the registry., and DWORDs.
The Windows Registry has several root keys that define separate tree structures within the database. Some important root keys include:
HKEY_CLASSES_ROOT: Ensures backward compatibility with the Windows 3.1 registry and holds data regarding file associations..
HKEY_USERS: Stores personalized data for various system users.
HKEY_CURRENT_USER: For the presently signed-in individual, an alternative label is given to their personalized section underneath HKEy_Users.
Utilizing the kRegistry Class for Convenient Registry Access providing Easy Accessibility to the Registry
To increase the efficiency in handling registry access, the creation of a visual class library named kRegistry is possible. This class library acts as a wrapper around the Registry API functions and simplifies Perform operations such as reading from or writing to registry keys along with effectively managing their associated values Interaction with the Registry becomes hassle-free using methods such as CreateKey and Deletekey provided by the kRegistry class.
Registering File Types for Seamless Application Integration
The Windows Explorer uses file associations when it comes to determining which application should be opened upon double-clicking on a file by the user. Writing to the registry allows applications to register themselves and handle specific file types programmatically. Through the usage of the kRegistry class, automating this process is achievable and link our application to particular file extensions.
Conclusion
A crucial element of the Windows OS is the Windows Registry, functioning as a centralized storage for configuration details. Comprehending its arrangement and using tools like the kRegistry class has the potential to streamline registry access and improve application integration with the Windows Explorer.
Microsoft Defender Firewall, also known as Windows Firewall, This feature is integrated into the operating systems of both Windows 11 and WIndowsw windows-8+ By filtering both incoming and outgoing network traffic, it functions as a shield that separates your computer from the outside world. The firewall’s primary function means stopping any attempt at unauthorized access while shielding your system from possible cyber threats, such as malware, viruses, and hacking attempts.
How to Turn On Microsoft Defender Firewall
Activating Microsoft Defender Firewall is an easy procedure. doesn’t require much effort or complexity. Follow the steps below to ensure that your computer is safeguarded from unauthorized access:
Windows 11:
Select the Start button, subsequently, pick Settings (gear icon).
Navigate to Upgrade & Safety > Windows Security.
Select Firewall & network protection.
Windows 10:
Activate the Start button, followed by proceed to click on Settings (represented by a gear icon).
Navigate to System Updates & Security > Windows Security.
In Windows Security, choose Firewall & network protection.
Select a Network Profile:
You will see three network profiles: The available networks include Domain, Private, and Public.
Pick the right profile that corresponds to your present network connection.
Turn On Microsoft Defender Firewall:
Toggle the setting to On beneath Microsoft Defender Firewall., turn on the setting.
Note:
If your device is currently linked to a network and being regulated by network policy settings, modifying the firewall settings could be restricted. When this occurs, notify your network admin to receive aid.
While it is suggested to maintain the firewall activated for better protection, there might be circumstances where you have to temporarily disable it. However, bear in mind that disabling the firewall can expose your device and network to potential risks. In case there is another reliable firewall, turning it off is recommended.
To turn off Microsoft Defender Firewall, follow these steps:
Windows 11:
Head to Start > Configurations > Upgrade & Protection > Secure Windows > Protect your network with firewall.
Windows 10:
Go to Start > Settings > Start Menu> Settings> Update > Windows Security > Firewall & network protection.
Select a Network Profile:
Choose the network profile corresponding for your current network connection.
Turn Off Microsoft Defender Firewall:
Under Microsoft Defender Firewall, toggle the setting to Off.
Enabling Individual Apps by means of the Firewall
When specific applications or services experience blocking from the firewall, opt for permitting their passage via the firewall on an individual basis instead of completely deactivating it By taking this action, you uphold an increased level of protection while guaranteeing the correct operation of critical applications.
Conclusion
A crucial security feature in Windows 11 and Windows 10 is the Microsoft Defender Firewall., providing protection against unauthorized access and potential cyber threats. The safety of your device and network relies on keeping the firewall enabled is vital for maintaining the safety of your device and network. If circumstances require turning off the firewall temporarily or making changes to app permissions, simply follow the given instructions to ensure informed security choices. Find an equilibrium between security and to establish a protected computing environment for your Windows computer.
In this piece, we will investigate the principles and design related to developing a Microsoft Edge plugin. With the increasing demand for specialized browsing experiences, extensions are vital in enhancing or altering features to cater to the preferences of the intended users. Nonetheless, it should be highlighted that not all extensions are equally good. Let’s delve into the core principles and the operation of multi-tab browsers within the scope of extensions.
Understanding Browser Architecture for Extensions
Prior to beginning the construction of your Microsoft Edge extension, it’s essential to grasp the functioning of browsers. Particularly when dealing with multiple tabs. Every browser tab operates in isolation from others. It functions in independent threads to ensure a seamless and secure browsing experience. A tab handles one GET request, obtaining a single data stream, often an HTML document, along with JavaScript, CSS, and image references. Downloading these resources is done by the tab and rendered within the browser tab.
Communication with a remote server occurs from each separate tab in a self-contained manner. Although isolated from other tabs, a tab can execute JavaScript to interact with a server. The server corresponds to the original server for the initial GET request from the tab’s URL bar.
Although the traditional communication model is used by the browser’s tab pages, a different approach is introduced by extensions. Just like tab pages, an extension runs in a separate thread. It is separated from other webpage tab threads. Nevertheless, extensions work similar to remote servers inside the browser.
After installing an extension, it forms an independent web server, containing a bundle of web resources. This collection is akin to what web developers commonly distribute. This bundle, compressed into a zip file, includes HTML, CSS, JavaScript, image files, and a manifest file (manifest.json). The manifest file serves as the blueprint of your extension. Vital details are contained such as the version, title, required permissions, and more.
Launching the extension server entails going to the web bundle by utilizing the extension runtime. During installation, this identifier is assigned and indicates the location of the installed web bundle. Each extension has a distinct unique identifier, which guarantees separation and security.
An extension can communicate with tabs and also the toolbar of the browser, improving user interaction and functionality. Managing running tab pages with thread separation ensures isolated DOM manipulation in each tab page. This guarantees that any edits performed in one tab page do not impact the rest. To facilitate communication between the extension and tab pages, developers can utilize the extensions API. This API gives extra features such as handling notifications and managing storage.
Managing Permissions for Extensions
During installation, extensions provide optional permissions, where users can decide whether to accept or decline. Permission settings are outlined in the manifest.json configuration. They are displayed when installing, informing users about the extension’s requirements. Based on the granted permissions, the extension gains access to specific information inside the browser. This enables it to carry out designated tasks.
Conclusion
Developing a Microsoft Edge extension requires knowledge of the unique structure that separates it from regular browsing. By comprehending how browsers handle tabs and incorporating effective communication models, developers have the ability to build robust extensions that offer customized experiences to their intended users. Keep in mind to evaluate permissions and guarantee that users can decide on the access provided to your extension. Seize the chances of extension development to elevate the browsing experience on Microsoft Edge for users all over the world.