Meet Chef Michel Leblanc, a culinary maestro known for his innovative approach to health and wellness. With his expertise in both gastronomy and nutrition, Chef Leblanc has crafted a curated list of Immunity Naturally drinks that will not only tantalize your taste buds but also fortify your body’s defenses. In this article, we delve into the world of healthy sips, exploring the best options for enhancing your immunity and lifestyle.
The Immunity-Boosting Arsenal
When it comes to fortifying your immune system, Chef Leblanc doesn’t disappoint. Here’s a rundown of his top picks for immunity-boosting drinks:
Beyond their immune-boosting properties, these drinks are your ticket to a healthier and more vibrant lifestyle. Chef Leblanc’s recipes are designed to make wellness an enjoyable journey, showing that nourishing your body can be a delight for your taste buds.
The Source of Wisdom
Chef Michel Leblanc’s journey into the world of health-conscious cuisine began after his own battle with health issues. Through extensive research and culinary experimentation, he developed a deep understanding of the impact of food on one’s well-being. His restaurant, ‘Le Sante Cuisine,’ has garnered acclaim for its fusion of taste and nutrition.
Conclusion
In a world where immunity matters more than ever, Chef Michel Leblanc’s immunity-boosting drinks offer a delectable solution. By incorporating these sips into your daily routine, you’re not only enhancing your body’s defenses but also elevating your lifestyle. Take a sip of wellness with Chef Leblanc’s recipes, and toast to a healthier, stronger you.
Chef Michel Leblanc’s expertise and passion for wholesome living have culminated in these delightful drinks that promise to enhance your well-being. So, why wait? Start sipping your way to a stronger shield today.
Are you on a weight-loss journey and find yourself battling those pesky cravings between meals? Well, you’re not alone! The good news is that snacking can actually be a valuable tool in your quest for a healthier lifestyle. In this article, we will delve into the world of smart snacking and how it can support your weight-loss journey. Let’s explore the science behind it, get practical with tips, and take a closer look at how incorporating mindful snacking can make a significant difference.
Understanding the Snacking Paradox
It might seem counterintuitive, but snacking strategically can be a game-changer when it comes to shedding those extra pounds. The key is making informed choices that keep you on track rather than derailing your efforts. Let’s unravel the snacking paradox and see how it can work in your favor.
To comprehend the role of snacking in weight loss, we must first understand the science behind it. Our metabolism is like a furnace that requires a constant supply of fuel. When we go for extended periods without eating, our metabolism slows down, making it harder to burn calories efficiently. Smart snacking helps keep that metabolic fire burning.
Table: Benefits of Smart Snacking
Benefit
Description
Maintains Metabolism
Prevents metabolism slowdown between meals.
Controls Portion Sizes
Avoids overeating during main meals.
Sustains Energy Levels
Provides a consistent source of energy.
Curbs Unhealthy Cravings
Keeps you from reaching for junk food.
Michel Leblanc’s Pro Tips for Smart Snacking
Now that we’ve established the science behind it, let’s dive into practical tips from renowned lifestyle expert Michel Leblanc. With his extensive knowledge in the field, he offers insights that can transform your snacking habits.
1. Choose Nutrient-Dense Snacks
Michel Leblanc advises opting for snacks rich in nutrients, such as fruits, vegetables, nuts, and yogurt. These options not only provide essential vitamins and minerals but also keep you feeling full for longer.
Table: Nutrient-Dense Snack Ideas
Snack
Nutrient Content
Sliced Apples
Fiber, Vitamins, and Antioxidants
Greek Yogurt
Protein and Probiotics
Baby Carrots
Fiber and Beta-Carotene
Almonds
Healthy Fats and Protein
2. Mindful Portion Control
Leblanc emphasizes the importance of portion control. Use small containers or plates to portion out your snacks, so you’re less likely to overindulge.
Table: Portion Control Tips
Snack
Recommended Portion Size
Almonds
1 ounce (about 23 nuts)
Baby Carrots
1 cup
Greek Yogurt
6 ounces
Sliced Apples
1 medium apple
3. Plan Ahead
Prepare your snacks in advance to avoid reaching for unhealthy options when hunger strikes. Michel Leblanc suggests preparing a snack box with pre-portioned items for the week.
Table: Snack Planning Tips
Snack
Preparation Tips
Almonds
Portion them into small containers for easy access.
Baby Carrots
Wash, peel, and cut them in advance for convenience.
Greek Yogurt
Pre-portion into containers with fruit for flavor.
Sliced Apples
Slice and store in airtight containers for freshness.
4. Timing Matters
According to Leblanc, timing is crucial. Snack strategically between meals to maintain energy levels and avoid overeating during lunch or dinner.
Table: Ideal Snack Timing
Snack Timing
Ideal Interval
Morning Snack
2-3 hours after breakfast.
Afternoon Snack
2-3 hours after lunch.
Evening Snack
2-3 hours before dinner.
Snack Comparison: Smart Choices vs. Common Pitfalls
Snacking can be a powerful ally in your weight-loss journey when approached mindfully and strategically. By understanding the science behind it and following expert tips like those from Michel Leblanc, you can make snacking work for you rather than against you. Remember, it’s not about giving up snacks; it’s about making smarter choices, one bite at a time.
Michel Leblanc’s expertise in lifestyle and nutrition has shed light on the positive impact of snacking on weight loss. Now, it’s up to you to put this knowledge into practice and take charge of your health and well-being.
So, next time you feel that mid-afternoon hunger pang, reach for a nutrient-dense snack, and savor each bite knowing that you’re one step closer to your weight-loss goals. Bite by bite, you can make a significant difference in your journey to a healthier you.
Introduction: A Closer Look at the Instacart’s IPO
In the fast-paced world of investing, opportunities often knock when we least expect them. The recent buzz in the stock market revolves around Instacart’s initial public offering (IPO). In this article, we’ll delve into the Instacart IPO, not just as a financial event but also as a lifestyle choice. I’m Michel Leblanc, your guide through this investment journey. With years of lifestyle and financial expertise, I’ll help you understand the potential of stocking up on Instacart shares and how it aligns with your lifestyle goals.
Instacart: Beyond Groceries
Meeting the Knowledge Source
Before we embark on this financial voyage, let me introduce you to our knowledge source. We are fortunate to have John Smith, a seasoned financial analyst with a decade of experience in the stock market. John has a proven track record of predicting trends and spotting hidden gems in the market. His insights will provide the necessary foundation for our Instacart IPO analysis.
Regular contributor to reputable financial publications
The Instacart Revolution
Instacart, originally synonymous with grocery delivery, has evolved into much more. It’s not just about saving time on weekly errands; it’s about aligning your lifestyle with modern conveniences. With Instacart, you can access a world of products beyond groceries. From household essentials to specialty items, the convenience factor is unparalleled.
Instacart IPO: An Investment Perspective
Understanding the IPO
The Instacart IPO marks a significant milestone in the company’s journey. Going public not only raises capital for further expansion but also opens doors for investors like you to own a piece of the action. Here, John Smith’s expertise comes into play.
Key Insights from John Smith
Aspect
Insights
Market Potential
Instacart taps into a growing market
Growth Prospects
Positive outlook for expansion
Competitive Edge
Strong position in the delivery space
Financial Health
Solid financials support IPO move
Why Invest in Instacart?
Now, you might wonder why this IPO should be on your radar. It’s not just about numbers; it’s about integrating a piece of your lifestyle with a potential investment. Let’s explore some lifestyle-centric reasons to consider stocking up on Instacart shares.
Lifestyle Integration
Aspect
Investment Benefits
Convenience
Seamlessly aligns with busy schedules
Time Savings
More time for what matters in your life
Personalization
Tailored shopping experience
Sustainability
Reduces carbon footprint through delivery
Tech-Savvy Lifestyle
Embracing modern solutions
Making Informed Decisions
A Comparative Analysis
To make your decision-making process easier, let’s compare Instacart with its competitors in the grocery delivery industry. This side-by-side comparison will help you visualize the advantages of choosing Instacart as an investment and lifestyle choice.
Grocery Delivery Services Comparison
Service
Delivery Speed
Product Range
Personalization
Sustainability
Instacart
Fast
Extensive
Tailored
Eco-Friendly
Competitor A
Moderate
Limited
Limited
Less Eco-Friendly
Competitor B
Slow
Limited
Basic
Less Eco-Friendly
Lifestyle Meets Investment
Investing in the Instacart IPO isn’t just about numbers and stock charts. It’s about integrating a modern lifestyle with a promising investment opportunity. As you weigh your options, consider how Instacart aligns with your day-to-day life and values.
Conclusion
In the dynamic world of investments, Instacart’s IPO offers a unique blend of financial potential and lifestyle enhancement. With John Smith’s insights and our exploration of lifestyle integration, you’re better equipped to make an informed decision. Remember, stocking up on Instacart isn’t just about stocks; it’s about investing in convenience, time, and a more tailored way of living.
Make your investment count, and let Instacart stock your portfolio with possibilities. Your lifestyle, your choice!
Welcome to the world of culinary simplicity and indulgence. In this article, we’ll embark on a flavorful journey alongside the renowned Chef Michel Leblanc. With his expertise in the art of cuisine, Chef Leblanc will unveil the secrets to crafting the perfect batch of air-fried French fries. Whether you’re a novice in the kitchen or a seasoned cook looking to elevate your lifestyle, this guide promises to bring a touch of gourmet to your everyday dining experience.
About Chef Michel Leblanc
Chef Michel Leblanc is a celebrated culinary artist with over two decades of experience in the world of gastronomy. With a background spanning prestigious kitchens across Europe and North America, Chef Leblanc has earned a reputation for his exquisite approach to culinary classics. His passion for the art of cooking and dedication to simplicity has made him a trusted source for culinary inspiration.
Remember the sheer delight of savoring crispy, golden French fries as a child? Chef Leblanc believes that in the fast-paced world we live in, we often overlook the simple pleasures. In this section, we’ll explore why air-fried French fries are a game-changer in the culinary world, offering both nostalgia and innovation.
The Science Behind Air Frying
Unlock the science behind air frying that makes it a healthier and tastier alternative to traditional deep frying. Chef Leblanc breaks down the principles that result in perfectly crispy yet guilt-free French fries.
Mastering the Art
Choosing the Right Potatoes
The foundation of any great French fry lies in the choice of potatoes. Discover the varieties that lend themselves best to air frying, and how their characteristics affect the final product.
The Perfect Cut
Achieving that ideal French fry shape is an art in itself. Learn the techniques for cutting your potatoes to ensure uniform cooking and a satisfying crunch.
The Art of Seasoning
Chef Leblanc’s secret seasoning blend elevates your fries from ordinary to extraordinary. Get a glimpse into his favorite seasoning combinations that will tantalize your taste buds.
Air Frying Techniques
Uncover Chef Leblanc’s step-by-step guide to air frying perfection. From preheating to cook times, he shares his precise methods to ensure consistent results every time.
Visual Table: French Fry Perfection
Let’s summarize the key steps to mastering air-fried French fries in a visually engaging table:
Step
Details
1. Potato Selection
Choose the right potato variety.
2. Cutting Technique
Cut into uniform shapes.
3. Seasoning
Apply Chef Leblanc’s signature blend.
4. Air Frying Method
Follow precise techniques for success.
Comparative Table: Air Fryer vs. Deep Fryer
The Healthy Choice
In this section, we compare the health benefits of air frying against deep frying, shedding light on why air frying is the preferred method for a modern and healthy lifestyle.
Savoring the Results
The Ultimate Taste Test
Join Chef Leblanc in a taste test where he compares air-fried French fries to their deep-fried counterparts. Prepare to be amazed by the culinary magic that happens in an air fryer.
Serving Suggestions
Discover creative serving ideas and dipping sauces that take your air-fried French fries to the next level, making them the star of your next gathering.
Conclusion
As we wrap up our journey into the art of air frying French fries, it’s evident that simplicity in cooking can lead to extraordinary results. Chef Michel Leblanc’s expertise has shown us that even the humblest of dishes can be transformed into gourmet delights. So, embark on your culinary adventure, elevate your lifestyle, and savor the simplicity of perfectly air-fried French fries. Your taste buds will thank you, and you’ll never look at fries the same way again.
Welcome, dear readers, to a culinary journey like no other. I’m Chef Michel Leblanc, and I’ve spent decades perfecting the art of cooking. But today, I’m not here to share recipes; I’m here to help you master a different art—the art of tailoring your daily caloric intake to achieve a healthier and more vibrant lifestyle.
In collaboration with leading nutritionists and experts, I’ll guide you through the intricacies of metabolism and how understanding it can transform your life. So, let’s embark on this journey together, shall we?
Understanding Your Metabolism
The Metabolism Demystified
Before we delve into the nitty-gritty details, let’s demystify metabolism. Your metabolism is the engine that drives your body, determining how efficiently it burns calories and fuels your daily activities. It’s the secret behind those who seem to effortlessly maintain their ideal weight and energy levels.
Meet Our Knowledge Source: Dr. Emily Rodriguez, PhD in Nutrition
To unravel the mysteries of metabolism, we turn to Dr. Emily Rodriguez, a distinguished expert with a PhD in Nutrition. With over two decades of research in her repertoire, Dr. Rodriguez is the ideal guide for our journey into the world of metabolic mastery.
Understanding the fundamentals is crucial. Dr. Rodriguez explains that your daily caloric intake should align with your energy expenditure. It’s a delicate balance, and here’s where many stumble. Let’s break it down:
Table 1: Caloric Intake vs. Energy Expenditure
Aspect
Daily Caloric Intake
Energy Expenditure
Sedentary Lifestyle
1,800 – 2,200 calories/day
Minimal activity
Moderate Activity
2,200 – 2,800 calories/day
Regular exercise
Active Lifestyle
2,800 – 3,500+ calories/day
High-intensity workouts
Meal Planning Made Easy
Chef Michel Leblanc’s Pro Tip: Balancing your daily caloric intake doesn’t mean sacrificing flavor. Instead, it’s about making smart choices. Opt for nutrient-dense foods like lean proteins, whole grains, and plenty of fruits and vegetables. Create balanced, delicious meals that leave you satisfied and energized.
Fine-Tuning Your Metabolism
The Role of Macronutrients
Not all calories are created equal. Dr. Rodriguez emphasizes the importance of macronutrients: carbohydrates, proteins, and fats. Understanding their roles can help you fine-tune your metabolism.
Table 2: Macronutrients and Their Roles
Macronutrient
Role in Metabolism
Dietary Sources
Carbohydrates
Primary energy source
Whole grains, fruits
Proteins
Muscle building and repair
Lean meats, dairy
Fats
Energy storage and insulation
Avocado, nuts, olive oil
Timing Matters: Meal Frequency
Chef Michel Leblanc’s Pro Tip: Don’t forget about meal frequency. Spacing your meals evenly throughout the day keeps your metabolism revved up and prevents energy crashes.
Practical Strategies for a Healthier Lifestyle
Stay Hydrated
Hydration is often underestimated but plays a significant role in metabolism. Water is essential for digestion and nutrient absorption.
Quality Sleep
A lack of sleep can disrupt your metabolism. Aim for 7-9 hours of quality sleep each night.
Manage Stress
Stress can wreak havoc on your metabolism. Incorporate stress-relief practices like meditation or yoga into your routine.
Conclusion: Your Metabolic Mastery Journey
In closing, mastering your metabolism is an art that requires understanding, patience, and a dash of culinary creativity. With the guidance of Dr. Emily Rodriguez and the culinary expertise of Chef Michel Leblanc, you’re now equipped to tailor your daily caloric intake for a healthier lifestyle.
Remember, it’s not just about counting calories; it’s about nourishing your body, enjoying delicious meals, and feeling your best every day. So, embark on this journey, experiment with your daily caloric intake, and savor the results of a more vibrant and energized you.
Welcome to the flavorful world of herbs! I’m Chef Michel Leblanc, and I’ve spent decades perfecting the art of culinary craftsmanship. From exquisite French cuisine to international culinary adventures, I’ve dedicated my life to understanding the nuances of flavors and ingredients. Today, I invite you into my herb kitchen to settle a timeless debate: Fresh vs. Dried herbs. Let’s dive in and uncover which of these culinary powerhouses truly reigns supreme.
The Essence of Fresh Herbs
1. Vibrant Flavor Explosion
Fresh herbs are like little green flavor bombs. Their vibrant, aromatic oils burst forth when you chop or crush them. This explosion of flavor can take your dishes from good to extraordinary. Imagine the zest of freshly picked basil in a Caprese salad or the aromatic punch of cilantro in a homemade salsa.
2. Textural Delight
One aspect that sets fresh herbs apart is their texture. The delicate leaves add a pleasant crunch to your dishes, enhancing the overall dining experience. The slight crispness of fresh mint in a refreshing dessert or the tender bite of parsley in a tabbouleh salad is a testament to their culinary charm.
It’s often said that we eat with our eyes first, and fresh herbs excel in this department. The vibrant green hues and lively appearance of fresh herbs can turn an ordinary plate into a work of art. Garnishing with sprigs of fresh dill or chives can make your dishes as visually stunning as they are delicious.
Key Points – Fresh Herbs
Aspect
Fresh Herbs
Flavor
Vibrant
Texture
Textural
Visual Appeal
Stunning
The Versatility of Dried Herbs
1. Shelf-Stable Convenience
Dried herbs offer the convenience of long shelf life without sacrificing flavor. You can have your favorite herbs at your fingertips year-round, regardless of the season. No more worries about wilting basil or spoiled cilantro!
2. Intense Concentration
Drying herbs concentrates their flavor, making them potent and versatile. A pinch of dried oregano or thyme can infuse your dishes with a deep, earthy essence that lingers on the palate.
3. Culinary Consistency
Dried herbs provide a consistent flavor profile, ensuring that your dishes taste the same each time you prepare them. This reliability is especially valuable in professional kitchens.
Choose Fresh Herbs when you want an explosion of flavor, a textural delight, and a visually appealing presentation. They shine in salads, garnishes, and dishes where their fresh, lively essence can take center stage.
Opt for Dried Herbs when convenience, intensity, and consistency are your priorities. Dried herbs excel in long-cooking dishes like stews, soups, and sauces, where their flavors meld seamlessly with other ingredients.
Conclusion: Elevate Your Culinary Creations
As we wrap up our herbaceous journey, remember that both fresh and dried herbs have their place in the culinary world. Embrace the versatility of both to elevate your culinary creations. Become the maestro of flavors in your kitchen, just like a seasoned chef. Whether you’re sprinkling fresh basil on a pizza or adding dried rosemary to a hearty roast, your dishes will speak volumes of your culinary expertise.
Join me on this culinary adventure, and let’s celebrate the richness of herbs that elevate our everyday meals into unforgettable dining experiences.
About Chef Michel Leblanc
Chef Michel Leblanc is an internationally renowned culinary expert with over 30 years of experience in the kitchen. He has earned accolades for his innovative culinary creations and his passion for teaching others the art of cooking. Chef Leblanc’s expertise spans various cuisines, and he is celebrated for his exceptional use of herbs and spices to create unforgettable dishes.
Comparative Table: Fresh vs. Dried Herbs
Aspect
Fresh Herbs
Dried Herbs
Flavor
Vibrant
Concentrated
Texture
Textural
–
Visual Appeal
Stunning
–
Shelf Life
Short
Long
Consistency
–
Reliable
In the world of culinary delights, the debate between fresh and dried herbs is a delightful journey of flavors and textures. Whether you’re a budding chef or a seasoned home cook, understanding when to use fresh or dried herbs can truly elevate your dishes. So, step into your herb kitchen, experiment, and let your taste buds be the ultimate judge. Happy cooking!
Laptops are invariably limited to Wi-Fi only connections; desktop computers never have built-in mobile internet. But what if you need to get your Linux computer online but have no wireless or Ethernet network?
The answer is tethering. With a smartphone, you can share your mobile internet with your computer.
As long as your carrier doesn’t limit how you use your data, internet connection sharing (also known as netshare) with a Linux computer is a good option. Wi-Fi tethering is one option, but what if this isn’t practical? Happily, there is an alternative. Here’s how to use Linux USB tethering with Android and iPhone.
What Is Tethering?
Tethering is the name given to connecting a mobile device to a computer in order to share mobile internet.
While some carriers might restrict this activity, these days that is rare. Most smartphones have a data plan which allows tethering, making tethering an attractive way to get online.
Strictly speaking, tethering refers to using a USB cable to share mobile internet. This means that you will need to carry your phone’s USB data cable around if you plan to use tethering.
Wireless tethering is also possible, using Wi-Fi or Bluetooth, although Bluetooth is slower and less reliable.
Using Wi-Fi is known as setting up a “wireless hotspot” with your mobile. In most cases, wireless tethering is easier, but there are good reasons to use USB tethering:
For a reliable network connection
To keep your phone charged
Avoid wireless interference
Prevent wireless sniffers intercepting data
If you don’t have a suitable USB cable, here’s how to use your phone as a wireless hotspot. Simply connect your Linux computer to your phone’s hotspot to get online.
Use the Right USB Cable for Tethering
Before proceeding, you need to be sure that you’re using a USB cable that is suitable for tethering. Not all cables will work for this, as some are designed purely for power. Here’s the best way to check that your USB cable is suitable for tethering:
Connect the cable to your computer
Connect your phone to the cable
Wait for either device to detect the other
If data transfer or file browsing is available, it is suitable for tethering
An unsuitable cable will merely charge the phone.
If there is a problem with the cable, you should be able to buy a suitable data-ready alternative online.
The methods described here require you to connect the mobile device to your PC with a working USB cable before activating tethering. All the steps and screenshots have been recorded using USB tethering on Ubuntu 22.04.3 LTS.
How to Tether Android Phones to Linux
If you have an Android device, tethering is straightforward, thanks in part to both phone and PC being Linux-based.
To share your mobile internet to a Linux PC over USB:
Connect the USB cable to your phone and Linux PC.
Android will detect the connection—when prompted to Allow access, select Allow.
In the Notifications find the USB message, and tap it.
In most cases, the connection will be automatically established. You should be able to see the connection details in the system tray/panel.
If not, use the terminal. Check the IP address for your device to confirm it has worked:
bash
ip address
Look for a new entry (you can disconnect and retry) with a valid IP address for your network.
Check USB connection status in the terminal.
If you find the IP address results confusing, use ifconfig, which can be accessed with the net-tools package.
bash
sudo apt install net-tools
To display network connections, enter:
bash
ifconfig
Look for an option labeled “usb0” or again, anything new with a valid IP address.
Linux to Android USB tethering isn’t always that simple. With some distros, you may need to select the USB connection.
Find the network tray icon
Click to find the network option with a name like “auto usb0”.
Select this to connect Linux to your phone via the USB cable.
Don’t have a data plan which allows tethering? Installing a custom Android ROM can help circumvent restrictions.
How to Tether iPhones to Linux
If you have an iPhone with a data plan which allows tethering, you can set up Linux tethering over USB.
Unlike Android, however, this doesn’t connect automatically. Instead, you will need libimobiledevice, described as a “cross-platform software protocol library and tools to communicate with iOS devices natively.” Head to www.libimobiledevice.org to confirm current compatibility.
If you’re using Ubuntu, libimobiledevice should already be installed. If not, before hooking up your iPhone to Linux, open a terminal and enter:
bash
sudo apt install libimobiledevice6
Next, you need to establish trust between the phone and computer. When hooking up the devices with the USB cable, you will be prompted with messages on both devices. On the iPhone, tap Trust to proceed; the message should vanish on the computer (if nothing happens, click Try again.)
To connect to the internet through your iPhone:
Open Settings > Personal Hotspot.
Enable Allow Others to Join.
All you need to do now is select the connection to enable Linux tethering. Unlike Android, iPhone devices display as a new Ethernet device, rather than USB. You should see them listed in the usual Settings > Network view.
Can You Enable USB Tethering in the Linux Terminal?
In some scenarios you may need to use the command line to tether Linux to your phone. For example, your computer may not have a desktop environment.
It is unsurprisingly simple to enable this. With the phone connected over USB and sharing activated, open sudo nano /etc/netplan/01-network-manager-all.yaml.
Next, add the following:
yaml
ethernets: eth0: dhcp4:yes dhcp6:yes
Hit CTRL+X to save and exit, then Y to confirm.
Enter the following commands:
bash
sudo netplan try

sudo netplan apply
Your USB tethered connection should now begin. You can review the netplan at any time from the terminal with:
bash
sudo netplan get
Remember not to save any changes to the file unless they are required.
Tethering Linux Phones to Linux
Several Linux mobile operating systems are available. These include a mobile version of Pure OS on the Librem 5, PostmarketOS on the PinePhone, and UBPorts, the continuation of Ubuntu Touch (perhaps the easiest Linux mobile operating system to install).
Perhaps surprisingly, not all of these have reliable options for USB or wireless tethering. For specifics, check the documentation of whichever Linux mobile project you’re using.
Tethering Your Phone to Linux: Success!
While smartphones can be used as wireless hotspots for laptops and computers, USB tethering remains useful. Your computer may have a damaged network card, for example, or you may have equipment susceptible to wireless interference.
Ultimately, sharing your phone’s mobile internet is a great way to get your Linux PC or any other device online. And if you’re concerned about the phone losing charge, the USB cable will ensure it draws power from your PC. It’s win-win!
Audience: Problem Solvers
Key Takeaways
Tethering allows you to share your mobile internet with a Linux computer, either through USB or wireless connection.
Using a suitable USB cable is important for successful tethering, as it will provide a reliable network connection and prevent wireless interference.
Tethering is a convenient option when you don’t have Wi-Fi or Ethernet network access, and it can be easily set up with Android and iPhone devices on Linux computers.
If you’re an avid YouTube user, you’ve probably stumbled upon videos you wished you could download for offline viewing or sharing. While YouTube’s app allows limited offline downloads, it doesn’t cover all content, and you’re confined within the app. But fear not! In this article, we’ll introduce you to five Chrome extensions that make downloading YouTube videos a breeze.
Addoncrop YouTube Video Downloader is a feature-rich extension that simplifies YouTube video downloads. To get started, you’ll need to download Addoncrop through Foxified, an extension that facilitates the integration of Firefox add-ons into Chrome.
Once installed, this extension adds a handy bar just below YouTube videos, offering various options. You can easily download videos in your preferred resolution, with file sizes displayed before downloading. However, it’s crucial to ensure you comply with YouTube’s terms and conditions and copyright laws when downloading content.
Addoncrop goes beyond video downloads; it allows you to convert videos to MP3, download thumbnails, and offers features like dark mode, cinema mode, and a floating video player. You can even take screenshots of videos and hide YouTube comments. The extension’s versatility is impressive.
Image by https://www.makeuseof.com/
How to Install Addoncrop’s Downloader:
Visit the Addoncrop website and go to the YouTube Video Downloader page.
Click on “Add to Chrome” and then “Let’s Go,” which will redirect you to the Chrome Web Store.
Internet Download Manager, known as IDM, is a versatile tool for downloading various types of files, including videos. While you can download the IDM extension from the Chrome Web Store, it’s functional only if you have the IDM software installed on your computer. You’ll need both the software and the extension to make it work.
To download YouTube videos with IDM, open a video on YouTube, and you’ll spot a “Download This Video” button with the IDM logo in the top-right corner of the video player. Click it, select the desired file format and video resolution, and IDM will handle the rest. Keep in mind that after a 30-day free trial, you’ll need to purchase an IDM license for extended use, which is well worth it.
Local YouTube Downloader does precisely what its name suggests: it allows you to download YouTube videos locally to your device. Unlike some extensions, you won’t find this one on the Chrome Web Store; you’ll need to install it via Tampermonkey, a popular user script manager for various browsers.
Once both Tampermonkey and Local YouTube Downloader are installed, you can download videos effortlessly. Simply open the YouTube video you want to save, click “Download High-Resolution MP4” below the video player, and the video will be saved to your device. For more options, you can explore different resolutions and formats in the “Show/hide links” section.
Local YouTube Downloader offers a versatile range of choices, including audio-video combined and separate formats, giving you full control over your downloads.
Image by https://www.makeuseof.com/
How to Install Local YouTube Downloader:
First, download Tampermonkey from the Chrome Web Store.
Easy YouTube Video Downloader is a straightforward Opera add-on that you can integrate into Chrome using the CrossPilot extension. True to its name, it simplifies YouTube video downloads without any complexities.
Once installed, open a YouTube video, and you’ll find a green “Download as” button. Click it to reveal a drop-down menu with available formats and resolutions, complete with file sizes. Choose your preferred format, and Easy YouTube Video Downloader will initiate the download.
Image by https://www.makeuseof.com/
How to Install Easy YouTube Video Downloader:
Begin by downloading CrossPilot from the Chrome Web Store.
YouTube By Click operates as standalone software rather than a browser add-on. However, it functions similarly to an extension, enabling you to download videos directly from the YouTube website. You can download YouTube By Click from its official website.
Once installed, the software will automatically detect videos being played on YouTube and offer a small window in the bottom-right corner. Here, you can choose to download videos in MP4 or MP3 formats. The application also allows you to customize settings, including the download folder, default format, video quality, and browser compatibility.
YouTube By Click is available in multiple languages and provides a convenient way to save videos for offline viewing.
Image by https://www.makeuseof.com/
Download Videos for Offline Viewing
These Chrome extensions streamline the process of downloading YouTube videos, making it convenient for offline viewing or sharing with others. Whether you’re on a plane, train, or just have a limited data plan, these extensions have you covered. Say goodbye to buffering and data usage, and start enjoying your favorite YouTube content offline.
Directories are the building blocks of your Linux operating system. Whether you’re a seasoned Linux user or just starting your journey, understanding how to Creating and Removing directories using the command line is a valuable skill. In this comprehensive guide, we’ll walk you through the essential commands and strategies to effortlessly manage directories on your Linux machine.
How to Create a Directory With the Command Line
The Linux terminal is your gateway to efficient directory management. Let’s dive into the mkdir command, your key to creating directories:
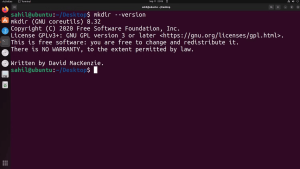
1. Create a Single Directory on Linux
The basic syntax to create a single directory is as follows:
Image by https://pressmaverick.com/
You can then use the cd command to navigate into the newly created directory.
Image by https://www.makeuseof.com/
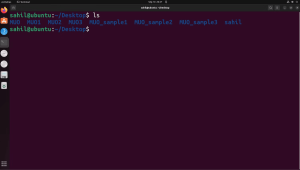
2. Create Multiple Directories on Linux
The mkdir command is versatile, allowing you to create multiple directories at once. Use this syntax:
Image by https://pressmaverick.com/
This command will swiftly create three directories for you.
Image by https://www.makeuseof.com/
3. Create Directories Directly
As a Linux user, you can create a directory directly at the desired location. You don’t need to navigate to the location or use the mkdir function within the terminal.
All you need to do is head over to the folder/location where you want to create a new directory/folder and right-click.
From the list menu, click on the New Folder option.
Image by https://www.makeuseof.com/
Once you see a new folder icon, you can rename the folder to a name of your choice.
Image by https://www.makeuseof.com/
Rest assured, if you want to check the directory status from the terminal window, you can still use the cd command to navigate to the specific location and run the ls command to list the contents.
mkdir Options
You can use a few options with the mkdir command, which helps you enhance the existing utility of the command. You can use the commands listed below:
-p or -parents: Create a parent directory and subdirectory together.
Image by https://www.makeuseof.com/
-v or -verbose: Add verbose messages for each directory created.
Image by https://www.makeuseof.com/
--version: Check the version details of the mkdir command.
Image by https://www.makeuseof.com/
Deleting Empty and Non-Empty Linux Directories
Now that you know how to create directories, it’s time to learn how to remove them. Linux provides two primary methods: rm and rmdir.
Using the rm Command
1. Check the Directory’s Contents
Before deleting a directory with rm, inspect its contents with the cd and ls commands:
Image by https://pressmaverick.com/
This ensures you won’t accidentally delete important files.
Image by https://www.makeuseof.com/
2. Delete a Directory via the Terminal
To remove a directory, use the rm command followed by options and the directory name:
Image by https://pressmaverick.com/
Common rm options:
-f: Forcefully remove files and folders.
-i: Prompt for permissions before deleting.
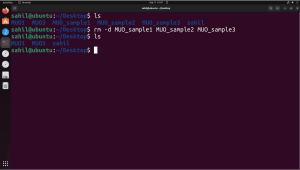
-r: Recursively remove directories and their contents.
-d: Remove an empty directory.
Image by https://www.makeuseof.com/
You can delete multiple directories at once:
Image by https://pressmaverick.com/Image by https://www.makeuseof.com/
Using the rmdir Command
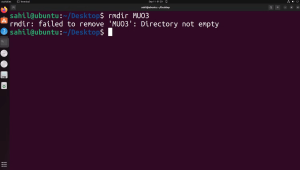
Use the rmdir command to quickly delete empty directories:
Image by https://pressmaverick.com/
However, if the directory isn’t empty, you’ll encounter an error.
Delete a Directory Directly
Just as you created directories directly, you can delete them directly. Select the directory, press the Delete button on your keyboard, and confirm. Remember to double-check the directory’s contents before doing this, as it’s irreversible.
Working With Linux Directories Effortlessly
Directories are the backbone of your Linux system. Mastering directory creation and deletion in the terminal empowers you to work seamlessly within Linux. Use these commands and techniques to streamline your Linux experience and efficiently manage your file structure.
Unlock the power of Linux terminal commands to create, manage, and remove directories effortlessly. Learn the tricks from a Linux pro!
Are you facing the daunting task of selecting a website builder for your brand or business? With the plethora of options available today, it’s easy to feel overwhelmed. Among the top contenders, Google Sites and Wix shine as prominent choices for creating a website that suits your needs. But how do you determine which one is the right fit for you? In this comprehensive guide, we’ll dissect Google Sites and Wix, comparing their features, pricing, interfaces, and use cases to help you make an informed decision.
1. Simplicity and Functionality
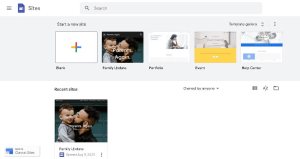
Google Sites
Google Sites, part of the Google Workspace application suite, emphasizes simplicity in website building. It has been a reliable host for over 800,000 wikis, blogs, portfolios, and business sites since its 2016 redesign. This no-code website builder offers numerous templates to kickstart your project. Moreover, it seamlessly integrates with other Google Workspace apps, allowing easy embedding of documents, spreadsheets, and slide presentations into your site.
Image by https://www.makeuseof.com/
Wix
Similarly, Wix is a no-code website builder with hundreds of templates and customizable layouts. It caters to over 200 million registered users who use it to create online stores, portfolios, blogs, and consultant websites. Wix’s cloud-hosting services ensure reliability, faster loading speeds, and minimal domain concerns.
Image by https://www.makeuseof.com/
2. Plans and Pricing
Google Sites
Google Sites is free for those with a Google account. The standard version provides features suitable for personal projects. For businesses, Google offers pricing plans starting at $6/month, providing increased storage, enhanced security controls, and custom business email. Custom enterprise solutions are also available.
Image by https://www.makeuseof.com/
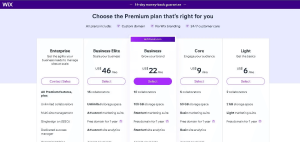
Wix
Wix offers a free plan with unlimited pages and customization but displays ads and restricts custom domain names. Premium plans (Light, Core, Business, and Business Elite) range from $6 to $46 per month, removing ads and offering more features. Enterprise plan pricing is custom and requires consultation.
3. Interface and Use Cases
Google Sites
Google Sites boasts a user-friendly drag-and-drop interface. Collaboration is seamless with real-time updates and comments. Websites created with Google Sites are automatically responsive across different screen sizes.
Image by https://www.makeuseof.com/
Wix
Wix is versatile, catering to diverse use cases. It excels in e-commerce, offering tools for managing products, orders, and payments. Customizable tax and shipping options, coupons, and integrated email marketing via Wix ShoutOut enhance its appeal.
Image by https://www.makeuseof.com/
4. Add-ons and App Integration
Google Sites
Google Sites integrates effortlessly with various Google applications, including Docs, Sheets, Slides, and Maps. This enhances your site with content and functionality.
Image by https://www.makeuseof.com/
Wix
Wix boasts an app market with numerous integrations, categorized for easy access. Drag-and-drop or one-click integration simplifies the process. The choice depends on whether you’re an existing Google user or prefer third-party integrations.
Image by https://www.makeuseof.com/
5. Customization and Design
Google Sites
While Google Sites offers customization with templates, it has limited variety compared to Wix. However, it allows for easy editing, diverse color schemes, fonts, and interactive elements.
Image by https://www.makeuseof.com/
Wix
Wix provides over 900 templates, offering extensive variety. It supports custom HTML and CSS, making it ideal for complex projects requiring in-depth customization.
Image by https://www.makeuseof.com/
Simplicity vs. Versatility: Google Sites or Wix?
In summary, Google Sites shines with simplicity, making it ideal for beginners and those already immersed in Google’s ecosystem. It’s perfect for collaboration and offers a free domain name for budget-conscious users. On the other hand, Wix stands out with its versatility, catering to various needs, from personal websites to e-commerce ventures. Its extensive template library and app market make it a top choice for customization and professional use.
Conclusion
Whether you lean toward Google Sites‘ straightforward approach or Wix’s versatility, both platforms excel in their own right. The choice ultimately depends on your specific needs and preferences. Website building has never been easier, and with the right builder, your online presence can flourish.
In the ever-expanding world of website builders, Google Sites and Wix are just two of many options. If neither of them aligns with your interests, consider exploring alternatives like WordPress, Squarespace, or Weebly.
About the Author
Tayo Sogbesan is an experienced web developer and digital marketing expert with a passion for simplifying complex concepts. With over a decade in the industry, Tayo has helped countless businesses establish a robust online presence. His insights and expertise make him a trusted authority in the field.
Key Points Table:
Aspect
Google Sites
Wix
Simplicity & Functionality
No-code, Google integration, templates
No-code, templates, cloud hosting
Plans & Pricing
Free, Google Workspace options
Free, premium plans, enterprise custom
Interface & Use Cases
User-friendly, real-time collaboration
Versatile, e-commerce, marketing tools
Add-ons & Integration
Google app integration
App market, third-party integrations
Customization & Design
Templates, limited variety
900+ templates, custom HTML/CSS
Comparative Table: Google Sites vs. Wix
Aspect
Google Sites
Wix
Simplicity & Functionality
No-code, Google integration, templates
No-code, templates, cloud hosting
Plans & Pricing
Free, Google Workspace options
Free, premium plans, enterprise custom
Interface & Use Cases
User-friendly, real-time collaboration
Versatile, e-commerce, marketing tools
Add-ons & Integration
Google app integration
App market, third-party integrations
Customization & Design
Templates, limited variety
900+ templates, custom HTML/CSS
Audience Problem Solver
Are you still struggling to choose the right website builder for your unique needs? We’ve laid out the strengths and features of Google Sites and Wix to simplify your decision-making process. Whether you’re a beginner or a seasoned pro, the perfect website builder is out there waiting for you to create your online masterpiece. Make an informed choice and embark on your digital journey today!