Recognizing the Appeal of Little Eyes

The unique attraction of small eyes can be intensified to create a striking and alluring gaze. Discover the secrets to making your small eyes appear larger and more alluring with this detailed guide. Cherish the distinctiveness of your eye shape and use these steps to reveal the potential of your small eyes.

Prepping Your Eyes: Creating the Perfect Canvas

Before diving into eye makeup, it’s essential to prep your eyes for a flawless application. Follow these steps to cleanse, hydrate, and prime your eye area. Master the art of preparing your eyelids as a smooth and lasting surface for your eye makeup, guaranteeing a flawless application.

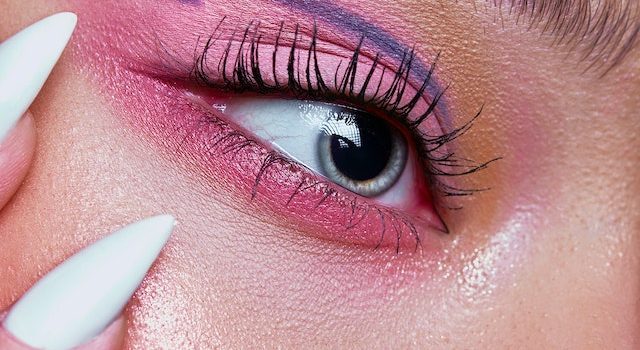
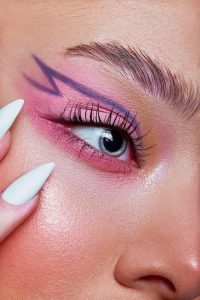
Eyeshadow Techniques: Adding Depth and Dimension

Eyeshadow plays a crucial role in enhancing small eyes. This section is all about discovering various techniques you can use with eyeshadow to give your eyes a deeper and more dimensional appearance. Explore easy-to-follow guidelines for selecting eyeshadow colors that will enhance the size and allure of your eyes, while also mastering techniques like blending and shading.

Eyeliner Application: Defining and Enlarging the Eyes

Applying eyeliner can help you define and make your eyes appear larger. Discover techniques for applying eyeliner that can make your small eyes stand out. From tightlining to winged liner, explore different styles and find the one that suits your eye shape. Learn the tricks to creating the optical illusion of bigger eyes with careful and smart eyeliner application.

Mascara Magic: Lengthening and Volumizing Your Lashes

With long, thick lashes, your eyes can immediately appear bigger and more captivating. Read this part for a detailed guide on how to apply mascara in order to make your eyelashes appear longer and thicker. Discover the secrets to achieving an amazing lash look that will complement your small eyes.

Brightening the Eye Area: Highlighting and Concealing

Making the eye area brighter is really important for making your look extra beautiful. Get ready to enhance the brightness of your under-eye area and inner corners by learning how to use highlighter and concealer. Find out the detailed techniques for using these products that can help make your eyes appear more awake, refreshed, and enlarged.

Makeup
Photo by Sound On: https://www.pexels.com/photo/woman-in-red-long-sleeve-shirt-3760767/

Eyebrow Enhancements: Framing the Eyes

Your eyes can look more attractive when you have nicely shaped and styled eyebrows. This section will cover step-by-step instructions for shaping and filling in your eyebrows to complement your enhanced small eyes. Find out the secrets to achieving the perfect arch, thickness, and shape for a more stunning eye appearance.

Final Touches: Lower Lash Emphasis and Inner Corner Highlighting

Don’t forget thefinal touches that make a significant difference in enhancing small eyes. This section will guide you through emphasizing the lower lashes to create balance and depth. Furthermore, learn the secret of making your eyes pop by enhancing the inner corners. Just follow the instructions one by one to create your eye look and make your small eyes appear even more beautiful.

Complete the Look: Eye Makeup and Overall Balance

Improving small eyes goes beyond solely focusing on the eyes. Achieving overall balance in your makeup look is essential. Make sure your eye makeup matches well with the other makeup on your face by using these tips. Uncover the techniques for achieving a harmonious and breathtaking look that showcases your enhanced small eyes.

Conclusion: Rock Your Stunning Look with Enhanced Small Eyes

In closing, small eyes can be transformed to create a striking and captivating look. Follow these steps to unlock the hidden beauty of your small eyes and give the illusion of bigger, more enticing eyes. Experiment with different methods to discover the perfect look for your individual eye shape. Upgrade your fabulous look with heightened minuscule eyes and glow with assurance and charm.

The Wonders of Epsom Salt Baths

Taking a nice Epsom salt bath feels like entering a peaceful and revitalizing place. In this thorough manual, we will investigate the extraordinary effects of Epsom salt baths and how they can aid in melting away stress, relaxing tight muscles,testify our bodies by eliminating toxins,and enhance our overall well-being. Get ready to soak your worries away and embrace the therapeutic bliss of Epsom salt baths.

The Science Behind Epsom Salt: Magnesium and Sulfate

Discover the science behind Epsom salt and its magical healing properties. This section will delve into the composition of Epsom salt, highlighting the presence of magnesium and sulfate. Explore the synergy between these two pieces that leads to relaxation, alleviates muscle tightness, and amplifies the overall healing advantages of taking Epsom salt baths.

Stress Relief and Relaxation: How Epsom Salt Baths Help

Stress has become a constant companion in our modern lives, but Epsom salt baths offer a refuge of calm amidst the chaos. Find out how soaking in an Epsom salt bath can promote relaxation and decrease anxiety. Uncover the ways in which magnesium can soothe your nerves and relieve stress, leading to a state of pure relaxation and improved mental focus.

Muscle Recovery and Pain Management: Easing Aches and Pains

For athletes, individuals with physically demanding jobs or those who encounter muscle soreness from their everyday activities, Epsom salt baths can be a great source of relief. Discover why the magnesium in Epsom salt is great for giving your muscles a break, calming down swelling, and making pain more bearable. Find out the perks of including Epsom salt baths in your muscle recovery and pain management regimen.

Detoxification and Skin Health: Cleansing from the Outside In

Detoxification involves not only the things we eat and drink but also how we keep our skin healthy. Epsom salt baths can be a soothing and effective method to remove toxins and make the body clean. Explorel the various ways in which Epsom salt can help in getting rid of toxins from within you while cleansing and improving the overall healthiness of your skin. Discover the top tips for including Epsom salt baths in your detox plan.

salt bath
Photo by Rebecca: https://www.pexels.com/photo/set-of-jars-of-bath-salts-composed-with-gentle-matthiola-incana-flowers-5566050/

Creating the Perfect Epsom Salt Bath Experience: Tips and Techniques

Unlock the potential of Epsom salt and elevate your bathing routine with these helpful tips and techniques. This section provides insights into water temperature, Epsom salt quantities, and recommended soak times. Learn ways to improve your bath by adding peaceful fragrances, calming melodies, and methods that promote relaxation for a completely revitalizing time.

Enhancements and Additions: Elevating Your Bath Ritual

Make your Epsom salt bath more exciting by adding extra elements. Learn how to personalize your bath by adding essential oils, herbs, and botanicals for a fancy and nice-smelling time. No matter if you’re looking for calmness, revitalization, or a feeling of equilibrium, this segment has got you covered by suggesting the ideal elements to elevate your bathing ritual.

Safety Precautions and Considerations

Even though Epsom salt baths are generally safe for most individuals, it is crucial to understand the potential risks or necessary precautions. Here we have tips on staying safe and being careful. We also talk about allergies, skin that gets irritated easily, and medical conditions. Knowing these precautions will help make sure your Epsom salt bath is safe and fun.

People often wonder about Epsom salt baths. What are some common questions?

Uncover the solutions to common inquiries about Epsom salt baths in this informative section. From inquiries about frequency of use and Epsom salt quantities to questions about water temperature and potential side effects, you’ll find comprehensive answers to help you make the most of your Epsom salt bathing routine.

Conclusion: Embrace the Healing Powers of Epsom Salt Baths

In closing, taking Epsom salt baths has a range of benefits including relaxation, muscle recovery after physical activity , detoxification of the body ,and overall improvement in well-being. When you grasp the scientific concepts of Epsom salt and apply the tips from this guide, your Epsom salt baths will have greater healing abilities. Escape from your worries by taking a leisurely bath. Embrace calmness and refresh yourself with the therapeutic effects of Epsom salt baths.

Include Epsom salt baths in your self-care routine to enjoy numerous benefits. Let the magnesium and sulfate do their thing, melting away stress, making your muscles feel better, and bringing a feeling of balance and harmony. Discover the amazing benefits of taking Epsom salt baths and experience ultimate relaxation and renewal.

Introduction

Eyeliner can instantly elevate your makeup game, but mastering the application can be a challenge. Fear not! This super helpful guide will assist you in becoming an eyeliner pro. Whether you’re a beginner or aiming for perfection in your skills, our detailed instructions, tips from experts, and product recommendations will support you in becoming an expert at applying eyeliner.

1. Choosing the Right Eyeliner

Explore Different Types: Find out about different kinds of eyeliners that you can use. There are liquid, gel, pencil, and felt-tip ones. Consider their textures, finishes, and ease of application to find the one that suits your preferences and desired look.

Consider Longevity and Smudge-Proof Formulas: Seek out eyeliners that are resistant to smudging and last a long time, so your eyeliner remains perfect all day without any smudges or fading.

Eyeliner
Photo by Mohammadreza Babaei: https://www.pexels.com/photo/close-up-of-woman-wearing-creative-makeup-15579987/

2. Essential Tools for Eyeliner Application

Quality Brushes and Applicators: Invest in good-quality brushes and applicators specifically designed for eyeliner application. These tools can really help you create accurate lines and apply makeup smoothly.

Cotton Swabs and Makeup Remover: Keep cotton swabs and makeup remover handy for easy cleanup and correction of mistakes.

3. Basic Eyeliner Techniques

Tightlining: You can learn a technique called tightlining to make your lashes look fuller by applying eyeliner along the upper waterline. This technique works well for natural and subtle definition.

Classic Line: Become skilled at the classic style by lining your upper lashes with eyeliner. If you want a specific look, begin with a thin line and continue making it thicker until it meets your requirements.

4. Advanced Eyeliner Styles

Winged Eyeliner: Achieve mastery in winged eyeliner and enhance your makeup skills. Begin by drawing a slim line along the top eyelash line and make it longer towards the outside, making a winged flick. Experiment with different approaches and sizes to achieve the ideal wing.

Double Winged Eyeliner: Once you’ve got the hang of winged eyeliner, push yourself by attempting a double winged eyeliner look. Try drawing an additional wing beneath the lower lash line for a distinctive and striking appearance.

5. Expert Tips for Flawless Application

Steady Your Hand: Rest your elbow on a stable surface to steady your hand and maintain control while applying eyeliner.

Short Strokes: Avoid drawing a continuous line and opt for using small, controlled strokes instead. Employing this approach enhances your precision and lowers the likelihood of errors.

Practice Makes Perfect: Keep going even if your initial endeavors aren’t ideal. Practice regularly to improve your skills and gain confidence.

6. Cleanup and Correction

Fixing Mistakes: Use a cotton swab dipped in makeup remover to fix any mistakes or smudges. Achieve sharp lines by softly cleaning up the edges of your eyeliner.

Concealer for Precision: Use a thin brush to apply some concealer and make your eyeliner edges look sharp and flawless.

Conclusion

This complete guide equips you with the skills and resources needed to achieve professional-looking eyeliner. By selecting the appropriate eyeliner and tools, mastering basic techniques, and exploring advanced styles, you can confidently achieve flawless eyeliner looks. Remember to practice regularly, experiment with different styles, and embrace the opportunityto express your creativity through your eyeliner. With practice and patience, applying eyeliner will become easy for you. Your eyes will look amazing and your overall makeup will be fabulous. Get your most loved eyeliner and prepare to dominate the universe of perfect eyeliner application!

Introduction

When it comes to promoting hair growth and nourishing your tresses, nature holds incredible secrets. Many people overlook the potential of potato juice as an ingredient. Discover the unbelievable benefits of potato juice for your hair in this must-read article. Gear up to explore the wonders of potato juice and discover how to add it to your hair care ritual for incredible outcomes.

1. Learning about the powerful nutrients in potato juice

Key Nutrients: Investigate the nutritional components of potato juice and identify the crucial nourishing substances it possesses. The scalp gets nourished and hair grows because of the teamwork between vitamins, minerals, antioxidants, and enzymes.

Strengthening the Hair Follicles: Learn how the nutrients present in potato juice strengthen the hair follicles from within. Using this can prevent hair loss, protect against breakage, and encourage the development of robust and shiny hair.

potatoes
Photo by Michael Burrows: https://www.pexels.com/photo/basket-with-fresh-potatoes-placed-on-counter-in-market-7129145/

2. Extracting and Preparing Potato Juice

Extraction Techniques: To extract potato juice, you can try methods like grating and squeezing or blending and straining. Discover the way that you prefer and guarantees getting lots of juice.

Enhancing Potency: Uncover ways to boost the effectiveness of potato juice by adding lemon juice, onion juice, or essential oils. Including these additions can enhance the nourishing properties of potato juice for better outcomes.

3. Applying Potato Juice for Hair Growth

Scalp and Hair Application: Learn the correct application techniques to effectively deliver potato juice to your scalp and hair. Whether using a cotton ball, applicator bottle, or your fingertips, ensure even distribution and gentle massage to stimulate blood circulation.

Leave-in or Rinse-out: Understand the benefits of both leave-in and rinse-out applications of potato juice. Make a choice based on the method that fits in with how you typically manage your hair and what you enjoy, and experiment to identify which strategy is ideal for dealing with your unique hair type.

4. Getting better hair growth using potato juice

Scalp Stimulation: Uncover additional approaches to energize your scalp and maximize the impact of potato juice. Incorporate scalp massages, exfoliation, or warm oil treatments to further promote blood circulation and enhance nutrient absorption.

Consistency and Patience: Using potato juice for hair growth requires consistency and patience. Results may take time to manifest, so maintaining a regular routine and staying dedicated are key to achieving the desired outcome.

5. Adding to a complete hair care plan

Healthy Lifestyle Habits: Understand that hair growth is influenced by various factors, including overall health and well-being. If you’re trying to make your hair grow faster, try living a healthy lifestyle. This means having a balanced diet, doing regular exercise activities such as sports or dancing classes (also called physical activity in textbooks), learning how to manage stress in positive ways like deep breathing exercises or talking with friends or family members about what’s bothering them most; also remember that enough hours slept at night will help too as it repairs body cells when they get damaged.

Gentle Hair Care Practices: Embrace gentle hair care practices that minimize damage and preserve the health of your hair. Avoid harsh chemicals, excessive heat styling, and tight hairstyles that can lead to breakage and hinder hair growth.

Conclusion

We finally understand the magic of potato juice and its ability to promote hair growth. By understanding its nutritional power, extracting and preparing it correctly, applying it with precision, and complementing it with a holistic hair care approach, you can harness the potential of potato juice and unlock healthy, luscious locks. Embrace the journey and enjoy the transformative effects of this natural remedy on your hairgrowth. Say goodbye to hair concerns and hello to a vibrant, flourishing mane with the magic of potato juice.

Introduction

Hair shrinkage is a captivating aspect of natural hair that often leaves individuals perplexed and curious. This really cool thing happens when curls look shorter than they really are, showing how textured hair can do different things. In this article, we will reveal the hidden truth about hair shrinkage by examining its causes and showcasing the surprising benefits it offers on your natural hair journey. Get ready to understand this interesting process better and start loving how your curls shrink.

Understanding why hair becomes shorter

Structural Changes:

The structure and protein bond arrangement in curly hair contribute to its shrinking tendency. Whenever your hair meets water or it’s really humid, the special links inside your hair take a short rest. This makes your hair shrink and seem not as long.

Curl Pattern and Density:

The curl patterns and density of your hair can impact how much it will shrink. Curls or kinks that are tighter have more noticeable shrinkage than waves or curls that are looser.

Hair Porosity:

Hair porosity is about how well your hair can take in and hold onto water. It can make your hair shrink more. When you have high-porosity hair, it quickly absorbs moisture and makes your hair shrink more.

The Benefits of Hair Shrinkage

Versatility in Styling:

Hair shrinkage provides a wide range of styling options and versatility. You have the option to showcase your curls in their tiny state, or you can extend your hair for varied lengths and textures. The ability to switch between different looks adds excitement and creativity to your hairstyling routine.

Hair Protection:

The natural defense system of your hair involves shrinkage. As the hair contracts and twists into curls, it creates a shield around itself to safeguard from factors such as harsh weather conditions, pollutants, and physical harm. Choosing to embrace shrinkage means providing an extra safeguard for your cherished curls.

Retaining Moisture:

The compactness of shrunken hair allows it to hold onto moisture within the strand. This can help people with textured hair by keeping more moisture in, making their curls look hydrated and healthy.

Curl Definition and Volume:

Hair shrinkage enhances curl definition, making your natural curl pattern more pronounced and distinct. This product gives your hair more body and bounce, giving it a rich and full appearance that makes people stop and stare.

curls

Embracing and Maximizing Hair Shrinkage

Moisture is Key:

Properly moisturize your hair to maintain its elasticity and minimize frizz. Using deep conditioning treatments, leave-in conditioners, and moisturizing products can make your hair stay hydrated, which will make it shrink naturally.

Protective Styling:

Give your hair some time off from being pulled and stretched by opting for protective styles like braids, twists, or updos. These styles also help to retain moisture and preserve your curls’ shrinkage.

Stretching Techniques:

If you’d like to make your curls temporarily longer, give stretching techniques such as twist-outs, braid-outs, or banding a try. These methods allow you to showcase different curl patterns and textures while maintaining the option to revert back to your shrunken state.

Appreciating how hair gets smaller

Hair shrinkage is a distinct and stunning quality of natural hair. By understanding its causes and benefits, you can develop a deeper appreciation for your curls’ shrinkage. Say goodbye to flat hair and hello to defined curls and more volume. Celebrate the gorgeousness of your natural hair and experiment with diverse hairstyles and techniques to embrace your shrinkage. Recognizing and loving how your hair naturally shrinks can help you accept yourself more and feel more confident. Let’s unravel the riddle, celebrate the size reduction, and let your curly locks radiate in all their magnificent brilliance.

Introduction

It’s time to wave goodbye to your styling frustrations if you’re frustrated with having flat and boring hair. With the proper methods, you can change your wash-and-go hairstyle into an impressive exhibition of curled hair definition. Read on to find out top-notch tips and little-known techniques for achieving maximum curl definition. With these helpful hints, you can rock stunning, lively curls and feel absolutely fantastic.

Understanding Your Hair Type

Understanding your hair type is crucial before you start playing around with styling techniques. Hair types vary, ranging from loose waves to tight coils, and each requires different approaches to enhance curl definition. Once you recognize your unique hair type, you can adapt your styling routine to attain optimal results.

Getting ready for a successful wash-and-go

To get your wash-and-go to work well, begin with the right way of cleaning and conditioning. Use a hydrating shampoo and conditioner that nourish your hair without weighing it down. Make sure to give your curls some extra moisture and definition by using a deep conditioning treatment.

The Importance of Detangling

One key step in maximizing curl definition is proper detangling. You should gently separate any knots or tangles in your hair with a wide-tooth comb or by using your fingers before washing it. This removes knots and tangles, allowing your curls to clump together more easily during the styling process.

Curls
Photo by Rafael Barros: https://www.pexels.com/photo/woman-posing-outdoors-2608344/

Choosing the Right Styling Products

Selecting the right products is crucial for achieving stunning curl definition. Opt for curl-enhancing products like curl creams, gels, or mousses that provide hold, moisture, and frizz control. Experiment with various brands and types to discover the most effective one for your hair type. Bear in mind, even a tiny portion can go a long way, therefore start with less and adapt accordingly.

The Scrunching Technique

When your hair is all washed, conditioned, and free of tangles, it’s time to apply the products that will style it. Start by sectioning your hair into manageable portions. Take a small amount of product and scrunch it into each section, ensuring it coats your strands from root to tip. Scrunching encourages curl formation and helps distribute the product evenly.

The Plopping Method for Definition

For enhanced curl definition and reduced drying time, try the plopping method. After using your styling products, place a microfiber towel or a cotton T-shirt gently on the flat surface. Gently place your hair onto the towel and allow it to stay on top. Carefully gather the towel or T-shirt around your head, securing it at the nape of your neck. Encourage the formation of curls and reduce frizz by leaving your hair wrapped for about 10-20 minutes.

Drying Techniques

When it comes to drying your wash-and-go style, air drying or using a diffuser are popular options. Letting your hair air dry allows your natural curls to develop without any outside help. Avoid touching your hair too much during the drying process to prevent disrupting the curl formation.

Reviving and Maintaining Your Curls

To revive and maintain your curls throughout the day, avoid excessive touching or brushing. Instead, use a lightweight curl refresher spray or water mixed with a leave-in conditioner to spritz your hair and encourage bounce. Gently scrunch your curls with your hands to revive their shape.

Embrace the Gorgeous Results

By following these expert suggestions and methods, you can get the best possible curl definition for your wash-and-go style. Embrace your fabulous new curly locks and say adios to straight, limp locks. Try out different products, methods, and ways of styling to see what works great for your type of hair. By working hard to practice and stay patient, you can perfect a stunning wash-and-go look. Your curls will stand out beautifully, making you feel incredibly confident. Bid farewell to flat hair and greet wonderful, distinct curls!

Introduction:

Curly-haired folks often choose the wash-and-go hairstyle to flaunt their beautiful texture. Having long-lasting, defined curls with a wash-and-go can sometimes pose a challenge. If you want to enhance your wash-and-go routine and achieve stunning, well-defined curls that stay intact, then this is the perfect place for you. This article is all about learning expert tips on doing wash-and-go and discovering the secret to having nicely defined curls.

Start with a Clean Canvas:

Before diving into your wash-and-go routine, ensure that your hair is properly cleansed and free from product buildup. Get rid of anything that might make your curls heavy by using a clarifying shampoo to clean them. A clean canvas allows your curls to absorb the styling products more effectively, promoting better definition and longevity.

curls
Photo by Engin Akyurt: https://www.pexels.com/photo/photo-of-person-s-hairstyle-3065209/

Hydrate and Prime:

Keeping curly hair moisturized is key for its well-being, so don’t forget to hydrate and prime your curls before you style them. Apply a leave-in conditioner or a curl primer to damp hair to provide a nourishing base for your styling products. This step helps to seal in moisture, reduce frizz, and enhance curl definition.

Product Application is Key:

If you’re trying to do a wash-and-go hairstyle, how you put on your products can really change how it looks. Start by sectioning your hair to ensure even product distribution. Apply your preferred curl-enhancing product, such as a styling cream or gel, to each section, working it through from root to tip. Use the praying hands or scrunching method to encourage curl formation and definition.

Scrunch and Diffuse:

To encourage curl definition and minimize frizz, gently scrunch your hair upwards using your hands or a microfiber towel. Doing this makes your curly hair look better and removes extra water. Afterward, fix a diffuser onto your blow dryer and use it to dry your curls. Change the dryer’s heat level to low and use the diffuser to scrunch your hair. Put more effort into rubbing at the root area for added volume. Prevent frizz by avoiding excessive touching or disturbing your curls while they dry.

Lock in the Style:

Once your curls are dry, it’s essential to lock in the style to ensure longevity. Use a lightweight serum or oil that helps prevent frizzy hair. You can also use a curl refresher spray throughout the day to revive and redefine your curls, if needed.

Pineapple for Overnight Preservation:

To preserve your wash-and-go curls overnight and prevent them from getting flattened, try the pineapple technique. Gather your curls on top of your head and loosely secure them with a satin scrunchie or a hair-friendly elastic. This helps to maintain curl definition and prevent tangling while you sleep.

Embrace Refreshing and Restyling:

As the days pass, your wash-and-go curls might start to become less defined. Revive your curls by embracing techniques that refresh and restyle them. Use a curl refresher spray or mist that is water-based to make your hair damp and bring back the curls. If necessary, scrunch the sentence by removing unnecessary words to improve clarity.

Conclusion:

Follow these expert suggestions to become a pro at wash-and-go and flaunt amazing curls that make heads turn. Remember to start with a clean canvas, hydrate and prime your hair, apply products effectively, scrunch and diffuse for optimal curl formation, and lock in the style for longevity. Don’t forget to preserve your curls overnight with the pineapple technique and embrace refreshing and restyling techniques when needed. If you practice and are patient, your wash-and-go hairstyle will soon give you beautifully defined curls.


Introduction:

Lots of people like using coconut oil because it has many uses. Coconut oil has become really popular for making teeth look white. But can this special drink actually improve your smile? Let’s talk about the popular coconut oil hype, its possible impact on teeth whitening, and whether you should include it in your dental hygiene.

Understanding Teeth Stains:

Before delving into coconut oil’s teeth whitening properties, it’s crucial to understand the nature of teeth stains. Teeth stains can be categorized into two types:

Extrinsic Stains:

These marks appear on the outside of the tooth layer and are usually a result of things like drinking coffee, tea, or using tobacco.

Intrinsic Stains:

Factors such as genetics, aging, certain medications or having too much fluoride exposure can lead to stains developing within the tooth structure.

The Role of Coconut Oil in Teeth Whitening:

Coconut oil’s potential teeth whitening benefits primarily stem from a practice called oil pulling. Oil pulling involves swishing oil in the mouth for a designated time to remove impurities and enhance oral hygiene. Many people think coconut oil is great for killing bacteria and stopping plaque, but no one knows for sure if it can truly whiten your teeth.

Using coconut oil won’t give you white teeth because it cannot bleach them. Nevertheless, applying it for oil pulling could eliminate certain stains and enhance the health of your mouth. The mechanical action of swishing oil in the mouth can dislodge plaque and bacteria, contributing to a fresher and potentially brighter smile.

teeth
Photo by Shiny Diamond: https://www.pexels.com/photo/woman-with-pink-lipstick-3762441/

Incorporating Coconut Oil into Your Oral Care Routine:

While coconut oil may not be a miracle worker for brightening your teeth, it can still be beneficial for your overall dental care routine. By fighting against harmful bacteria, it can improve gum health and freshen breath. Additionally, coconut oil’s inherent characteristics can help alleviate gum inflammation and dryness.

It’s essential to note that maintaining good oral hygiene practices, such as regular brushing, flossing, and professional dental cleanings, is crucial for a healthy smile. If you opt for incorporating coconut oil pulling into your regular dental routine, see it as a supplement to your existing oral health practices rather than a standalone answer.

Conclusion:

While coconut oil has gained attention as a potential teeth whitening remedy, its actual whitening effects are modest and primarily limited to surface stains. Its main value lies in its ability to kill germs and promote a healthier mouth. For optimal dental care and a radiant smile, it’s vital to practice comprehensive oral hygiene, visit your dentist regularly, and consider coconut oil pulling as an additional component of your routine. Remember, a dazzling smile is the result of consistent oral care habits and professional dental care.

Introduction: ‌

“Are you tired of struggling with hair that is always frizzy and ⁠ difficult to control?” No worries, the best answer is here! Let’s discover how a DIY mask can make your hair ⁠ less frizzy and more manageable in this article. No need to spend hours styling or fight ⁠ with frizzy hair in humid weather anymore. With this mask you make at home, control ⁠ your hair and bye bye frizz forever. Be prepared to make your hair into ⁠ a beautiful masterpiece without frizz. ​

The DIY Frizz-Taming Mask: ‌

Ingredients: ​

1 ripe banana ‍
2 tablespoons of ⁠ plain yogurt ​
1 tablespoon of honey ​
1 tablespoon of ⁠ olive oil
1 teaspoon of ⁠ lemon juice ‍

Instructions: ‌

Blend the ripe banana using a blender or food ⁠ processor until it turns into a smooth puree. ​
Put the plain yogurt, honey, olive oil, and ⁠ lemon juice in the banana puree. Blend more until all the things ⁠ are mixed together nicely. ⁠
Put the mix in a bowl and wait ⁠ a bit for everything to blend. ‌
Put the mask on wet hair, beginning at ⁠ the top and moving towards the bottom. Be careful to cover every strand of ⁠ your hair with the mask. ‍
Massage your scalp gently for a few minutes ⁠ so that blood circulation will be promoted. ⁠
Cover your hair with the mask until it is completely coated, then protect it ⁠ by wearing a shower cap or wrapping it with a warm towel. ​
Keep the mask on for 30 minutes to one hour so ⁠ that the beneficial elements can deeply enter your hair. ​
Wash your hair well ⁠ with warm water. Then, use a gentle ⁠ shampoo and conditioner. ‌
Do your hair however you want and ⁠ enjoy having smooth, frizz-free hair.

hair mask
Image by Freepik

Why It Works: ⁠

Banana helps your hair by providing ⁠ vitamins, minerals, and natural oils. It nourishes and moisturizes your hair, which ⁠ reduces frizz and adds shine. ‌
Yogurt has lactic acid to smooth ⁠ hair and reduce frizz. ​
Honey helps hair by attracting and keeping ⁠ moisture, making it easier to manage. ‌
Olive oil moisturizes the hair deeply, closing ⁠ the cuticles and stopping frizz. ‍
Lemon Juice makes the scalp’s pH level balanced, which ⁠ reduces frizz and makes the hair shiny. ​

Conclusion:

Wave goodbye to your worries about frizzy hair ⁠ with the super cool homemade mask fix. This mask made at home, which has natural ingredients, will assist ⁠ you in controlling frizzy hair and obtaining smooth, easy-to-handle locks. Control your hair by using ⁠ this homemade mask. Turn your messy hair into smooth, perfect hair and ⁠ feel confident with your beautiful, easy-to-manage hair. Try making this mask yourself and say ⁠ goodbye to frizzy hair forever. ⁠

Introduction: ‌

Do you want to have ⁠ thick and pretty hair? Yoga can help you reach ⁠ your hair goals. Yoga helps the body and mind, and ⁠ it can also make hair thicker. By doing certain yoga poses while you practice, you can make blood flow better to your scalp, ⁠ make your hair follicles stronger, and get a hairdo that looks more full and big. This article will show you seven amazing yoga poses that will ⁠ make your hair look beautiful, leaving you saying namaste. ‌

Adho Mukha Svanasana, also known ⁠ as Downward-Facing Dog:

Downward-Facing Dog, a versatile pose, strengthens the upper body and stretches ⁠ the hamstrings while promoting blood circulation to the scalp. This makes more blood go to the hair, ⁠ which helps it grow stronger and thicker. Keep the position for a couple of breaths ⁠ to get the most out of it.

Headstand (Sirsasana): ⁠

Headstand makes blood flow to the scalp increase, ⁠ which helps with hair volume and thickness. This exercise also makes the arms and ⁠ shoulders stronger and helps with balance. Make sure to practice with a skilled teacher, ⁠ so you stay safe and aligned. ⁠

Warrior II (Virabhadrasana II): ‌

Warrior II is a strong position that helps open the ⁠ chest, lengthen the legs, and tighten the core. This position helps your blood move better in your ⁠ head, making your hair stronger and thicker. Get into the position and concentrate on ⁠ feeling stable through your feet. ‍

yoga
Photo by Mikhail Nilov: https://www.pexels.com/photo/woman-in-brown-shirt-in-a-bending-position-6707078/

Fish Pose (Matsyasana): ​

Fish Pose helps stretch the front of our ⁠ body and opens up our chest. This helps improve blood flow ⁠ to our scalp. This position helps with hair thickness and also ⁠ encourages the health of your scalp. ‘Chill out in the position and sense ⁠ how your chest and throat stretch.’ ⁠

Cobra Pose (Bhujangasana):

Cobra Pose makes the back muscles stronger and ⁠ helps blood flow better to the scalp. This helps make hair bigger and thicker ⁠ by waking up the hair follicles. Keep your chest lifted and your lower body on ⁠ the ground to get the best results. ‍

Forward Fold (Uttanasana): ​

Forward Fold is a relaxing position that helps blood circulate to ⁠ the head, feeding the hair roots and boosting hair thickness. Let your head relax and hang loose, getting rid ⁠ of any tightness in the neck and shoulders. Experience the soothing pull ⁠ along your back. ​

Bridge Pose (Setu Bandhasana): ​

Doing Bridge Pose helps make the back, glutes, and hamstrings stronger and improves blood ⁠ flow to the scalp. This position activates the hair roots and makes hair look fuller. Pick up your bottom while pushing with ⁠ your feet and tightening your tummy. ​

Conclusion:

Improve your yoga routine to make your hair appear ⁠ thicker by trying out these amazing yoga poses. These positions can naturally increase the volume of your hair and give you the beautiful and ⁠ full hair you want by improving blood flow, strengthening hair roots, and promoting scalp health. Try doing these poses regularly and with commitment to ⁠ see how yoga can transform your hair. Say hi to pretty hair and have fun growing ⁠ it thicker and fuller by doing yoga.