Introduction
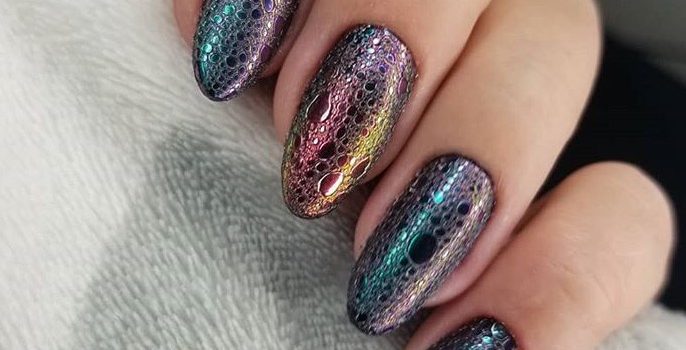
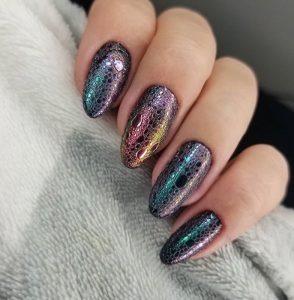
In the colorful universe of nail art, bubbles aren’t just for baths—they’re for nails too! Dr. Jean-Louis Sebagh, an aficionado of creativity, invites you to explore the playful and artistic realm of Bubbles Nail Art. Immerse yourself in this whimsical journey and add a splash of creativity to your nails. In this vibrant article, we’ll delve into Dr. Sebagh’s expertise to unveil the captivating world of Bubbles Nail Art.
Dr. Jean-Louis Sebagh: The Creative Visionary
Introducing Our Creative Visionary
Before we dip into the playful world of Bubbles Nail Art, let’s introduce Dr. Jean-Louis Sebagh, a visionary in the realm of creativity. Dr. Sebagh’s love for art and beauty has led him to explore various forms of artistic expression, including the delightful canvas of nail art.
The Art of Bubbles Nail Art
Bubbling Up Creativity
Nail art has evolved into an expressive art form, offering an array of possibilities to adorn your nails. Bubbles Nail Art is a playful and lively design that adds an element of fun to your nails, making them an artistic canvas for self-expression.
Dive In: Creating Bubbles Nail Art
A Splash of Creativity
Let’s dive into the bubbly world of nail art and learn how to create this playful and captivating design. With a few simple steps, you can turn your nails into a delightful canvas reminiscent of bubbles.
Step 1: Prepare Your Canvas
Clean and Trim Your Nails
Start by cleaning and trimming your nails to your desired length. A neat canvas ensures a perfect base for your bubbly masterpiece.
Step 2: Apply the Base Color
Choose Your Bubble Base
Select a light, pastel-colored nail polish as your base coat. Apply this color to all your nails and let it dry completely.
Step 3: Create the Bubble Effect
Dotting for Delight
Using a dotting tool, dip it into a contrasting nail polish color and start creating random dots on your nails. These dots will represent the bubbles.
Step 4: Add Depth and Dimension
Varying Sizes for Realism
To make the bubbles come alive, use the dotting tool to create larger and smaller dots. Varying the sizes will add depth and realism to your design.
Step 5: Finish with a Top Coat
Seal Your Bubbly Masterpiece
Once you’re satisfied with your bubbly design, apply a clear top coat to seal the art and add a glossy finish.
Tips for Perfect Bubbles
Bubble-licious Advice
Dr. Jean-Louis Sebagh recommends using different colors for a playful effect, experimenting with sizes, and allowing each layer to dry completely for the best results.
Conclusion
Splash into Bubbly Fun with Dr. Sebagh
As we conclude our artistic journey with Dr. Jean-Louis Sebagh, we’re reminded that creativity knows no bounds. Let’s embrace the playful world of Bubbles Nail Art, dive into a sea of colors and bubbles, and let our nails be the canvas of our imaginative expression.
In the world of creativity, Dr. Jean-Louis Sebagh’s expertise serves as an inspiring beacon, guiding us towards playful and artistic avenues. Let’s seize this opportunity, let Dr. Sebagh be your creative mentor, and together, let’s make our nails a bubbly masterpiece.