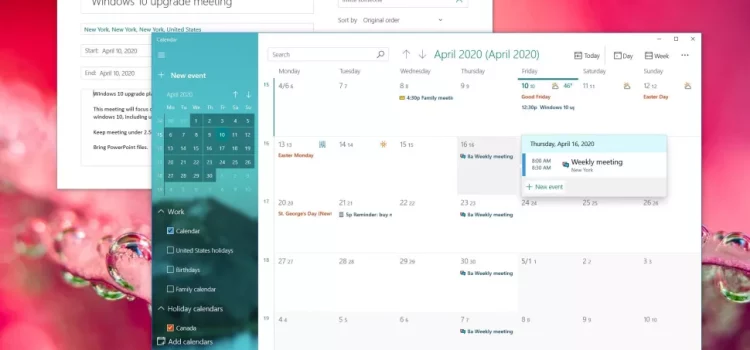
Get to Know the Windows 10 Calendar App
The powerful Calendar app on Windows 10 is specifically designed to assist with efficient schedule management. From the realm of meetings and reminders to the domain of appointments and diverse other events. All the necessary features for staying organized and managing your commitments are provided by this app. An added bonus is it has excellent compatibility with most popular external calendar providers and works offline. An excellent solution for both work and personal events is created by this.
Within this extensive tutorial, we will explain thoroughly everything that is required for your understanding for efficient utilization of the Windows 10 Calendar app.
How to Add and Manage Accounts on the Calendar App
To maximize the benefits of using the Calendar app, consider integrating it with your established accounts.

Luckily, the application enables you to import and manage schedule events from different external platforms, which encompass Outlook.com, Microsoft 365 Suite (including Outlook), Google Calendar service provided by Google LLC., Yahoo Calendar service provided by Yahoo Inc., as well as Apple iCloud
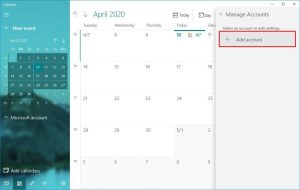
Follow these steps to add an account to the Calendar app:
Open the Calendar app.
Locate and click on the gear-shaped Settings button positioned in the lower-left corner. in the bottom-left corner.
“Manage Accounts” can be found in the top-right corner. from the top-right corner.
For those who already utilize the Mail app, this list will contain your accounts.
Choose the service you use for calendar events (e.g., Outlook.com, Microsoft 365, Google, Yahoo, iCloud).
Follow the on-screen instructions to complete the setup using your account credentials.
Adding as many accounts as you require allows for seamless management of personal and work-related events.
Personalizing and Collaborating Schedules for Enhanced Efficiency
After successfully setting up your accounts, Let’s personalize and collaborate on calendars for better organization
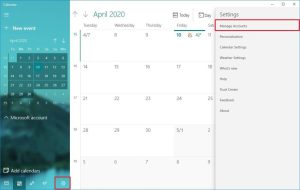
Customize Calendar Color and Visibility:
Open the Calendar app.
Click with your right mouse button on the calendar under the chosen account and pick a new color.
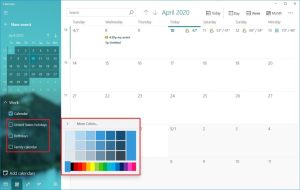
If desired, click “More colors” to generate a personalized color.
Deselect the checkbox if having a calendar is not your preference for the app.
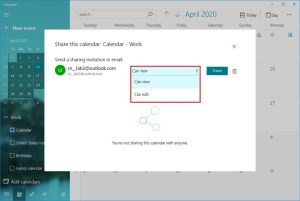
Sharing Calendars with Others:
Open the Calendar app.
Within the preferred account,, Click with your right mouse button on the calendar and select “Share calendar.”
When sharing your calendar, please enter an accurate email ID for sharing purposes and determine whether they should be granted viewing or editing privileges.
Click the “Share” button.
Creating and Tracking Working with the Calendar in Windows 10
With your calendars now established, let’s discover how to generate and handle events within the Calendar application.
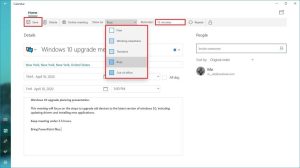
Adding Events with Detailed Information:
Open the Calendar app.
Click the “New event” button in the top-left corner or use the Ctrl + N keyboard shortcut.
Specify a descriptive title for the event.
Choose from the available dropdowns for choosing the date, commencement time, conclusion time, along with its designated place.
Add more specifics concerning the event. about the event.
Set a reminder for the event by making use of the provided choices in the drop-down menu named “Reminder”.
Press the “Save” button within the left topmost area.
Creating Repeating Events:
Open the Calendar app.
Choose the “Repeat” button situated at the corner on the right side at the top.
Utilize the “Start” option to indicate the event’s start date.
Specify the interval at which you want the event to repeat (like daily, weekly, monthly, yearly) (e.g., daily, weekly, monthly, yearly).
To determine when the event should stop repeating, utilize the “End” option.
Fill in the other event details as usual.
Click the “Save” button.
Scheduling Group Events:
Open the Calendar app.
Under the “People” section, Share/email invitations by entering their email addresses.
Fill in the event details, including date, start time, end time, and location.
Add any additional information.
Select the “Send” option for inviting the invited guests. to invite the attendees.
Quickly Creating Events from the Taskbar:
Tap on the taskbar button that displays time and date in the taskbar.
Pick a date for the event.
Click “Show agenda” situated at the lower right corner.
Enter the event details in the text box.
Choose the calendar to save the event.
Specify the beginning and conclusion of the planned gathering.
Click the “Save” button.
Integrating Recognized Calendars for Holidays, Sports, and TV Shows
Stay organized and updated by incorporating popular calendars into your schedule with The Calendar app to stay informed about holidays, sports events, or TV show airings. Here’s how:
Open the Calendar app.
Click on the button with the text “Add calendars” situated in the lower-left corner. situated in the lower left-hand corner.
Select a category for the calendar like Holiday calendars, Popular options, Sports-oriented themes or TV-inspired ones.
Decide on the specific calendars to be added.
The events will populate in your calendar.
Event Synchronization for Seamless Calendar Updates
In case you utilize several devices or modify events via the web edition of your calendar service, you’ll want to ensure your events sync across all platforms. Follow these steps to sync events in the Calendar app:
Open the Calendar app.
Click the menu (three-dotted) button in the top-right corner.
Personalizing Your Calendar Experience on your Windows 10 Device
To tailor the Calendar app to your preferences, it is possible to personalize both its appearance and settings.
Customizing Color Schemes and Themes:
Open the Calendar app.
Click the “Settings” (gear) button in the bottom-left corner.
Select “Personalization.”
Choose your preferred color scheme and theme (Light, Dark, or Use my Windows mode).
Setting Calendar Preferences and Work Hours:
Open the Calendar app.
Click the “Settings” (gear) button in the bottom-left corner.
Select “Calendar Settings.”
Tailor the beginning of your week to your liking, days you work, which includes setting up specific working hours.
Changing Weather Settings for Accurate Forecasts:
Open the Calendar app.
Locate and press on the gear-shaped button called “Settings” within the corner positioned at the bottom left.
Select “Weather Settings.”
Make a selection between Celsius and Fahrenheit as the scale for recording temperatures.
Conclusion
The Windows 10 Calendar app provides great assistance in efficiently organizing your schedule. for optimal scheduling management. By abiding by this thorough instruction, you can maximize its functionalities, stay organized, and seamlessly record all your essential gatherings. Irrespective of whether you’re employing it for work or personal utilization, the Calendar tool will support you in staying organized with all your appointments. You won’t miss any crucial occasion ever another time again.