
Introduction: Temporary Files in Windows
Temporary files are like unwelcome guests—eventually, you want them to leave. But what happens when they decide to overstay their welcome? In this guide, we’ll walk you through various methods to bid farewell to these stubborn temporary files that just won’t go away.
Using Disk Cleanup Tool
Windows provides built-in tools to deal with temporary files, and the Disk Cleanup tool is a standout option. If the standard methods of deletion fail, this tool might just do the trick.
- Press Win + S to access the search menu.
- Type “disk cleanup” and press Enter.
- Choose the drive you want to clear temporary files from.
- Select the files you want to remove.
- Confirm by clicking “Delete Files.”
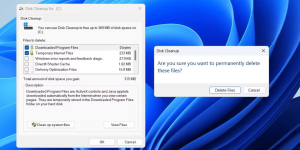
Image by https://www.makeuseof.com/
Command Prompt Method
If Disk Cleanup doesn’t quite cut it, the Command Prompt can be your next best friend. But don’t worry; it’s not as complex as it may sound.
- Right-click the Start icon and choose “Terminal (Admin).”
- Approve the User Account Control prompt by selecting “Yes.”
- Copy and paste the following command and hit Enter:

Emptying Software Distribution Folder
Windows loves to save update files in the Software Distribution folder before installing them. But when updates get stuck, these files can pile up. Here’s how to clear the clutter:
- Press Win + S and search for “services.” Press Enter.
- Find the Windows Update service, right-click, and choose “Stop.”
- Press Win + R and enter: C:\Windows\SoftwareDistribution\Download
- Select all files, hit the trash icon, and delete.
- Restart the Windows Update service from the Services window.
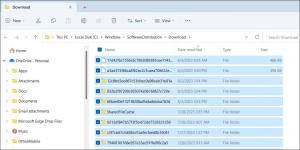
Image by https://www.makeuseof.com/
Editing Registry Files
The Disk Cleanup utility might spare recent temporary files, but what if you want them all gone? Tread carefully here, as editing the Windows Registry requires caution:
- Press Win + R and type “regedit” before pressing Enter.
- Approve the User Account Control prompt.
- Navigate to HKEY_LOCAL_MACHINE > SOFTWARE > Microsoft > Windows > CurrentVersion > Explorer > VolumeCaches > Temporary Files.
- Double-click the “LastAccess” key and set the Value data as 0.
- Restart your PC and attempt temporary file deletion again.
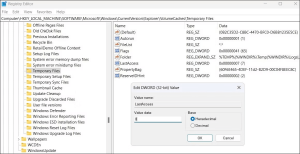
Image by https://www.makeuseof.com/
Safe Mode Booting
Third-party programs and services can be stubborn obstacles to deleting temporary files. Enter Safe Mode—your refuge from such interference:
- Boot into Safe Mode using appropriate methods.
- Once in Safe Mode, try deleting the temporary files again.
Conclusion
Temporary files might cling to your Windows PC like barnacles to a ship, but you need not tolerate their presence. By employing the methods outlined in this guide, you can bid farewell to these files and enjoy a cleaner, more optimized system. Whether you opt for the Disk Cleanup tool, Command Prompt, Registry editing, or Safe Mode booting, you’re on the path to a smoother Windows experience.