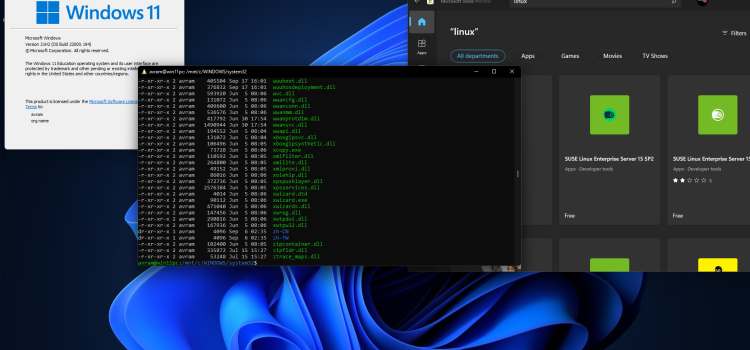
The Windows Subsystem for Linux (WSL) has revolutionized the development landscape by allowing developers to run a complete GNU/Linux environment on Windows. With most command-line tools, utilities, and applications available directly on Windows, WSL offers a seamless experience without the need for a traditional virtual machine or dual-boot setup. In this article, we’ll dive into WSL and explore its latest version, WSL 2, which brings even more exciting features for developers.
1. What is Windows Subsystem for Linux (WSL)?
WSL is a compatibility layer in Windows that enables running Linux distributions alongside the Windows operating system. It allows you to choose your preferred GNU/Linux distribution from the Microsoft Store, making it easy to set up and use. Once installed, WSL provides access to common command-line tools like grep, sed, awk, and other ELF-64 binaries. Additionally, you can run Bash scripts and various GNU/Linux applications, including popular tools like vim, emacs, and tmux.
Image by https://www.google.com/
2. Introducing WSL 2: The Latest Version
WSL 2 is the next generation of the Windows Subsystem for Linux architecture. It is designed to run ELF64 Linux binaries on Windows and brings significant improvements over its predecessor, WSL 1. One of the primary goals of WSL 2 is to enhance file system performance, resulting in faster access to files and improved overall system performance.
This new architecture also provides full system call compatibility, meaning that Linux applications can interact seamlessly with your computer’s hardware. WSL 2 changes how Linux binaries interact with Windows, but rest assured, it maintains the same user experience as WSL 1, which is widely available and widely used.
3. Benefits of WSL 2 for Development
WSL 2 offers a range of benefits for developers, making it an excellent choice for various use cases. Some of the key advantages include:
Flexibility in Distributions: With WSL 2, you can run different Linux distributions, such as Ubuntu, Fedora, Debian, and more. This allows you to work with your favorite Linux environment and access its vast package repositories.
Enhanced File System Performance: Thanks to the architecture changes in WSL 2, file system operations are significantly faster, making software builds and other file-intensive tasks more efficient.
GPU Acceleration: Developers involved in machine learning, data science, and other GPU-intensive tasks can leverage GPU acceleration directly within the WSL 2 environment. This opens up new possibilities for GPU-based development on Windows.
Compatibility and Interoperability: WSL 2 brings improved compatibility with various Linux software, enabling developers to seamlessly use Linux tools and applications alongside their Windows applications.
4. Getting Started with Windows Subsystem for Linux
Setting up WSL on your Windows machine is straightforward. Here’s a quick guide to get you started:
Enable WSL Feature: Go to “Control Panel” > “Programs” > “Turn Windows features on or off.” Check the box for “Windows Subsystem for Linux” and click “OK.” Restart your computer when prompted.
Install a Linux Distribution: Open the Microsoft Store, search for your preferred Linux distribution (e.g., Ubuntu, Debian, or Fedora), and install it. Once installed, launch the distribution to complete the initial setup.
Updating to WSL 2 (Optional): To upgrade to WSL 2, you’ll need to have Windows 10 version 2004 or later. Follow the instructions in the Microsoft documentation to upgrade your WSL version.
Using WSL: After installing and setting up your preferred Linux distribution, you can access it by launching the respective app or running “wsl” from the command prompt or PowerShell.
Conclusion
The Windows Subsystem for Linux (WSL) has undoubtedly transformed the development experience on Windows machines. With the latest version, WSL 2, developers gain access to a more robust and performant environment. Whether you’re a Linux enthusiast or a developer seeking cross-platform capabilities, WSL is a game-changer. Embrace the power of WSL and explore the vast possibilities it brings for your development projects. Happy coding!
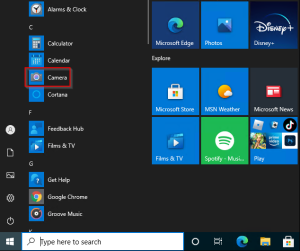
To start using the Camera app, follow these simple steps:
Click on the Start button, then select “Camera” from the list of apps.
Once the Camera app is open, choose either “Photo” or “Video” mode to take a picture or start recording a video. For video mode, click “Video” again to finish recording.
Viewing Your Photos and Videos:
After capturing your photos and videos, you can easily access them by following these steps:
Click on the Start button, then select “Photos” to open the Photos app.
Choose the collection you want to view, and your newly captured media will be accessible here.
Changing Camera Settings:
The Camera app allows you to customize various camera options to suit your preferences. To change camera settings, follow these steps:
Click on the Start button, then select “Camera” from the list of apps.
Once the Camera app is open, click on the “Settings” icon to access camera options.
Here, you can adjust settings such as framing grid, photo quality, and more to enhance your photo and video capture experience.
Image by https://www.google.com/
Switching Between Cameras:
If your device has multiple cameras, such as a front-facing and a rear-facing camera, you can easily switch between them:
Click on the Start button, then select “Camera” from the list of apps.
Once the Camera app is open, click on “Change camera” to switch from one camera to the other.
Zooming In or Out:
Although the Camera app in Windows 10 does not include a digital zoom feature, you can achieve a similar effect by taking a photo and then cropping it:
Click on the Start button, then select “Photos” to open the Photos app.
Choose the photo you want to crop, then select “Crop & rotate” from the menu.
Adjust the aspect ratio or drag the borders to crop the photo as desired.
Once you’re satisfied, save the cropped photo.
Automatically Saving Photos and Videos to OneDrive:
OneDrive integration allows you to automatically save your photos and videos, ensuring easy access across all your devices. Here’s how to set it up:
Photos:
In the search box on the taskbar, type “File Explorer,” and then select “Open.”
Select “This PC,” right-click on the “Pictures” folder, and then choose “Properties.”
Go to the “Location” tab, then select “Move.”
Choose “OneDrive,” then click “Select Folder” followed by “Move.”
Videos:
In the search box on the taskbar, type “File Explorer,” and then select “Open.”
Select “This PC,” right-click on the “Videos” folder, and then choose “Properties.”
Go to the “Location” tab, then select “Move.”
Choose “OneDrive,” then click “Select Folder” followed by “Move.”
Including Location Info in Photos:
The Camera app can utilize latitude and longitude information for geotagging photos taken from devices connected to the internet or a mobile network:
Click on the Start button, then select “Settings” (gear icon) followed by “Privacy.”
Under “Location,” ensure that the location service is turned on.
In “Choose which apps can access your precise location,” turn on “Camera.”
Turning Off the Camera for Specific Apps:
Windows allows you to control which apps can access your camera. To manage camera access for different apps:
Click on the Start button, then select “Settings” (gear icon) followed by “Privacy.”
Under “Camera,” toggle off “Allow apps to access your camera.”
To selectively grant camera access to specific apps, toggle on “Allow apps to access your camera” and adjust the switches accordingly.
Troubleshooting Camera Issues:
If your camera is not functioning correctly, follow these steps to identify and resolve the problem:
Disconnect the camera from your PC, then reconnect it.
If the issue persists, check for driver updates from your camera’s manufacturer. You can do this by accessing the Device Manager and scanning for hardware changes.
Restart your PC after installing any updates.
For additional help, you can visit the Microsoft community pages dedicated to music, photos, video, devices, and drivers to find solutions for specific camera-related problems.
By customizing and effectively using the Windows Camera app, you can make the most of your camera’s capabilities and capture memorable moments effortlessly. Whether you’re a photography enthusiast or just love taking candid shots, the Camera app provides a user-friendly interface to enhance your photo and video capture experience on Windows 10.
When attempting to access data on an external USB hard drive, you may encounter the following error message:
“USB Device not recognized: One of the devices attached to this computer has malfunctioned, and Windows does not recognize it.”
Applies to: Windows 10, version 1709, Windows 7 Service Pack 1 Original KB number: 2654149
Cause: Several situations can lead to the “USB Device not recognized” error:
The currently loaded USB driver has become unstable or corrupt.
Your PC requires an update for issues that may conflict with a USB external hard drive and Windows.
Windows may be missing other important updates for hardware or software issues.
Your USB controllers may have become unstable or corrupt.
Your external drive may be entering selective suspend.
Your PC motherboard may need updated drivers.
Image by https://pressmaverick.com/
Resolution 1 – Uninstall and then reconnect the external hard drive:
This method addresses issues where the currently loaded USB driver has become unstable or corrupt.
Select Start, type Device Manager in the Search box, and then choose Device Manager from the returned list.
Under Disk Drives, find and press and hold (or right-click) the USB external hard drive with the issue, then select Uninstall.
After the hard drive is uninstalled, unplug the USB cable.
Wait for 1 minute and then reconnect the USB cable. The driver should automatically load.
Check for the USB drive in Windows Explorer.
Note: Avoid connecting your USB external
hard drive into a non-powered
USB hub as it may lack enough power to operate the external drive. Instead, plug it directly into your computer.
If this method does not resolve the issue, proceed to resolution 2.
Install hotfixes that resolve issues on Windows 7:
These hotfixes can address known conflicts between a USB external hard drive and Windows.
Go to KB976972 titled “You encounter problems when you move data over USB from a Windows 7-based computer that has an NVIDIA USB EHCI chipset and at least 4 GB of RAM.”
Under Update information, select the appropriate download link that corresponds to your version of Windows 7 (32-bit or 64-bit).
Follow the onscreen instructions to complete the download and installation.
Additionally, visit KB974476 titled “The computer stops responding when a USB device resumes from the USB Selective Suspend state in Windows 7,” and request and install the hotfix for your version of Windows 7.
Restart your computer after installing the hotfixes.
If your problem still persists, proceed to .
Install the latest Windows Updates: This method involves installing the latest device drivers for your USB external hard drive.
Select the Start button, type Windows Update in the Search box, and then choose Windows Update in the results pane.
Select Check for Updates. After the scan is complete, select Review optional updates.
Select the check box next to the updates and then choose Install updates.
Follow the onscreen instructions to download and install the updates.
If prompted, reboot your computer.
If your problem persists, proceed to resolution 4.
Reinstall USB controllers: This method addresses situations where the currently loaded USB driver has become unstable or corrupted.
Select Start, then type Device Manager in the Search box, and then choose Device Manager.
Expand Universal Serial Bus controllers. Press and hold (or right-click) each USB device and select Uninstall. Repeat for each device.
Once complete, restart your computer. Your USB controllers will automatically reinstall.
If your problem still exists, proceed to resolution 5.
Resolution 5 – Disable USB selective suspend setting: This method prevents your USB external drive from powering down.
Select the Start button, type power plan in the Search box, and then choose Choose a power plan.
Next to your currently selected plan, select Change Plan Settings.
Select Change advanced power settings.
Expand USB Settings > USB selective suspend settings.
Select Plugged in, choose the drop-down menu, and then select Disabled.
If you’re using a laptop, select Battery, choose the drop-down menu, and then select Disabled.
Select Apply > OK.
If this doesn’t resolve your issue, proceed to.
Install your motherboard’s latest chipset drivers: This method involves updating your motherboard’s chipset drivers so your computer will recognize your USB external hard drive.
Review your computer’s documentation to find the name of the motherboard manufacturer.
Visit your computer manufacturer’s support website and navigate to find the appropriate drivers for your motherboard.
Download and install the latest chipset drivers following the manufacturer’s instructions.
If your issue still persists, we recommend contacting Microsoft product support for further assistance.
By following these troubleshooting steps, you can resolve USB device detection issues in Windows and regain access to your USB external hard drive. Remember to check each resolution method carefully, and if one doesn’t work, proceed to the next until the issue is resolved.
Windows Sync Center is a powerful tool that allows you to sync files with a network server on your Windows 11 or Windows 10 computer. It enables you to check the results of your recent sync activity and access copies of your network files even when your computer isn’t connected to the network. This functionality is incredibly useful for professionals who work on the go or in remote locations, as it ensures seamless productivity by keeping your important files accessible at all times.
How does Windows 11/10 Sync Center work?
Sync Center in Windows 11/10 enables you to store files for computers connected to a particular network. It allows you to keep information in sync between your computer and files stored in folders on network servers. These files are referred to as “offline files” because you can access them even when your computer or the server is not connected to the network.
This capability is especially beneficial when you find yourself in situations where the network connection is intermittent or unavailable. You can continue working on your offline files, and once the network connection is restored, Sync Center will automatically synchronize any changes you made with the network server.
In addition to syncing with network servers, Sync Center also provides support for syncing between your PC and certain compatible mobile devices. This feature comes in handy when you want to access your files on the go using a mobile device.
Configure Files in Windows 11/10 Sync Center
To configure files using Windows Sync Center in Windows 11/10, follow these step-by-step instructions:
Enable Offline Files:
Press Win+X to open the Quick Access menu and select “Control Panel.”
In the Control Panel search field, type “Sync Center” and hit “Enter.”
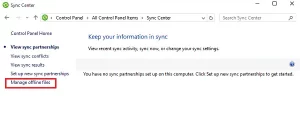
Click on the “Manage offline files” link in the left column of the Sync Center window.
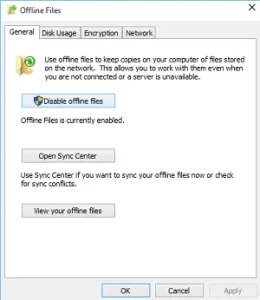
In the “General” tab, check if offline files are enabled. If not, click “Enable Offline Files” and then click “OK.”
Restart your computer to apply the changes.
Manage Disk Usage:
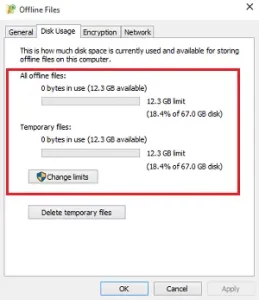
After your computer restarts, open the Sync Center and go to the “Disk Usage” tab.
Here, you can view the amount of disk space currently occupied by offline files, as well as the available space on your PC for storing these files.
To change the data limit, click on the “Change limits” button. A window will appear offering two options: “Offline files” and “Temporary files.”
Adjust the slider to set your desired limit for offline files, and then click “OK.”
Download Windows Speedup Tool:
To optimize your PC’s performance and fix errors, you can download the Windows Speedup Tool.
Visit the official Windows website or a trusted software download platform to find the tool.
Follow the on-screen instructions to download and install the tool on your computer.
Once installed, launch the Speedup Tool to start the optimization process.
Enhance Performance with Windows Speedup Tool:
The Windows Speedup Tool will scan your system for errors, junk files, and unnecessary registry entries that may be slowing down your computer.
Once the scan is complete, the tool will present you with a list of issues found on your PC.
Review the list and select the options to fix the errors and clean up your system.
Click on the “Fix” or “Optimize” button to resolve the issues and speed up your PC.
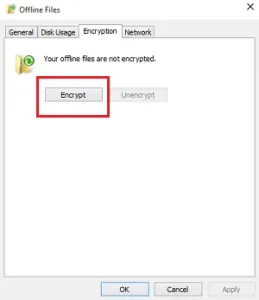
Securing Offline Files with Encryption
While Windows Sync Center offers convenience and accessibility, it’s essential to prioritize the security of your offline files, especially if they contain sensitive information. To add an extra layer of security, you can encrypt your offline files.
Here’s how you can encrypt your offline files:
Open the Sync Center and go to the “Encryption” tab.
Image by https://www.thewindowsclub.com/
Click the “Encrypt” button to initiate the encryption process.
Image by https://www.thewindowsclub.com/
Follow the on-screen instructions to set up encryption for your offline files.
Image by https://www.thewindowsclub.com/
Ensure you use a strong and unique encryption key to protect your data.
Image by https://www.thewindowsclub.com/
By encrypting your offline files, you can safeguard them from unauthorized access and ensure the confidentiality of your sensitive data.
Conclusion
Windows Sync Center in Windows 11/10 is a valuable tool for users who need access to network files even when offline. By configuring files using Sync Center, you can ensure seamless productivity and stay organized, regardless of your network connection status. Additionally, using the Windows Speedup Tool, you can optimize your PC’s performance and enhance its speed.
Remember to prioritize security by encrypting your offline files, especially if they contain sensitive data. By following these steps, you can make the most of Windows Sync Center’s features and streamline your file synchronization experience on Windows 11/10.
Robocopy, short for Robust File Copy, is a powerful command-line tool in Windows used to efficiently copy and synchronize files and directories. It offers a wide range of options to customize the copying process and is especially useful when you need to copy only new files and subfolders from a source directory to a destination disk.
Understanding the Command Line Options
Before diving into the specifics of copying new files and subfolders, let’s understand some essential command-line options used with Robocopy:
/E: The /E switch stands for “copy subdirectories, including empty ones.” It ensures that all subdirectories are copied from the source to the destination.
/XO: The /XO switch means “exclude older files.” When copying files, only those that are newer in the source compared to the destination will be copied.
How to Copy Only New Files and Subfolders
To copy only new files and subfolders from a source directory (e.g., C:\Users\Valery\Documents) to a destination disk (e.g., J:\Robocopy), we can use the /S switch, which stands for “copy subdirectories but not empty ones.” This prevents Robocopy from creating all the subfolders on the destination if there are no new files in them.
The command would look like this:
Image by https://pressmaverick.com/
In this command, /MAXAGE:20131030 ensures that only files created after the specified date (e.g., October 30, 2013) will be considered for copying. This way, you’ll copy only new files from the source to the destination.
Excluding Empty Folders for a Cleaner Destination
To further improve the destination directory’s cleanliness and avoid copying empty folders, we can add the /XD switch, which stands for “exclude directories.” You can list the directories you want to exclude after the /XD switch.
Image by https://pressmaverick.com/
In this example, “Folder1” and “Folder2” are excluded from the copying process. You can add more directories as needed.
Improving Efficiency with Additional Options
Robocopy offers many other options to fine-tune the copying process, such as multithreading, logging, and excluding specific file types. For instance, you can use the /MT switch to enable multi-threaded copying, which can significantly speed up the process on modern systems:
Image by https://pressmaverick.com/
Conclusion
Robocopy is a versatile and efficient tool for copying files and directories in Windows. By using the appropriate command-line options like /S and /XD, you can ensure that only new files and subfolders are copied while excluding empty folders on the destination. Experiment with additional options to optimize the copying process based on your specific requirements. With Robocopy’s power at your fingertips, managing file copies becomes a breeze!
The Get Help app supplies crucial help for people confronting challenges with diverse technology. Numerous assistance options are provided, encompassing troubleshooters, fast replies, extensive Microsoft articles, and further assets. Users are motivated to take proactive steps and locate solutions before contacting assisted support.
Virtual Agent and Search Support consumer interaction experiences.
Users can access customized content based on their device’s regional settings and language., An interactive chatbot designed to assist users with Windows-related queries is Virtual Agent. A conversational Virtual Agent helps comprehend issues and offer suitable answers. The Virtual Agent directs users to contact support if it cannot resolve the problem.
If Virtual Agent isn’t offered, the substitute experience, named Search Support, is accessible. Customers can input their inquiries and gain suggested help resources. Just beneath the search outcomes, customer support contact details are displayed.
Enterprise Experience and Support Options
Specialized SKUs in the Enterprise category receive a tailored experience within the Get Help app, emphasizing targeted support. Enterprise customers can access varied support mechanisms, subject to their contractual agreements.
Surprisingly, OEM assistance options are not shown within the Enterprise aspect of the Get Help app.,
Incorporate OEM Information into the App
OEMs can optimize the Get Help app by personalizing the supplied information for users. OEMs may route clients to their unique support platform or program, resulting in a streamlined support journey.
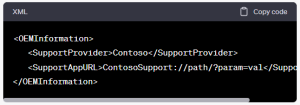
Linking to Your Support App
The Unattend.xml file serves as a conduit for linking your support app’s URI to the Get Help app. The XML code will look like this:
Image by https://pressmaverick.com/
Make sure the Support App URL includes legitimate character strings. The Support Provider field offers adaptable name display alternatives.
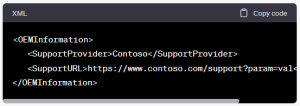
Navigating Users to Your Aid Platform
Offering a URL in the Unattend.xml file enables customers to access a tailored support space. The XML code will look like this:
Image by https://pressmaverick.com/
Review the Support URL to confirm the presence of accurate string values., The Support Provider field enables customizable names for linked content.
Implementing Get Help through Your Digital Channel
Embedding the Get Help app within your own platform can augment customer happiness. This is achieved by creating a link with the following format:
Image by https://pressmaverick.com/
Enter an all-lowercase and uninterrupted name that represents your brand, such as ‘contoso’ or ‘fabrikaminc’, when replacing <Manufacturer>. This particulars allows for the identification of app release origins without directly modifying the application itself.
Conclusion
The app provides resources for those seeking assistance., Offering tailored assistance by OEM sync boosts customer satisfaction. Providing a seamless pathway to the Get Help app via your platform promotes accessibility and user fulfillment. Tap into these personalized possibilities to strengthen your customer connections.
I typically compare Windows storage spaces with RAID when explaining it to others. Most IT Administrators have prior knowledge regarding RAID technology. With some recollection, I do recall…]
RAID technology builds redundancy into its file structures and uses advanced algorithms to boost fragment performance. However RAID is primarily associated with handling large amounts of data on disk based systems, there are also software grounded versions available, Virtualization systems often leverage Raid technologies to produce logical volumes that appear to users as a single block device.
Windows storage spaces is an alternative to physical hardware RAID configurations Windows Storage Spaces does n’t come as a tackle- grounded perpetration.
Windows Storage Spaces A provides a full historical account of all operations performed on the array
Microsoft first offered windows storage spaces with its operating system called Windows 8 Windows Storage Spaces is also available besides moment
Storage Spaces Direct was one of the additional features introduced with the initial release by Microsoft; it lets you construct expansive and scalable storehouses. , among other things. Azure integration, deduplication, contraction, and so on.
Image by https://www.bdrsuite.com/
Step 1 Prepare your disks
Prior to beginning the process of combining two pools, make certain that you’ve physically or virtually created sufficient storage devices.
I use three 10 gigabyte hard drives for demo purposes on Windows Garcon 2022. Nevertheless, larger disks will usually be used in real world scripts.
Step 2 produce a Storage Pool
With Director Garçon produce a storage pool Please log into your Windows Garcon and do with the coming way.
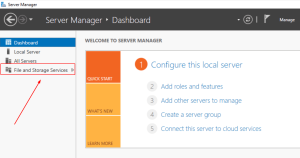
Open Garçon director.
Tap train and storage services
Image by https://www.bdrsuite.com/
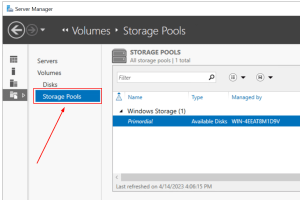
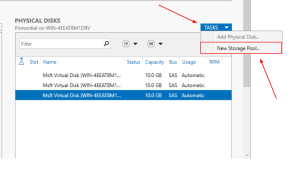
Click on Storage Pools.
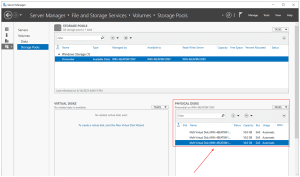
Navigating to Physical Disks will verify that any attached disks are detectable by Windows and can be used for creating a Storage Pool With these 3 harddisks you can build up a storagpool of about 31 GB
Image by https://www.bdrsuite.com/
Go to Tasks and click New Storage Pool as well,
Image by https://www.bdrsuite.com/
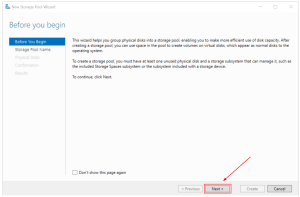
Under” Before you begin,” click Next.
Image by https://www.bdrsuite.com/
Specify your storehouse pool name and subsystem, along with clicking Next On his system, VembuStoragePool was called ‘ WIN-4EEAT8M19V.’ In addition, you may also include a description if desired.
Image by https://www.bdrsuite.com/
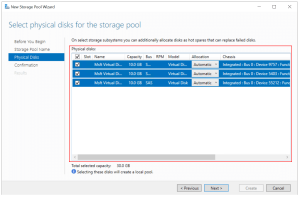
For your physical storage media disks that will be used to form the storehouse pool, select them from within the Physical Disks section. Click Next after selecting all appropriate items. In his particular instance, he labeled all three drives with names that totaled to ten gigabytes (GB) each.
You may adjust how to allocate your fragments, There are three options available
Pools disk capacity with available space to disks automatically.
For faulty disk drives Hot-extra offers an automatic alternative
You can assign a particular amount of capacity for every segment of your homemade arrangement,
Image by https://www.bdrsuite.com/
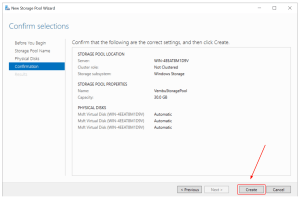
Use evidence to confirm your selections and click produce
Image by https://www.bdrsuite.com/
formerly done, click Close.
Image by https://www.bdrsuite.com/
Congratulations! You’ve configured a new storage pool In Garçon director when navigating to storage pools, a new storehouse pool will be generated In my illustration, the new storehouse pool named ‘VembuStoragePool’ can hold up to 30GB (3disks X 10GB).
Step 3 produce virtual disks
We created a storehouse pool; still, we can not use it. Next, a digital fragment from storage is generated through alternate steps. Then it becomes possible to generate more artifacts for consumption and control within our system of operations,
Open Garçon director.
To access train or storage service options click on the links labeled ‘Train’ and ‘Storage’.
Image by https://www.bdrsuite.com/
Click on Storage Pools.
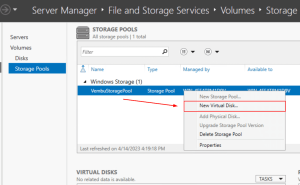
Right- click on the recently created Storage Pool and also click New Virtual Fragment.
Image by https://www.bdrsuite.com/
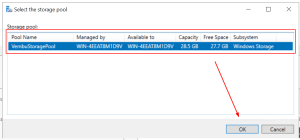
choose the storehouse pool and also click OK
Image by https://www.bdrsuite.com/
Under” Before you begin,” click Next.
Image by https://www.bdrsuite.com/
NY sales office data store. If you have at least one physical fragment allocated by Vembu Storage Pool auto-creation, you can use categories for storehouses. Storage categories move lines onto speedy cache for quicker access.
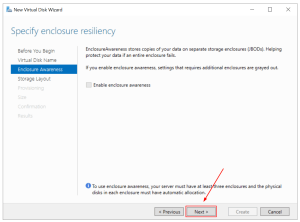
Under quadrangle mindfulness, click Next. Mentally aware geometric forms preserve clones of your data inside isolated repository chambers Quadrangle mindfulness requires that a boy’s garcon have at least three enclosures, and for each quadrangle, the physical disks must use automatic allocation.
Under Storage Layout, elect the storehouse layout and also click Next. You may choose between three layout options: Simple, Equality and Mirror.
In addition, outturn occurs when processing operations can operate on multiple strips at once improving performance by keeping parallel pipelines full There’s no fragment failover forbearance. In my case, three disks with 10 GB each will affect in a 30 GB Simple storehouse layout.
Mirror Storehouse has a layout where A trustable storehouse design that reduces capacity is outlined below The total storage capacity of your mirror storehouse will be 10 GB if each disk has a 10 GB capacity, At minimum you’ll need 5 hard drives to survive from 2 failures
Adding trustability by storing data on multiple drives reduces storage capacity and performance for a equality storehouse layout To cover against a single- fragment failure, use at least three disks. You can rest assured that even if fragments fail, you won’t lose any data. The system recovers from fragmentation automatically.
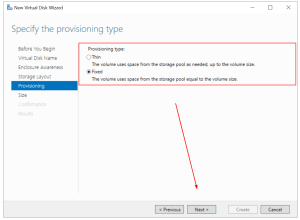
Under Provisioning, elect Thin or Fixed and also click Next. In thin provisioning volume space is drawn from the store house pool on demand until the size of the volume is reached. To use space from their storehouses as a fixed provision, Fixed is column that uses the volume size value
In Size, choose the specific allotted space for your virtual fragment, which can be a given amount or maximum allowed storage. Then click Next. I use the biggest size for myself.
Confirm the selection and also click produce.
formerly done, click Close.
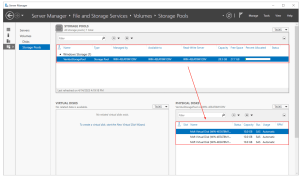
Step 3: Create virtual disks
We created a storage pool; however, we can’t use it. In the third step, we will create a virtual disk based on the Storage Pool we created in the second step.
Open Server Manager.
Click on File and Storage Services on the left side of the window.
Image by https://www.bdrsuite.com/
Click on Storage Pools.
Right-click on the newly created Storage Pool and then click New Virtual Disk.
Image by https://www.bdrsuite.com/
Select the storage pool and then click OK.
Image by https://www.bdrsuite.com/
Under “Before you begin,” click Next.
Image by https://www.bdrsuite.com/
Under Virtual Disk Name, specify the virtual disk name, add a description (optional), and click Next. In my case, the virtual disk name is “StoragePoolVembu.” If you have a minimum of one automatically allocated physical disk, you can enable storage tiers. Storage tiers enable the automatic movement of the most frequently accessed files to faster storage.
Under Enclosure Awareness, click Next. Enclosure Awareness stores copies of your data on separate storage enclosures. To use enclosure awareness, your server must have at least three enclosures, and the physical disks in each enclosure must have automatic allocation.
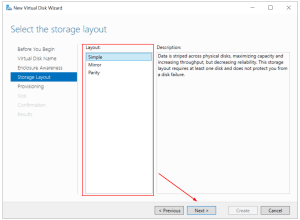
Under Storage Layout, select the storage layout and then click Next. You can choose a Simple, Mirror, or Parity layout:
Simple storage layout – data is striped across all disks, maximizing capacity and increasing throughput. There is no disk failover tolerance. In my case, three disks with 10 GB each will result in a 30 GB Simple storage layout.
Mirror storage layout – data is striped across all disks, creating copies of data. This storage layout increases reliability and decreases capacity. In case of a single disk failure, use at least two disks. If you have two disks of 10 GB capacity each, the total capacity of Mirror storage will be 10 GB. To protect against two disk failures, use at least five disks.
Parity storage layout – data is striped across all disks, increasing reliability but also reducing capacity and performance. To protect against a single-disk failure, use at least three disks. In case of disk failure, your data will not be lost.
Under Provisioning, select Thin or Fixed and then click Next. For Thin provisioning, the volume uses space from the storage pool as needed, up to the volume size. For Fixed provisioning, the column uses space from the storage pool equal to the volume size.
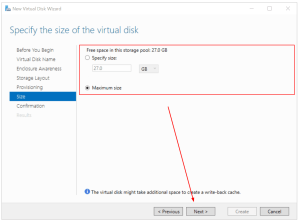
Under Size, specify the size you want to allocate to your virtual disk, could be a specific size or maximum size, and then click Next. In my case, I use the maximum size.
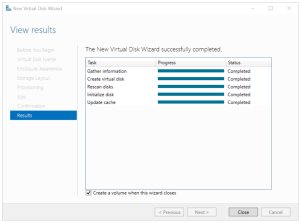
Confirm the selection and then click Create.
Image by https://www.bdrsuite.com/
Once done, click Close.
Image by https://www.bdrsuite.com/
A new wizard will open to create a volume. Proceed with the next step.
Step 4: Create a volume
In the fourth step, you will create a volume and prepare it for storing your data.
Under “Before you begin,” click Next.
Image by https://www.bdrsuite.com/
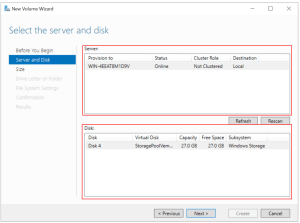
Under Server and Disk, select the server and disk, and then click Next.
Image by https://www.bdrsuite.com/
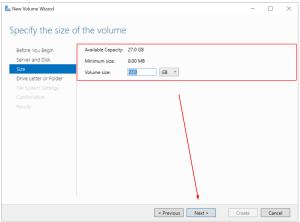
Under Size, specify the size of the volume and click Next. I use the maximum capacity.
Image by https://www.bdrsuite.com/
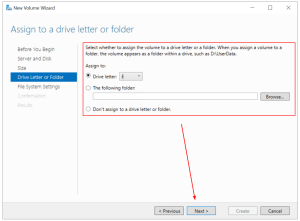
Under Drive Letter or Folder, assign a driver letter and then click Next. I use the volume letter E.
Image by https://www.bdrsuite.com/
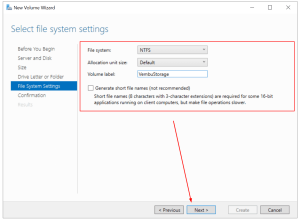
Under File System Settings, select file system settings, allocation unit size, and define the volume label, and then click Next. In my case, I keep the default settings and only change the volume label to VembuStorage.
Image by https://www.bdrsuite.com/
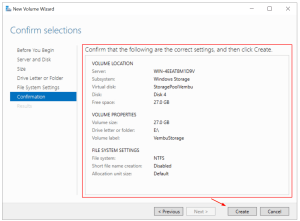
Under Confirmation, confirm selections and click Create.
Image by https://www.bdrsuite.com/
Once done, click Close
Image by https://www.bdrsuite.com/
Open File Explorer and navigate to the newly created volume. This volume is a storage pool that includes three disks, 10 GB each. The total capacity is 30 GB (Simple storage layout).
Wrapping Up
A Storage Pool is a native Windows Server feature that helps you combine multiple physical or virtual disks into a single logical disk. It has been available since Windows Server 2012 and is still supported in Windows Server 2022. Storage Pool provides data redundancy and helps increase performance. The procedure consists of four steps, including installing or preparing disks, creating a storage pool, creating a virtual disk, and creating a volume.
By following this step-by-step configuration guide, you can leverage Windows Storage Spaces to build efficient and reliable storage solutions for your organization’s data needs.
Remember to carefully plan your disk allocation, storage layout, and provisioning options based on your specific requirements. Whether you’re setting up a simple storage layout for maximum capacity or a mirrored layout for increased reliability, Windows Storage Spaces offers flexibility and scalability to meet your storage demands.
Introduction to RSAT and Importance in Windows 10
On Windows 10, RSAT allows you to manage Windows Server-based services. Tools like ADUC and Server Manager offer familiarity when managing Windows Server environments from Windows 10 machines.
Microsoft encourages Windows Admin Center (WAC) to be the forthcoming interface for controlling Windows Server. To control certain Windows Server elements efficiently, it is imperative to operate RSAT from a device running Windows 10.
The installation of RSAT in Windows 10 can be accomplished through the Settings App.
The deployment of the Windows 10 edition 1809 leads to the automatic installation of RSAT, which was earlier installed from the Control Panel. The Settings app allows you to install RSAT instead of doing so via the command line. Here’s a step-by-step guide to help you get started:
Your Windows 10 PC should be accessed using the administrator account.
The WIN+I key combination will open the Settings app.
On the Settings app, click the ‘Apps’ option.
On the Apps & features screen, click the Manage optional features option.
On the ‘Manage optional features’ screen afterward, you can click ‘Add a feature’.
Select the RSAT feature you want from the available choices. RSAT tools are installed individually, so select the specific tool you need and click “Install.”
The RSAT tool on your Windows 10 system is being configured right now.
Using RSAT tools, managing Windows Server environments is very simple.
Alternative Method: This PowerShell script installs and removes RSAT.
If you prefer using PowerShell for installation and removal of RSAT tools, here’s how you can do it:
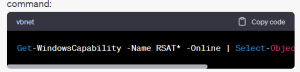
Run a PowerShell prompt with local administrator privileges. To view which RSAT tools are already installed, use the following command:
Image by https://pressmaverick.com/
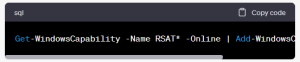
To install all available RSAT tools, run the following command:
Image by https://pressmaverick.com/
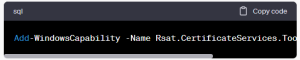
If you wish to add specific RSAT tools, identify the tool’s name using the ‘Get-Windows Capability’ command and include it in the ‘Add-Windows Capability’ command. For example, to install the Certificate Services tools, use the following command:
Image by https://pressmaverick.com/
To eliminate a pre-existing RSAT capability, utilize the Remove-Windows Capability command. For instance, to remove the Certificate Services tools, use the following command:
Image by https://pressmaverick.com/
The key note for Feature-On-Demand and Microsoft Update
Microsoft Update is necessary when you’re installing RSAT as a Feature-On-Demand in Windows 10. Windows Update servers can be located internally within your organization or externally, and both may cause installation issues.
You can either momentarily set up the device to use Microsoft Update or manually choose ‘Search for updates online’ in the Windows Update settings to allow RSAT installation.
The administration of your Windows Server environment can be managed from your Windows 10 device by installing the Remote Server Administration Tools for Windows 10. The RSAT tools may facilitate your everyday administrative responsibilities as Windows Admin Center continues to mould the future of Windows Server GUI management.
Are you facing difficulties while setting up external monitors for your Windows device? External monitors can greatly enhance your productivity and overall computing experience, but sometimes they can be a bit finicky to set up correctly. Don’t worry; we’ve got you covered with some troubleshooting tips to get your external monitor working seamlessly.
Checking the Extend Option
The first thing to do when setting up an external monitor is to ensure the Extend option is selected. To do this, press the Windows logo key + P to open the Project menu. Select the Extend option to allow the display to extend to the external monitor. If the Extend option is already selected, move on to the following troubleshooting tips.
Troubleshooting Single External Monitor
If you are using only one external monitor and it’s not working, there might be some connectivity or driver issues. Here’s what you can do:
Check the cable connections between your device and the external monitor.
Try using a different cable or port on your device.
Ensure that your external monitor is powered on and set to the correct input source.
Update your display driver through Device Manager or the manufacturer’s website.
Avoid using any adapters or converters if possible, as they may cause compatibility issues.
Adding Multiple External Monitors
Setting up two or more external monitors can be a little more complex than a single monitor. Follow these steps to troubleshoot any issues:
Check if your device supports multiple displays. Some older devices might not have this capability.
Verify that you are using compatible cables and ports for the additional monitors.
Open the Windows Project menu (Windows logo key + P) and select the Extend option for a multi-monitor setup.
Ensure that your graphics card can handle multiple displays and has the latest drivers installed.
Resolving Issues with Existing Setup
If your external monitor setup was working well previously but has suddenly stopped, you can try the following solutions:
Use a Windows key sequence to refresh your display settings.
Restart your device to resolve any temporary glitches.
Consider rolling back your display driver to a previously stable version.
If rolling back the driver doesn’t work, try reinstalling the display driver with the latest version from the manufacturer’s website.
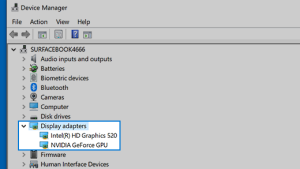
Identifying the Manufacturer of Your Display Adapter
If you need to troubleshoot specific driver issues or seek support, it’s essential to know the manufacturer of your display adapter. Here’s how you can find it:
Right-click on the Start button and select Device Manager.
Expand the Display adapters category to find the manufacturer’s name.
Additional Solutions for Lingering Problems
If you are still experiencing issues despite trying the above troubleshooting steps, consider these additional solutions:
Check for Windows updates and install any pending updates.
Update your graphics card driver directly from the manufacturer’s website.
Try using the external monitor with another device to rule out hardware problems.
By following these troubleshooting tips, you should be able to resolve most issues related to setting up external monitors. If the problem persists, it’s advisable to seek support from the manufacturer or a qualified technician to diagnose and fix any underlying hardware issues. Happy multitasking with your extended display setup!
Credential Manager is a precious point on Windows 10 that securely stores sign- in information for websites, operations, and networks. Whether you want to save your login credentials for unborn use or need to manage being logon data, Credential Manager is the go- to tool. In this companion, we’ll walk you through the way to effectively use Credential Manager and take full control of your login information.
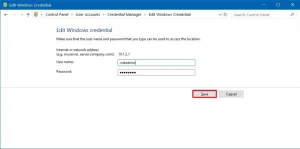
Editing subscribe- in Information in Credential Manager
occasionally, we may enter the wrong username or word when saving login credentials for the first time. With Credential Manager, correcting these crimes is a breath. Follow these way to modernize your being sign- in information
Open Control Panel on your Windows 10 computer.
Click on” stoner Accounts.”
elect” Credential Manager.”
Click on the” Windows Credentials”( or” Web Credentials”) tab.
detect the account you want to edit and click the” Edit” button.
By following these simple way, your login information will be streamlined, and you will no longer encounter login issues due to incorrect credentials.
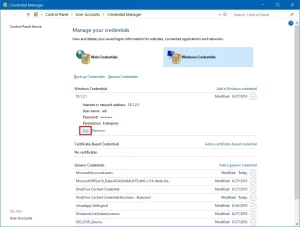
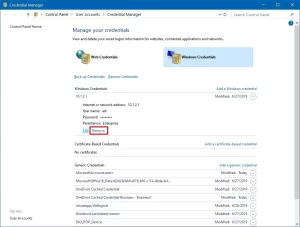
Deleting subscribe- in Information from Credential Manager
There might be cases where you no longer need certain credentials stored in Credential Manager. To cancel similar information, perform the following way
Open Control Panel.
Click on” stoner Accounts.”
elect” Credential Manager.”
Access the” Windows Credentials”( or” Web Credentials”) tab.
detect the account you want to remove and click the” Remove” button.
Upon completion, the named account credentials will be removed from the Credential Manager, and you will be urged to enter the login details manually in the future.
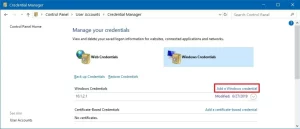
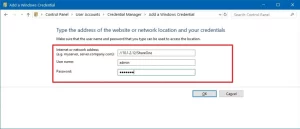
Adding New subscribe- in Information with Credential Manager
Adding new credentials to Credential Manager is essential when you want to automatically subscribe in to apps or networks without homemade input. Then is how you can do it
Open Control Panel.
Click on” stoner Accounts.”
elect” Credential Manager.”
Access the” Windows Credentials” tab.
Click on” Add a Windows credential”( or” Add a instrument- grounded credential”).
Following these way, the new account information will be securely stored in Credential Manager and used for automatic logins.
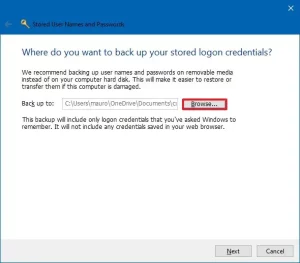
Backing up Credentials using Credential Manager
Creating a backup of your credentials is a wise move to avoid any loss of important login data. To do this, use the following way
Open Control Panel.
Click on” stoner Accounts.”
elect” Credential Manager.”
Go to the” Windows Credentials” tab.
Click on the” Back up Credentials” option.
give a name for the. crd backup train.
Save the train and do by clicking” Next.”
Set a word to cover the Credential Manager backup.
Click” Coming” and also” Finish” to complete the process.
With these way, you will have a. crd train containing all your Windows 10 and web credentials, which can be imported to another computer or used after a clean installation.
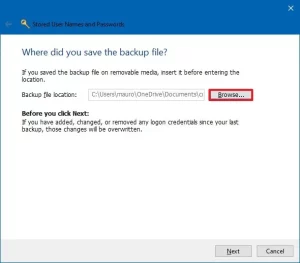
Restoring subscribe- in Information using Credential Manager
Restoring your sign- in information from a backup is pivotal, especially when switching bias or after a fresh Windows 10 installation. Follow these way to restore your credentials
Open Control Panel.
Click on” stoner Accounts.”
elect” Credential Manager.”
Access the” Windows Credentials” tab.
Click on the” Restore Credentials” option.
Click” Open,” also do with” Next.”
Use the Ctrl Alt cancel keyboard roadway when urged.
Enter the word to unleash the Credential Manager backup.
Click” Coming” and also” Finish.”
After completing these way, all your credentials for websites, apps, and networks will be successfully restored, making the sign- in process hassle-free.
Conclusion
Credential Manager is a important tool on Windows 10 that simplifies the operation of login information. By learning its operation, you can painlessly edit, cancel, add, backup, and restore credentials, icing a flawless and secure login experience. Embrace the convenience of Credential Manager to take full control of your sign- in data and make your computing life easier.