Bitcoin ATMs: Unlocking the Cryptocurrency Convenience
In the age of digital currencies, the demand for Bitcoin and other cryptocurrencies has surged to unprecedented heights. But how can you easily acquire and trade these assets? The answer lies in the world of cryptocurrency ATMs. With over 32,000 of them scattered across the globe, these machines provide a convenient gateway to owning and exchanging digital currencies like Bitcoin. In this comprehensive guide, we’ll delve into the world of Bitcoin ATMs, understand how they work, and discover when to use them wisely and when to steer clear.
How Does a Bitcoin ATM Work?
Before we dive into the pros and cons, it’s essential to understand the mechanics behind a Bitcoin ATM. Unlike traditional bank-operated ATMs, these crypto counterparts operate independently of banking systems. They serve as hubs for exchanging digital currencies, particularly Bitcoin, with physical cash and vice versa.
The process is remarkably straightforward:
Approach the Bitcoin ATM: Locate a nearby Bitcoin ATM, which is often found in popular areas such as shopping malls, convenience stores, and coffee shops.
Follow On-Screen Instructions: Once at the ATM, follow the on-screen instructions. If you intend to buy Bitcoin, input the desired amount.
Generate a Receiving Address: Open your cryptocurrency wallet and generate a new receiving address along with a QR code.
Deposit Cash: The ATM will prompt you to deposit cash equivalent to the current market rate of Bitcoin.
Finalize the Trade: After the cash deposit is made, the ATM completes the transaction, and your Bitcoin is credited to your wallet.
Selling Bitcoin through a Bitcoin ATM follows a similar process, with the key difference being that you send the cryptocurrency to the ATM, and it dispenses the corresponding cash amount.
Image by https://www.makeuseof.com/
Why You May Want To Use a Bitcoin ATM
1. Privacy and Speed
Bitcoin ATMs initially gained popularity as a swift and efficient means of acquiring cryptocurrency. In the early days of crypto, when mainstream exchanges like Coinbase and Binance were scarce, Bitcoin ATMs were a lifeline. They bypass the sluggishness of bank transfers and verification procedures commonly associated with online exchanges.
Furthermore, Bitcoin ATMs provide a level of privacy that online exchanges often lack. They are preferred by individuals seeking to maintain a discreet digital footprint and safeguard their identities.
However, it’s worth noting that in some countries, Bitcoin ATM transactions may require user identification, particularly for withdrawals exceeding a certain threshold.
2. Simplified Access
Bitcoin ATMs cater to individuals who value simplicity in their crypto transactions. They eliminate the need for complex online trading interfaces and offer a straightforward method for converting cash into cryptocurrency or vice versa.
3. Limited Tax Liability
Since Bitcoin ATM transactions often involve smaller amounts due to their lower withdrawal limits, they may not attract the attention of tax authorities. This can be advantageous for users concerned about tax liabilities, as they can conduct small-scale transactions without significant scrutiny.
How Do You Find a Nearby Bitcoin ATM?
Locating a Bitcoin ATM is relatively straightforward, thanks to tools like Coin ATM Radar, a web and mobile app that tracks the availability of cryptocurrency ATMs worldwide. These ATMs can be found in a variety of businesses, such as shopping malls, convenience stores, and coffee shops, making them accessible for frequent visits.
Image by https://www.makeuseof.com/
When You Should Not Use a Cryptocurrency ATM
While Bitcoin ATMs offer convenience, it’s essential to weigh their drawbacks before making a decision.
1. High Transaction Fees
One significant drawback of Bitcoin ATMs is their transaction fees, which can range from 5% to a staggering 20%. These fees are considerably higher than those associated with online exchanges. Users must consider these fees along with the exchange rate before using a Bitcoin ATM, as they can significantly impact the cost of acquiring or selling Bitcoin.
2. Unfavorable Exchange Rates
In addition to transaction fees, some Bitcoin ATMs offer less favorable buy/sell rates compared to prevailing exchange rates. This means you may pay more for Bitcoin or receive less when selling it through an ATM. It’s crucial to check the rates offered by the ATM and compare them to current market rates before making a transaction.
3. Limited Transaction Amounts
Bitcoin ATMs often impose lower transaction limits compared to online exchanges. While this may suit users with modest transaction needs, those looking to conduct larger transactions may find the limits restrictive. Completing a Know Your Customer (KYC) process with the ATM operator may raise transaction limits but requires user identification.
Make Informed Choices
Before using a Bitcoin ATM, take time to check the transaction fees and exchange rates. Websites like CoinMarketCap provide real-time exchange rate information, ensuring you get a fair deal. For larger transactions or frequent trading, consider using a cryptocurrency exchange for lower fees and comprehensive tax reports.
In conclusion, Bitcoin ATMs offer privacy and convenience but come at a cost. To decide whether they’re right for you, weigh the advantages against the fees and potential rate disadvantages. Stay informed, and you can navigate the world of cryptocurrency with confidence.
Meet the Expert: Rahul Nambiampurath
About the Author:Rahul Nambiampurath is a seasoned cryptocurrency enthusiast with a deep understanding of blockchain technology. As a writer and researcher, he has provided valuable insights into the world of cryptocurrencies and blockchain for over a decade. Rahul’s expertise makes him a reliable authority on all things related to Bitcoin and digital currencies.
With this expert guidance and a comprehensive understanding of Bitcoin ATMs, you’re now equipped to make informed decisions in the cryptocurrency world. Whether you seek privacy or prefer to maximize your profits, remember to weigh your options carefully when considering a Bitcoin ATM. Your financial journey in the world of cryptocurrencies starts with knowledge, and you’re on the right path.
In today’s digital age, the blockchain-powered web, known as Web3, is rapidly gaining momentum. One of the key aspects of this revolution is the emergence of Web3 domain names, which offer a range of advantages over traditional domains. These innovative domains enable the integration of cryptocurrency wallet addresses and the creation of decentralized, censorship-resistant websites. As the Web3 landscape continues to evolve, securing the right Web3 domain is becoming crucial for individuals, businesses, and projects.
In this comprehensive guide, we’ll introduce you to the top 7 Web3 domain name registry platforms that can empower you on your Web3 journey. From user-owned digital identities to unique domain extensions, these platforms offer a myriad of features that cater to the diverse needs of the Web3 community.
1. Unstoppable Domains
Unstoppable Domains is a pioneer in the Web3 domain space. Established in 2018 in San Francisco, this platform aims to empower individuals by providing user-owned digital identities in the digital world. With a wide range of domain extensions, including .crypto, .nft, .wallet, and more, Unstoppable Domains offers flexibility and resilience. You can even upload websites to the decentralized IPFS network and link them to your domains. Notable features include easy integration of crypto wallet addresses and rewards for managing digital identity.
Image by https://www.makeuseof.com/
Pricing: Varies, with options like Unstoppable Blue, Bulk Unstoppable Vault, and Ai Art.
2. ENS Domains (Ethereum Name Service)
Registered Domains: Over 2.5 million
ENS (Ethereum Name Service) operates on the Ethereum blockchain and aims to provide a user-friendly way to interact with blockchain addresses and decentralized websites. While the native domain extension is .eth, ENS allows you to import traditional domain names like .com and .org. ENS seamlessly integrates with popular web browsers and extensions and enables the creation of censorship-resistant decentralized websites.
Image by https://www.makeuseof.com/
Pricing: Depends on factors such as characters and registration period.
3. EDNS Domains (Ether Domain Name Service)
Registered Domains: Nearly two million
EDNS Domains is built on Polygon and offers unique Web3 domain extensions such as .meta, .web3, and more. It provides access to a robust ecosystem of crypto wallets, apps, and browsers. Notable features include decentralized storage services and a Chrome browser extension for Web3 domain information. Pricing options include one, three, or five-year subscriptions.
Image by https://www.makeuseof.com/
Pricing: Starts at $25 for one year.
4. Punk Domains
Punk Domains offers a unique approach to domain registration and digital identity in the Web3 space. It operates on Layer 2 chains, allowing users to create various top-level domain templates. Domains registered on Punk Domains are Ethereum NFTs, making them tradable on NFT marketplaces.
Image by https://www.makeuseof.com/
Pricing: Depends on the chosen TLD and characters.
5. SPACE.ID
SPACE.ID is a comprehensive platform offering blockchain-based domain extensions like .bnb, .eth, and .arb. It simplifies Web3 name services integration and supports subdomain management, NFT collections, and enhanced security through smart contracts.
Image by https://www.makeuseof.com/
Pricing: Standard $5 per year for all domains.
6. Freename
Freename specializes in Web3 top-level domains, supporting various blockchain networks. It offers flexibility in choosing domain extensions, trademark registration, and customization. Prices vary depending on the chosen domain.
Image by https://www.makeuseof.com/
Pricing: Starts at $5 for second-level domains.
7. PeerName
PeerName is a registrar for decentralized domain names based on blockchain technology. It supports multiple payment methods and offers domain extensions like .bit, .tor, .coin, and more. Key features include a user-friendly interface and annual domain renewals.
Image by https://www.makeuseof.com/
Pricing: Varies depending on the domain extension.
Grab Your Web3 Domain
The Web3 domain space is ushering in a new era of decentralized, user-friendly, and versatile online identities. As blockchain technology reshapes the digital landscape, securing a memorable and secure Web3 domain is essential. Whether you’re an individual, a business, or a project, these platforms provide the gateway to a decentralized digital future where you have control over your online identity. Don’t miss out on the opportunity to be part of this exciting revolution. Start your Web3 journey today!
Meet John Awa-Abuon, an AI enthusiast with a passion for solving the challenges of AI hallucination. In this article, John shares invaluable insights into minimizing AI hallucination by employing six strategic prompting techniques. With a background in AI research and a commitment to helping the AI community, John’s expertise shines through in these practical solutions. If you’ve ever encountered erratic AI responses, this article is your guide to obtaining more reliable and precise results.
1. Provide Clear and Specific Prompts
The foundation of reducing AI hallucination lies in crafting clear and specific prompts. Avoid vague instructions, as they can lead to unpredictable outcomes. Instead, be explicit in your requests. For example, instead of a broad query like “Tell me about dogs,” opt for a detailed prompt like “Give me a detailed description of the physical characteristics and temperament of Golden Retrievers.” Clarity in your prompts is a straightforward way to prevent AI hallucination.
Image by https://www.makeuseof.com/
2. Use Grounding or the “According to…” Technique
AI systems may occasionally generate content that is factually incorrect, biased, or misaligned with your perspective. This can occur due to the diverse data they are trained on. To mitigate this, employ grounding or the “according to…” technique. Attribute the output to a specific source or perspective. For instance, request a fact about a topic “according to Wikipedia” or another reliable source. This approach ensures accuracy and minimizes bias.
Image by https://www.makeuseof.com/
3. Use Constraints and Rules
Constraints and rules serve as safeguards against inappropriate, contradictory, or illogical AI-generated content. They shape the output according to your desired outcome and purpose. You can explicitly state these constraints in your prompt or imply them through context. For instance, when requesting a poem about love, specify the structure with details like “write a sonnet about love with 14 lines and 10 syllables per line.” This ensures the AI adheres to your requirements.
Image by https://www.makeuseof.com/
4. Use Multi-Step Prompting
Complex questions can sometimes trigger AI hallucination, as the model attempts to answer them in a single step. To overcome this, break down your queries into multiple steps. For instance, instead of asking, “What is the most effective diabetes treatment?” start with “What are the common treatments for diabetes?” and follow up with “Which of these treatments is considered the most effective according to medical studies?” This approach leads to more accurate and well-informed responses.
5. Assign Role to AI
Assigning a specific role to the AI model in your prompt clarifies its purpose and reduces the risk of hallucination. For example, instead of a general request like “Tell me about the history of quantum mechanics,” instruct the AI to “Assume the role of a diligent researcher and provide a summary of the key milestones in the history of quantum mechanics.” This framing encourages the AI to act with precision.
Image by https://www.makeuseof.com/
6. Add Contextual Information
Context is key to preventing AI hallucination. Providing relevant contextual information helps the model understand the task’s background, domain, or purpose, resulting in more coherent outputs. Include keywords, tags, categories, examples, references, and sources as needed. For instance, when generating a product review, offer details like the product name, brand, features, price, rating, or customer feedback. Contextual prompts yield more relevant results.
Image by https://www.makeuseof.com/
Conclusion
In the quest for reliable AI responses, these six prompting techniques serve as indispensable tools. While they are not foolproof, they significantly reduce the likelihood of AI hallucination. Remember to verify AI outputs, especially for critical tasks. By following these strategies, you can harness the power of AI more effectively and obtain the precise information you need.
Knowledge Source:
Author: John Awa-Abuon
Credentials: AI Enthusiast and Researcher
Expertise: AI Hallucination Mitigation Techniques
Informative Table: 6 Prompting Techniques to Reduce AI Hallucination
Technique
Description
Clear and Specific Prompts
Craft explicit and detailed instructions to prevent unpredictable AI responses.
Grounding or “According to…”
Attribute output to a specific source or perspective to ensure factual accuracy.
Constraints and Rules
Apply explicit constraints or rules to shape AI output and prevent inappropriate content.
Multi-Step Prompting
Break down complex queries into multiple steps to improve response accuracy.
Assign Role to AI
Clarify the AI’s purpose by assigning specific roles in your prompts.
Add Contextual Information
Provide relevant context to help the AI generate coherent and pertinent responses.
Comparative Table: Traditional vs. AI-Enhanced Content Creation
Streamline Your Workflow with These Notion Startup Templates
In today’s fast-paced business world, efficiency is key. Startups, in particular, are always on the lookout for ways to streamline their workflows, boost productivity, and achieve their goals more effectively. Fortunately, Notion, the versatile productivity tool, has become a game-changer for many startups.
Several companies worldwide leverage Notion to manage their daily tasks, track their progress, and collaborate seamlessly with their teams. Notion’s extensive library of templates has made it even easier for startups to get organized and work efficiently. In this article, we’ll explore some of the most valuable Notion startup templates that are worth incorporating into your workflow.
1. Buffer’s OKRs
Objective: Setting Clear Goals and Measuring Success
Buffer, a social media management platform, caters to small businesses and creators. Given its remote operation, Buffer relies on Notion to ensure teams meet their objectives. Buffer’s OKR template is a powerful tool for measuring Objectives and Key Results (OKRs). It allows you to define your targets, track your progress, and delegate tasks to team members. Whether you’re working in a remote team or pursuing personal projects, this template is a game-changer.
Key Features
Benefits
OKR Tracking
Clear goal setting
Progress Measurement
Track your success
Task Delegation
Collaborate effectively
Image by https://www.makeuseof.com/
2. Netflix’s Branding Framework
Objective: Crafting a Strong Brand Identity
Netflix, the streaming giant, is known for its robust branding. Creating a brand of such caliber requires meticulous planning. Netflix’s Branding Framework template in Notion helps you brainstorm ideas for your brand. It guides you through questions about your long-term vision, customer benefits, and provides examples to kickstart your creative process. This template is ideal for entrepreneurs and freelancers looking to build a brand or enhance their resumes.
Key Elements
Benefits
Vision and Benefits
Craft a compelling brand vision
Summarization
Concise concept development
Examples
Inspiring brand ideas
Image by https://www.makeuseof.com/
3. Deel’s PR Brief
Objective: Effective PR Management
Deel, a San Francisco-based company, specializes in global talent acquisition and international payments. Like Buffer, Deel operates remotely and relies on Notion for smooth operations. Deel’s PR Brief template simplifies press release management, helping you outline key story points, timelines, and progress tracking. It’s a valuable tool for journalists and writers, whether you work independently or for organizations.
Key Sections
Benefits
Story Points
Focus on essential story aspects
Timelines and Progress
Efficient project management
Team Collaboration
Streamlined PR efforts
Image by https://www.makeuseof.com/
4. Edlyft’s Product-Market Fit System
Objective: Refining Your Product-Market Fit
Edlyft, a platform for STEM students, uses the Product-Market Fit system template in Notion to enhance its services. This template helps identify areas that need improvement, suggests changes, and assigns tasks. Whether you’re planning a startup or working in a marketing team, this template aids in audience appeal.
Key Features
Benefits
Issue Identification
Identify areas needing improvement
Task Assignment
Delegate responsibilities effectively
Team Collaboration
Enhance audience appeal
Image by https://www.makeuseof.com/
5. Synctera’s Monthly Company Retro
Objective: Continuous Improvement
Synctera, a B2B banking platform, uses the Monthly Company Retro template to review monthly performance. This versatile template allows you to highlight achievements, identify areas for improvement, and create action plans. It’s an excellent choice for startups, students, and anyone aiming for personal development.
Key Components
Benefits
Achievement Review
Recognize successes
Improvement Analysis
Identify areas for growth
Action Plan
Plan and execute improvements
Image by https://www.makeuseof.com/
6. Match Group’s Roadmap
Objective: Goal Tracking and Achievement
Match Group, a leader in the online dating market, relies on the Roadmap template to outline objectives and success metrics. This template facilitates goal breakdown by quarters and confidence level assessment. It’s suitable for tracking professional goals and fitness metrics.
Key Elements
Benefits
Objective Setting
Define clear goals
Success Metric
Measure goal achievement
Quarters and Confidence
Efficiently plan and evaluate progress
Image by https://www.makeuseof.com/
How to Use These Notion Startup Templates
Incorporating these templates into your Notion workspace is simple:
Click on the link for the template you want.
Select “Start with this template.”
Choose your workspace.
Duplicate the template and start customizing it to your needs.
Boost Your Workflow with Notion
Notion offers a wide range of templates to enhance your productivity. These templates, generously shared by leading startups, can simplify your workflow and help you achieve your goals. Explore more options on the Notion templates website and unlock the full potential of this versatile tool.
Remember, in today’s competitive landscape, efficiency is the key to success. With Notion and these startup templates, you’re well-equipped to streamline your workflow and drive results.
Steganography is the art of concealing data within other data, and in the realm of computing, it’s the perfect way to safeguard your confidential files on Windows 10 and 11. In this comprehensive guide, we’ll delve into the fascinating world of steganography and unveil two methods to hide ZIP Archives within images. Whether you’re a tech enthusiast or simply looking to protect your important files, this article is your gateway to mastering this digital art.
Understanding Steganography: A Brief Introduction
Steganography, the art of hiding data in plain sight, is a powerful technique for protecting your confidential files. It involves concealing data within seemingly innocuous files, such as images. Imagine a ZIP archive masquerading as a simple image file—this is where steganography shines.
Method 1: Using Command Prompt – Hiding ZIP Files with Ease
Are you a command-line aficionado? Learn how to hide a ZIP file within an image using the Command Prompt. It’s a straightforward process that requires just one command. You’ll be amazed at the simplicity of this technique.
Image by https://www.makeuseof.com/
How to Get Started With the Command Prompt
To begin, create a ZIP archive containing the files you wish to conceal. Ensure that your image and ZIP file are in the same folder for this method to work effectively. Then, follow these steps:
Step
Action
1
Create the ZIP archive to conceal.
2
Place the ZIP file in the image folder.
3
Open an elevated Command Prompt.
4
Navigate to the folder with your files.
5
Execute a command to merge the files.
6
Access your concealed ZIP archive.
Note: Replace the file names in the command with your actual file names. Avoid using spaces in file names for this method.
Method 2: Image Steganography Software – The Automated Approach
Prefer a more user-friendly approach? Enter Image Steganography software, designed for Windows 10 and 11. This tool allows you to embed ZIP archives into images without the need for complex commands. Here’s how it works:
Download Image Steganography: Get this user-friendly software from Softpedia.
Select Your Files: Ensure both your image and ZIP archive are in the same folder.
Drag and Drop: Use the software to select your image and ZIP archive.
Choose Output Location: Decide where to save your newly created image.
Start the Process: Let Image Steganography work its magic.
Note: Ensure your image file is larger than the ZIP archive, or use the Pre-Scale Image option if needed.
Accessing Hidden Archives: Unveiling Your Secure Files
Now that you’ve hidden your ZIP archive within an image, how do you access it? We recommend using the versatile 7-Zip software, a powerful file extraction tool for Windows. Follow these steps:
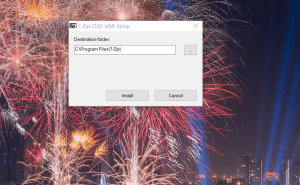
Install 7-Zip: Download and install 7-Zip, available in 64-bit version on their website.
Image by https://www.makeuseof.com/
Locate Your Image: Find the image with the concealed ZIP archive.
Image by https://www.makeuseof.com/
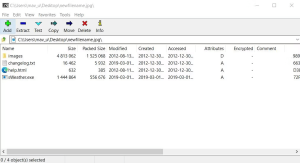
Open with 7-Zip: Double-click your image to open it in 7-Zip.
Image by https://www.makeuseof.com/
Access Your Files: Browse and extract the contents of the ZIP archive.
How to Hide a ZIP in an Image File With Image Steganography
If a more automated way to hide a ZIP archive in an image file is preferred, check out the Image Steganography software. Image Steganography is freeware software for Windows 11/10 that enables you to embed ZIP archives in images without any command input necessary. This is how you can hide a ZIP in an image with the Image Steganography software:
Open this Image Steganography page on Softpedia.
Download and double-click the Image Steganography Setup.exe file to bring up an installer window.
Image by https://www.makeuseof.com/
3.Select Yes when prompted to start Image Steganography.
Open the folder that contains the ZIP archive and image file you want to merge. Remember that both files must be in the same folder just like the first method.
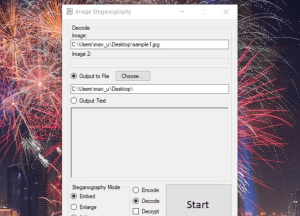
Drag and drop the image file from its folder onto the Image box within the software to select it. Now that you’re ready to go, proceed with the following:
Click the File radio button.
Then drag and drop the ZIP archive from the folder onto the file box.
Click the Choose button for the output image.
Choose a folder to save the output file in. Input a name for the new image file and click Save.
Make sure the Embed and Encode steganography mode options are selected.
Image by https://www.makeuseof.com/
Press the Start button in Image Steganography.
If an error message pops up that says the “image is too small,” you’ll need to select a bigger picture file. The image file must be larger than the ZIP archive you want to merge it with. Alternatively, select the Pre-Scale Image checkbox.
Your new image output file will be in whatever folder you selected to save it in. The ZIP file is embedded in it, but you’ll only see the image with whatever software it opens in.
Image by https://www.makeuseof.com/
Why Steganography Matters: Safeguarding Your Confidential Data
In an era where digital security is paramount, steganography offers a unique way to protect your most important files. Concealing ZIP archives within images ensures that your confidential data remains hidden in plain sight, safeguarding your privacy.
Conclusion: Mastering the Art of Digital Concealment
In this digital age, data security is a top priority. Steganography empowers you to hide your ZIP archives within images, adding an extra layer of protection to your confidential files. Whether you prefer the simplicity of the Command Prompt or the user-friendly Image Steganography software, you now have the tools to master this art of digital concealment.
So, go ahead, safeguard your most important files with steganography. Your secrets will remain hidden, even in plain view.
About the Author
Jack Slater is a tech enthusiast with years of experience in data security. As an avid Windows user, he’s dedicated to sharing his knowledge and expertise with fellow tech enthusiasts. Jack’s passion for digital privacy has led him to explore the fascinating world of steganography.
Hyper V, a powerful virtualization tool, comes built-in with most Windows 11 editions, but there’s a notable exception – Windows 11 Home. If you’re a Windows 11 Home user, don’t worry; we’ve got you covered. In this guide, we’ll show you how to enable Hyper-V on Windows 11 Home, allowing you to harness the potential of virtualization and create virtual machines with ease.
Hardware Virtualization: The First Step
Before we dive into enabling Hyper-V, it’s crucial to ensure that your hardware supports virtualization. Hyper-V relies on Hardware Virtualization, which must be enabled in your computer’s BIOS. Here’s how to do it:
Image by https://www.makeuseof.com/
1. Power Down and Access BIOS
Shut down your PC if it is powered on.
Turn on your computer and start pressing the BIOS access key (F10, F2, F12, F1, or DEL) to enter BIOS.
2. Enable Virtualization
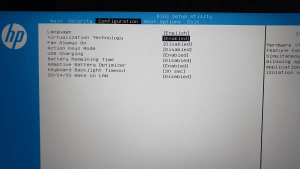
In the BIOS Setup utility, navigate to the Configuration tab.
Locate “Virtualization Technology” using the arrow keys.
Hit Enter and select “Enabled,” then press Enter again to confirm.
Save changes by pressing F10 and exit BIOS.
Your PC will now restart with Hardware Virtualization enabled, setting the stage for the installation of Hyper-V on Windows 11 Home.
Installing Hyper-V: The Batch Script Hack
With Hardware Virtualization enabled, you’re ready to proceed with the installation of Hyper-V on Windows 11 Home. However, before you start, it’s advisable to create a restore point to safeguard your system. Here’s how to enable Hyper-V:
Image by https://www.makeuseof.com/
1. Create a Batch Script
Open a new Notepad file by pressing Win + R, typing “notepad,” and clicking OK.
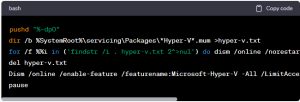
Copy and paste the provided batch script into the Notepad file.
Image by https://pressmaverick.com//
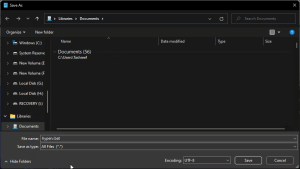
Save the file as “hyperv.bat” (the “.bat” extension is crucial).
In the file name field, type hyperv.bat. The .bat extension at the end of the file name is important to execute the script.
Image by https://www.makeuseof.com/
5. Next, click the drop-down for Save as type and select All Files.
6. Click the Save button to save the file.
Image by https://www.makeuseof.com/
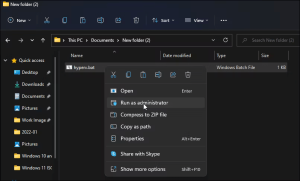
7. Next, right-click on the hyperv.bat file and select Run as administrator. Click Yes if prompted by User Account Control.
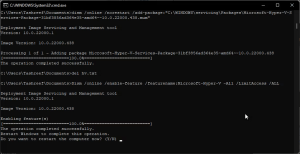
8. The scrip will start executing in the Command Prompt to install Hyper-V. It may take a while, so wait till the process is complete.
9.Once completed, you will see the Operation completed successfully message.
Image by https://www.makeuseof.com/
10. Type Y to confirm and restart your PC. If not, enter N to exit the Command Prompt.
After the restart, Hyper-V will be successfully installed on your Windows 11 Home system. You can now create and manage virtual machines with ease.
Here’s how you can quickly add Hyper-V to Windows 11 using Command Prompt:
Press the Win key and type cmd. Then right-click on Command Prompt and select Run as administrator.
Image by https://www.makeuseof.com/
In the Command Prompt window, type the following command and press Enter:
The above command uses the Deployment Imaging Service and Management (DISM) tool to enable Microsoft Hyper-V and the necessary dependencies on your Windows computer. The operation completed successfully message means you have successfully enabled Hyper-V.
Alternative Method: Enabling Hyper-V Using Command Prompt
If the batch script method isn’t your preference, you can enable Hyper-V through Command Prompt:
Press the Win key, type “cmd,” right-click on Command Prompt, and select “Run as administrator.”
In the Command Prompt, type the following command and press Enter:
This command utilizes the Deployment Imaging Service and Management (DISM) tool to enable Hyper-V. If you see the “Operation completed successfully” message, you’ve successfully enabled Hyper-V.
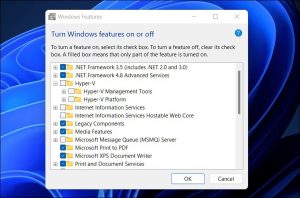
Uncheck the “Hyper-V” option and click OK. Wait for the uninstallation process to finish.
Click “Restart Now” to apply the changes.
Image by https://www.makeuseof.com/
Exploring Alternatives: Windows Sandbox
While Hyper-V isn’t available on Windows 11 Home by default, you can explore another virtualization solution, Windows Sandbox, which offers lightweight isolation for running applications. However, this feature is exclusive to the Pro and Enterprise editions of Windows 11.
If you’re on Windows 11 Home and need a virtualization solution, consider exploring third-party alternatives for running and testing applications in isolation.
In conclusion, while Microsoft officially restricts Hyper-V to certain Windows 11 editions, a few tweaks and the right batch script can empower Windows 11 Home users to enjoy the benefits of virtualization. With Hyper-V installed, you can create and manage virtual machines seamlessly, enhancing your computing experience.
Remember to use these methods responsibly and always back up your data before making significant system changes. Enjoy your enhanced Windows 11 Home experience with Hyper-V!
Knowledge Source:
Tashreef Shareef, a tech enthusiast with years of experience in Windows and virtualization technologies.
Mihir Patkar is a seasoned writer and technology enthusiast who understands the challenges of beginners when it comes to journaling. With his vast experience, he’s here to introduce you to the world of guided journaling apps that will transform your self-care diary experience. Whether you’re new to journaling or looking for fresh inspiration, Mihir has you covered.
Journaling has long been hailed as a powerful practice for self-reflection and mental well-being. Yet, for beginners, the blank page can be intimidating. What do you write about every day? How can you tap into the profound benefits of journaling without feeling overwhelmed?
In this article, we’ll explore five guided journaling apps specially designed for beginners. These apps offer daily prompts and ideas, making it easier than ever to embark on your journaling journey. Whether you seek self-reflection, gratitude, or mindfulness, these apps have you covered.
Reflection – Your Daily Companion
Subtitle: Simplicity at its Best
Are you new to journaling? Don’t fret; Reflection has got your back. This beautiful web and mobile app is ideal for beginners. The “Today” tab greets you with a daily inspirational question, simplifying the process of what to write about. And if that doesn’t resonate with you, the “Inspiration” section offers a variety of questions, motivational quotes, and customizable templates.
Writing your daily entry is a breeze with Reflection’s user-friendly interface. Its speed makes it perfect for quick entries, even multiple ones a day. Additionally, track your journaling streak and revisit past entries for reflection.
But here’s where Reflection truly shines: it focuses on monthly and annual reviews, guiding you through your highlights and lowlights in six key areas: mind, body, soul, work, play, and love. It even helps you set intentions for the future. While some features are paid, Reflection offers a world of value for free.
Waffle – Sharing Your Journey
Subtitle: Journaling, Made Social
Not all journals need to be private. Waffle understands that sometimes, sharing your diary entries with loved ones or therapists can be immensely therapeutic. This app simplifies the process with shared journals and daily prompts tailored to your chosen audience.
Creating a new journal on Waffle is a breeze. Choose who you want to share it with, and the built-in Waffle AI provides daily prompts based on your preferences and writing style. You can also manually create questions or posts, adding photos to create a personal daily social network.
Waffle ensures that sharing your thoughts and experiences becomes a meaningful and enriching part of your life.
Tell Molly – Simplify Your Journaling
Subtitle: Mood and Gratitude Journaling Made Easy
For those who find writing extensive entries challenging, Tell Molly is the perfect solution. This mood and thought journal streamlines the process, focusing on your feelings and daily gratitude.
Tell Molly’s interface is straightforward, featuring mood emojis and tags for quick logging. It encourages you to pen down your thoughts in a concise manner. The limited character count ensures your entries remain clear and to the point.
Track your journaling journey with insightful statistics and a calendar view. Tell Molly makes journaling about your mood and gratitude a breeze.
Image by https://www.makeuseof.com/
Journal Monkey – The Prompt Generator
Subtitle: Fueling Your Creative Journaling
Journal Monkey isn’t an app for writing your entries; it’s your go-to source for thought-provoking prompts. Whether you’re into deep writing, mindfulness, or gratitude journaling, this website has a prompt generator for you.
Deep Writing Prompts, Mindfulness Prompts, and even prompts for kids’ gratitude journals – Journal Monkey has it all. Simply click until you find a prompt that resonates with you. It’s a valuable companion to your journaling practice.
Image by https://www.makeuseof.com/
Robyn Liechti – Your Self-Care Journal Guru
Subtitle: Guided Journals for Every Need
Robyn Liechti offers a treasure trove of guided self-care journals, including free printable prompts. Tailored for beginners, these prompts cover various topics like self-love, gratitude, and relief from stress and anxiety.
While Robyn’s prompts don’t include a space to write your entry, they serve as a valuable starting point. Pair them with your preferred journaling method, whether online or in a physical diary.
Image by https://www.makeuseof.com/
Customize Your Journaling Routine
Subtitle: The Freedom of Choice
Daily journaling is a powerful habit, but it’s not the only way to reap the benefits. You have the freedom to choose a schedule that suits you best. Whether it’s daily, weekly, or somewhere in between, what matters is cultivating self-reflection.
Exploring Different Types of Journaling
Subtitle: More Than Words
Journaling comes in various forms, each offering unique benefits. Explore food journaling, gratitude journaling, travel journaling, or bullet journaling to find the style that resonates with you.
Are Guided Journals Worth It?
Subtitle: The Value of Direction
If you’re new to journaling, guided journals are a valuable investment. They provide direction, prompts, and questions that inspire introspection and focus. Unlike regular journals, they guide you on what to write and think about, making your journaling journey more fulfilling.
In conclusion, these guided journaling apps and resources offer an array of options for beginners to kickstart their self-care diary journey. Embrace the power of journaling, enhance your mental well-being, and embark on a path of self-discovery. Remember, it’s not about perfection; it’s about progress.
Informative Table for Key Points:
App
Platforms
Main Features
Additional Features
Cost
Reflection
Web, Android, iOS
Daily prompts, customizable templates
Monthly and annual reviews
Free/Premium
Waffle
Android, iOS
Shared journals, tailored prompts
AI-based prompts, photo sharing
Free
Tell Molly
Web
Mood and gratitude journal, simplicity
Statistics, calendar view
Free
Journal Monkey
Web
Prompt generators for various topics
Deep writing, mindfulness, and more
Free
Robyn Liechti
Web, Printable
Guided self-care journals, printable
Multiple topics, month-long exercises
Free
Comparative Table for Guided Journaling Apps:
App
Simplicity
Sharing
Mood & Gratitude
Prompt Generator
Variety of Topics
Cost
Reflection
✔
❌
❌
❌
❌
Free/Premium
Waffle
❌
✔
❌
❌
❌
Free
Tell Molly
✔
❌
✔
❌
❌
Free
Journal Monkey
❌
❌
❌
✔
✔
Free
Robyn Liechti
❌
❌
✔
❌
✔
Free
Conclusion:
Embarking on a journey of self-care through journaling has never been easier for beginners. These guided journaling apps offer a variety of options to suit your needs, whether you seek simplicity, social sharing, mood and gratitude focus, or thought-provoking prompts. With the right tools at your disposal, you can boost your mental health, cultivate self-reflection, and make journaling a rewarding part of your daily routine. Don’t wait; start your self-care diary today.
In the ever-evolving realm of AI chatbots, two prominent players have emerged: ChatGPT and Bing’s AI Chatbot. Both are powered by state-of-the-art language models, but they cater to different needs and preferences. In this article, we’ll dissect these two chatbots, highlighting their distinctions and guiding you in making an informed choice. Whether you’re a casual user or a problem solver seeking the perfect AI companion, read on to uncover the 10 key differences between ChatGPT and Bing’s AI.
1. Purpose
ChatGPT: The Multipurpose Chat Companion
ChatGPT serves as a versatile chatbot, drawing from a diverse range of sources, including academic journals, business websites, publications, and Wikipedia. Its primary function is to engage in conversations, answer questions, write essays, and more. It’s your all-in-one language model.
Bing’s AI: The Search Engine Meets Chatbot
Bing’s version of the chatbot combines the power of an AI chat feature with a robust search engine. It excels at providing information from a broader dataset, making it a hybrid between a search tool and a chatbot. Whether you’re searching for facts or having a conversation, Bing’s AI has you covered.
2. Conversational Language
Both ChatGPT and Bing employ the GPT model, known for its human-like text generation. However, there’s a subtle difference.
Image by https://www.makeuseof.com/
ChatGPT, powered by GPT-3.5, generates grammatically correct but somewhat stiff responses. On the other hand, Bing’s AI uses GPT-4, which produces more natural and engaging conversations, making it feel like you’re chatting with a real person.
Image by https://www.makeuseof.com/
3. Data Accuracy
ChatGPT has its limitations, with occasional data inaccuracies, especially regarding events after 2021. It lacks knowledge of its own release date, which raises questions about its reliability.
Image by https://www.makeuseof.com/
In contrast, Bing AI utilizes its advanced search engine to fetch timely and accurate information, minimizing inaccuracies. It even cites sources, enhancing fact-checking capabilities.
Image by https://www.makeuseof.com/
4. Mathematical Precision
Image by https://www.makeuseof.com/
Both chatbots showcase strong mathematical abilities, handling equations and computations. While they excel in most math-related queries, some complexities may challenge them. However, for general math and physics questions, they perform admirably.
Image by https://www.makeuseof.com/
5. Security Measures
Image by https://www.makeuseof.com/
ChatGPT faced early criticisms for potential misuse by cybercriminals. OpenAI acknowledges these issues and continuously works on security. Bing’s AI also addresses cybersecurity risks with stricter limitations, ensuring safer interactions.
Image by https://www.makeuseof.com/
6. Accessibility
Initially, ChatGPT lacked accessibility, but it has since expanded to iOS and mobile versions. Bing’s AI, from the start, offers cross-platform accessibility, except for third-party browsers like Firefox and Safari.
7. Sign-Up Process
Signing up for ChatGPT is straightforward, with instant access for most users. In contrast, Bing AI initially had a waitlist, but it has since been lifted, granting instant access upon email registration.
Image by https://www.makeuseof.com/
8. Functionality
Bing’s AI boasts a broader dataset and advanced language model, resulting in more accurate responses. However, it enforces stricter conversation guidelines and ends discussions after 15 messages. ChatGPT offers more control and customization options for creative prompts.
Image by https://www.makeuseof.com/
9. Fees
ChatGPT is free, but ChatGPT Plus, priced at $20 per month, provides enhanced features. Bing’s AI is also free and plans to monetize through advertisements, making it a cost-effective option.
In conclusion, the choice between ChatGPT and Bing’s AI depends on your specific needs. Consider the nuances of language, data accuracy, accessibility, and functionality when making your decision. Keep in mind that the AI landscape is ever-changing, and new developments may reshape your options. Whether you’re a casual user or a problem solver, there’s an AI companion tailored to your preferences. Choose wisely and embrace the future of conversational AI.
Unmasking the Geek Squad Email Scam: How to Protect Yourself
In an age where cyber threats loom large, you might have found yourself on the receiving end of an email that seems legitimate but raises suspicion. If you’ve ever received an email from Geek Squad confirming a transaction that you didn’t initiate, you’re not alone. This might just be the Geek Squad Email Scam knocking at your virtual door. In this article, we’ll delve into what this scam entails, how it works, and most importantly, how you can steer clear of it.
What Is the Geek Squad Email Scam?
The Geek Squad Email Scam is a deceptive scheme orchestrated by cybercriminals. They send out fraudulent emails, masquerading as official transaction confirmations from Geek Squad, a subsidiary of the well-known multinational consumer electronics company, Best Buy. These scam emails contain information regarding a subscription renewal or an order that you, the recipient, have no knowledge of.
The scammers go to great lengths to make their emails appear authentic. They employ fake invoice numbers, renewal dates, and other order details. They even use official logos and promotional banners to lend an air of legitimacy to their deceit. To further their illusion, they provide contact numbers and urge recipients to get in touch if they need assistance with their supposed order.
Once the unsuspecting recipient contacts them, the scam takes on various forms, all leading to the cybercriminals’ ultimate objective: extracting as much money as possible from their victims.
The moment you make that call to the number provided, the scammers claim a transaction has indeed occurred from your account. To allay your concerns, they offer to cancel the transaction, which most recipients naturally agree to.
Here’s where it gets insidious. The scammers proceed to request personal details – information that no legitimate company would ever ask for over the phone, including credit card details and social security numbers.
In some cases, they inform victims that they can’t cancel subscriptions from their end due to an alleged computer issue. They insist on remote access to your computer to resolve the problem, all while playing on your fears that this mysterious transaction could happen again.
Once they have access to your computer, they are essentially in control. They may initiate unauthorized bank transactions, install malicious software for future scams, demand payment for their so-called remote support, or even impose “cancellation fees.”
How to Spot the Geek Squad Email Scam
Protecting yourself starts with being vigilant. Here are some tips to help you distinguish a scam email from a legitimate one:
Check for Spelling and Grammar Errors: Scammers often make mistakes in their emails.
Examine the Sender’s Email Address: Legitimate emails usually come from official domains, not generic or misspelled addresses.
Personalization Matters: Genuine emails will address you by name, not with a generic “Dear Sir/Madam.”
Avoid Clicking on Links: Hover over links to check their destination or use a link-checking website to verify their legitimacy.
Currency Mismatch: If the transaction currency differs from your bank account’s currency, it’s a red flag.
Urgency: Scammers create urgency by demanding quick action. Beware of emails pressuring you to respond within a day or two.
Verify the Recipient Email: Ensure the email matches the one you used to sign up for Geek Squad services.
Double-Check Your Bank: Confirm that no unauthorized transactions have occurred from your bank account.
How to Avoid the Geek Squad Email Scam
If you suspect you’ve received a Geek Squad scam email, you’ve already taken the first step to avoid falling victim. Here’s what to do next:
Never Share Personal Details: Under no circumstances should you send personal information via email or phone, and don’t reply to the suspicious email or call the provided number.
Don’t Click, Don’t Download: Avoid clicking on any links or downloading attachments in such emails.
Raise Awareness: Inform your friends and family about the scam but avoid forwarding the email to prevent others from falling victim.
Block the Sender: If you share your computer with others, block the sender’s email to protect them from inadvertently engaging with the scam.
In essence, ignoring the Geek Squad scam email and blocking the sender is your safest bet.
What to Do if You Become a Victim
If you find yourself ensnared in the Geek Squad Email Scam, follow these steps:
Don’t Act on Their Instructions: If you’ve already communicated with the scammers, refrain from taking any further actions as per their guidance.
Block the Number: Prevent the scammers from contacting you again by blocking the number you called.
Contact Your Bank: If you’ve shared sensitive information, such as credit card details, with the scammers, contact your bank immediately to freeze your funds.
Scan for Viruses: Check your computer for viruses if you’ve downloaded any software or files from the suspicious email.
Change Your Passwords: If you used the provided links to sign in with your email address, change your login details immediately.
Disable Your Webcam: Temporarily disable your webcam if it’s enabled to prevent potential scammers from recording you.
Use a Secondary Email: Register for third-party apps and services with a secondary email address, not your primary one.
Avoid Clicking Push Notifications: Don’t click on push notifications from suspicious websites or apps.
Block Phishing Senders: Block emails from senders attempting phishing scams.
Enable Two-Factor Authentication: Enhance your email account security with two-factor authentication.
By following these strategies, you can significantly lower the risk of falling prey to phishing scams in the future.
Avoiding the Geek Squad Email Scammers
Now that you’re well-informed about the Geek Squad Email Scam, you can protect yourself and those around you. The red flags discussed here apply not only to this scam but also to other phishing schemes. Stay vigilant, and share this knowledge to create a safer online environment for everyone.
In the fast-paced world of cryptocurrencies, where fortunes can be made in the blink of an eye, there exists a dark underbelly – the notorious rug pull. Understanding what a rug pull is can be your first line of defense against becoming a victim.
A rug pull in the cryptocurrency realm is akin to an elaborate magic trick, where investors are promised the world, only to have the illusion shattered and their funds vanish into thin air. It typically unfolds when individuals invest their hard-earned money into a novel digital currency project, lured by the prospect of substantial profits. These projects are often backed by individuals with nefarious intentions, masquerading as visionary developers. They employ tantalizing promises, eye-catching marketing tactics, and the allure of quick wealth to entice unsuspecting investors into their web of deceit. However, once a sufficient amount of funds has been accumulated, these rogue operators vanish, leaving investors with worthless tokens and a profound sense of betrayal.
Understanding the mechanisms of a rug pull is crucial to avoid falling victim to one. The promise of quick and easy riches is a common thread that runs through these scams, and recognizing it can be your first line of defense. When an investment opportunity appears too good to be true, it often is.
In essence, a rug pull is not just a financial loss; it’s a breach of trust that erodes confidence in the entire cryptocurrency ecosystem. While the cryptocurrency market holds enormous potential for innovation and wealth generation, the prevalence of rug pulls highlights the need for caution and thorough due diligence. By being aware of the tactics employed by scammers, you can protect yourself and your investments from falling into the clutches of deceitful operators.
Rug Pulls Come in Different Shapes and Sizes
To truly defend against rug pulls, one must understand the diverse forms they can take. Each variation is a cleverly designed trap, aimed at ensnaring unsuspecting investors. Let’s explore these variations and how to recognize them:
Image by https://www.makeuseof.com/
Liquidity Stealing
Imagine a scenario where you and a group of people contribute money to a shared savings pool. The creators of this pool suddenly decide to siphon off the majority, if not all, of the funds, leaving everyone else with substantial losses. This deceptive maneuver is known as liquidity stealing, and it’s a cunning way for scammers to make a quick escape with your money. Recognizing liquidity stealing involves vigilance regarding where your investments are pooled and how they are managed.
Limiting Sell Orders
Now, picture a game where the rules change without warning. Creators of certain cryptocurrency projects manipulate the mechanics, making it exceedingly difficult to sell your coins at a fair price. As a result, you end up losing money while they benefit from the altered rules. This deceptive tactic, known as limiting sell orders, can catch investors off guard. To identify it, closely monitor the conditions for selling your tokens within a project.
Dumping
A different manifestation of rug pulls can be likened to a crowded theater where everyone rushes for the exit simultaneously. In the cryptocurrency world, this is referred to as “dumping.” Creators of a project execute a mass sale of their coins in a short span, causing the coin’s value to plummet. This abrupt drop in value can lead to significant losses for regular investors. To spot dumping, keep an eye on the project’s trading activity and assess whether there are unusual spikes in coin sales by the creators.
Understanding these various forms of rug pulls is paramount to safeguarding your investments. While the specific tactics may differ, the underlying intention remains the same: to deceive and profit at the expense of unsuspecting investors. By staying vigilant and recognizing the signs, you can significantly reduce the risk of falling victim to these elaborate traps.
Top 5 Rug Pulls in Crypto History
Now, let’s delve into the annals of cryptocurrency history and uncover the most infamous rug pulls to date. These stories serve as cautionary tales, emphasizing the importance of thorough research and skepticism in the crypto world.
1. OneCoin (Over $4 Billion)
OneCoin, led by Ruja Ignatova, stands as one of the most notorious cryptocurrency scams in history. The saga began in 2014, with OneCoin claiming to be a revolutionary cryptocurrency poised to outshine Bitcoin. Through aggressive marketing and promises of astronomical returns, people were lured into investing. However, it was all a mirage. OneCoin lacked a genuine blockchain or cryptocurrency; it was, in reality, a Ponzi scheme. Early investors received payouts from the money of new investors. In 2017, Ruja Ignatova disappeared, and the scam crumbled. Investors collectively lost over $4 billion, making this one of the largest crypto scams ever.
2. Bitconnect ($2.4 Billion)
Bitconnect, a cryptocurrency platform promising high returns, enticed individuals to invest their Bitcoin in exchange for Bitconnect Coins (BCC). Investors were assured of daily interest earnings. However, it was a scam. Bitconnect, led by its (now) convicted founder, Satish Kumbhani, used new investors’ funds to pay off earlier ones. In early 2018, regulators initiated investigations, labeling it a Ponzi scheme. This left over 4,000 people from 95 countries grappling with substantial losses. Although approximately 800 individuals received a share in a $17 million restitution case, millions in losses remained unresolved.
3. Thodex (Over $2 Billion)
Thodex, a cryptocurrency exchange headquartered in Turkey, attracted attention by offering a variety of cryptocurrencies for trading. However, in April 2021, a distressing turn of events unfolded. The founder, Faruk Fatih Özer, abruptly halted withdrawals from the exchange, trapping users’ assets totaling over $2 billion. Authorities accused Özer of fraud and fleeing the country with the substantial funds. This incident left thousands of people in financial turmoil and underscored concerns about the lack of regulatory oversight in the cryptocurrency industry.
4. AnubisDAO ($60 Million)
AnubisDAO, a decentralized autonomous organization (DAO) project operating on the Ethereum blockchain, aimed to provide investment opportunities in various assets. Unfortunately, in March 2021, attackers exploited a vulnerability in the smart contract, siphoning off approximately $60 million worth of assets. This incident served as a stark reminder of the risks associated with smart contract vulnerabilities and the critical importance of security audits in decentralized finance (DeFi) projects.
5. Uranium Finance ($50 Million)
Uranium Finance, a DeFi project operating on the Binance Smart Chain, offered yield farming and liquidity provision services. However, in April 2021, a hacker identified a vulnerability in Uranium Finance’s code and made off with around $50 million in user funds. This incident raised concerns about the security of DeFi projects on various blockchains and underscored the need for rigorous code audits.
These rug pulls are more than cautionary tales; they serve as stark reminders of the risks inherent in the cryptocurrency space. They highlight the imperative need for caution and diligent research when considering investments. Furthermore, they shed light on the absence of comprehensive regulations that could protect investors from fraudulent schemes.
How to Check a Crypto Project Against Crypto Rug Pulls
With rug pulls being a real and persistent threat in the cryptocurrency space, it’s essential to arm yourself with the knowledge and tools to assess and mitigate these risks. Let’s explore the steps to verify a crypto project’s legitimacy and protect your investments:
Research the Team
Thoroughly investigating the background and credibility of the project’s team members is a crucial first step. Look for information on their LinkedIn profiles, past projects, and involvement in the crypto community. Transparency and a well-documented history should be indicators of trustworthiness. Conversely, a lack of transparency or anonymity should raise red flags. A legitimate project should have a team willing to stand by its reputation.
Transparency
Examine the level of transparency provided by the project. Legitimate projects should offer clear and comprehensive documentation regarding their goals, technology, and future plans. A professionally written whitepaper that outlines the project’s objectives, technology, and roadmap is a positive sign. Conversely, a vague or unprofessional whitepaper should be viewed with skepticism.
Community Engagement
Evaluate the project’s level of engagement and communication within its community. Active and responsive developers, along with a supportive and engaged user base, can be positive indicators. Genuine projects tend to maintain open channels of communication with their community members. In contrast, a lack of community engagement or unanswered questions should be viewed as warning signs.
Audit Reports
Ensure that the project’s smart contracts have undergone thorough audits by reputable third-party firms. Audits are crucial in identifying vulnerabilities and potential risks within the project’s code. Reliable projects are typically open about the audit results and take steps to address any issues uncovered during the auditing process. Beware of projects that lack audit reports or fail to address identified vulnerabilities.
Liquidity Lock
Check if the project’s liquidity is locked in a decentralized manner through a time-locked smart contract. Liquidity locks reduce the risk of creators suddenly removing funds from the project, a common tactic in rug pulls. Transparent projects typically provide verifiable proof of liquidity locks. If a project lacks liquidity locks or provides unverifiable claims, exercise caution.
Token Distribution
Investigate the token distribution within the project. Projects where a small group of individuals or entities holds a significant percentage of tokens can pose a higher risk of manipulation and market control. Ideally, a legitimate project should have a fair and decentralized token distribution. Be cautious if you find evidence of token concentration among a select few.
Tokenomics
Understand the tokenomics of the project. Legitimate projects have well-defined tokenomics, including clear use cases for their tokens within the ecosystem. Beware of projects that promise unrealistic returns or appear too good to be true. If a project’s tokenomics seem convoluted or lack a clear utility, exercise skepticism.
Community Feedback
Seek feedback from the broader cryptocurrency community through forums, social media platforms, and review websites. Other investors’ experiences and opinions can provide valuable insights into the project’s legitimacy and performance. Positive feedback and endorsements from reputable figures within the crypto space can be reassuring. Conversely, a project with a history of negative reviews, unresolved disputes, or suspicious behavior should be approached with caution.
Rug Pull Scanners
Utilize rug pull scanner tools or websites to assess the project for potential red flags. These tools can analyze the project’s code and behavior to detect any suspicious or malicious actions. Keep in mind that rug pull scanners are not foolproof, but they can serve as an additional layer of scrutiny when evaluating a project’s legitimacy.
Diversify Your Portfolio
Mitigate the risk of falling victim to a rug pull by avoiding the temptation to concentrate all your assets in a single project. Diversifying your investments across multiple cryptocurrencies can help spread risk and reduce the potential impact of a single investment gone wrong. While diversification does not guarantee immunity from rug pulls, it can help safeguard a portion of your portfolio.
Stay Informed
Stay actively engaged in the cryptocurrency space by keeping yourself informed about the latest news, trends, and developments. Remaining up-to-date can help you recognize potential red flags early on. Follow reputable crypto news sources, participate in relevant online communities, and stay attuned to emerging threats and scams.
Trust Your Instincts
Lastly, trust your instincts when assessing a crypto project. If something about a project feels off, too risky, or too good to be true, it’s perfectly acceptable to exercise caution or walk away entirely. Emotions like FOMO (Fear of Missing Out) can cloud judgment and lead to hasty decisions. Remember that preserving your capital and ensuring the security of your investments should always be your top priorities.
In summary, protecting your investments from rug pulls requires a combination of due diligence, skepticism, and proactive research. By following these steps and remaining vigilant, you can significantly reduce the risk of falling victim to fraudulent cryptocurrency schemes.
Avoid Rug Pulls and Keep Hold of Your Crypto
It’s crucial to remember that not all cryptocurrency projects are scams, and the crypto industry holds the potential for genuine growth and innovation. However, safeguarding your investments demands a cautious and informed approach. While the fear of rug pulls should not deter you from exploring the vast opportunities within the cryptocurrency space, maintaining vigilance and skepticism is paramount. Avoid being lured by promises of quick riches, conduct thorough research, and prioritize the protection of your assets. With these principles in mind, you can navigate the crypto landscape with confidence and minimize the risk of falling victim to rug pulls or other fraudulent schemes.