Introduction:

If you’re seeking to elevate your fitness routine and develop a stronger core with better posture, stability ball exercises are your ticket to success. The stability ball, also known as an exercise or Swiss ball, offers a dynamic and engaging platform to enhance your stability and coordination. In this article, we’ll explore 13 invigorating stability ball exercises that will help you achieve a well-toned core, improved balance, and posture that radiates confidence.

Stability Ball Plank:

Let’s begin with the classic Stability Ball Plank, an exercise that targets your core, shoulders, and glutes. Place your forearms on the ball and extend your legs behind you into a plank position. Keep your body in a straight line, engaging your core muscles. Hold the plank for 30 seconds to a minute, gradually increasing the duration as you progress.

Stability Ball Russian Twists:

Sit on the stability ball with your feet flat on the ground and your knees at a 90-degree angle. Lean back slightly while keeping your back straight and core engaged. Hold a weight or medicine ball and twist your torso from side to side, engaging your oblique muscles. Repeat for 10-15 reps on each side.

Stability Ball Rollouts:

Kneel in front of the ball and place your hands on top of it. Slowly roll the ball forward while extending your arms, keeping your core tight and back straight. Roll out as far as you can control without arching your lower back excessively. Then, return to the starting position. Repeat for 10-12 reps.

ball
Photo by Mikhail Nilov: https://www.pexels.com/photo/woman-leaning-on-the-wall-with-a-ball-6740055/

Stability Ball Pike:

Start in a plank position with your feet on the ball. Engage your core and lift your hips towards the ceiling, rolling the ball towards your hands. Your body will form an inverted V shape. Slowly roll the ball back to the starting position. Perform 10-12 reps.

Stability Ball Leg Curl:

Lie on your back with your heels resting on the ball. Lift your hips off the ground to form a bridge and keep your body in a straight line. Bend your knees and use your feet to roll the ball towards your glutes. Extend your legs back out without dropping your hips. Repeat for 12-15 reps.

Stability Ball Knee Tucks:

Assume a push-up position with your shins resting on the ball. Engage your core and use your knees to pull the ball towards your chest. Extend your legs back out to the starting position. Perform 12-15 reps.

Stability Ball Superman:

Lie face down on the ball with your hips and belly supported. Extend your arms forward and lift your arms and legs simultaneously, engaging your lower back and glutes. Hold the position for a few seconds before lowering back down. Repeat for 10-12 reps.

Stability Ball Hip Lifts:

Lie on your back with your feet flat on the ball. Lift your hips off the ground to form a bridge and engage your glutes and hamstrings. Lower your hips back down without touching the ground and lift them up again. Perform 12-15 reps.

Stability Ball Chest Press:

Sit on the ball with your feet flat on the ground and hold dumbbells at shoulder height. Push the dumbbells upward until your arms are fully extended, engaging your chest and shoulders. Lower the dumbbells back to the starting position. Repeat for 10-12 reps.

Stability Ball Triceps Dips:

Sit on the ball and place your hands on the sides of the ball. Walk your feet forward until the ball rolls under your shoulders. Bend your elbows to lower your body towards the ground and engage your triceps to push yourself back up. Perform 10-12 reps.

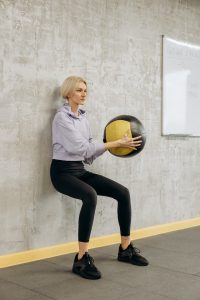
Stability Ball Wall Squats:

Stand with your back against a wall and place the ball between your lower back and the wall. Lower yourself into a squat position while keeping the ball pressed against the wall for support. Push through your heels to return to the starting position. Repeat for 12-15 reps.

balancing ball
Photo by Mikhail Nilov: https://www.pexels.com/photo/woman-holding-an-exercise-ball-6740087/

Stability Ball Oblique Crunches:

Sit on the ball and walk your feet forward until your lower back is supported. Place your hands behind your head and crunch to one side, engaging your obliques. Return to the center and repeat on the other side. Perform 12-15 reps on each side.

Stability Ball Balance:

For a simple yet effective exercise, sit on the stability ball with your feet flat on the ground. Lift one foot off the ground and hold the position for 20-30 seconds. Switch to the other foot and repeat. Challenge yourself by lifting both feet off the ground simultaneously.

Conclusion:

Mastering balance, strengthening your core, and improving your posture are essential components of a well-rounded fitness routine. By incorporating these 13 stability ball exercises into your workouts, you’ll not only achieve a stronger and more stable core but also enhance your overall body coordination and flexibility. So, get ready to elevate your fitness journey and experience the rewards of a healthier and more balanced you!

Introduction:

Maintaining stability and balance is essential for a healthy and active lifestyle, regardless of your age. Improving your balance can enhance coordination, prevent falls, and boost overall confidence in daily activities. Whether you are a young adult or a senior, incorporating balance exercises into your fitness routine is a wise choice. Here are seven must-try exercises that can help you build better stability and keep you steady at any age.

1. Basic Standing Balance:

Begin with a fundamental exercise that lays the foundation for your balance routine. Stand with your feet hip-width apart, arms relaxed at your sides. Find a focal point in front of you and maintain your gaze while keeping your body centered. Hold this position for 30 seconds to 1 minute, gradually increasing the duration as you progress.

2. Single-Leg Stance:

Take your balance training up a notch with the single-leg stance. Lift one foot off the ground and find your balance on the other leg. Aim to hold the position for 30 seconds on each leg. This exercise strengthens the supporting leg and improves stability in the ankles.

3. Heel-to-Toe Walk:

Imagine you are walking on a tightrope. Take slow and deliberate steps, placing your heel right in front of your toe with each stride. This exercise enhances balance and proprioception, which is your body’s awareness of its position in space.

4. Yoga Tree Pose:

Stand with your feet together and shift your weight onto one foot. Bend the other knee and place the sole of your foot against your inner thigh or calf. Bring your hands together at your chest in a prayer position. Hold for 30 seconds to 1 minute and switch sides. The Yoga Tree Pose improves focus and balance while stretching the hips and thighs.

5. Tai Chi:

Consider trying Tai Chi, a gentle and flowing form of exercise that promotes balance and relaxation. Tai Chi involves slow, graceful movements that challenge stability and coordination. It has been shown to reduce the risk of falls in older adults and offers various health benefits.


balance
Photo by Tima Miroshnichenko: https://www.pexels.com/photo/woman-in-blue-tank-top-and-black-leggings-doing-yoga-on-beach-5928334/

6. BOSU Ball Exercises:

Incorporate a BOSU ball into your balance routine for added challenge. Perform exercises like squats, lunges, and single-leg stands on the BOSU ball. The unstable surface engages core muscles and improves balance control.

7. Standing Weight Shifts:

Stand with your feet hip-width apart and slowly shift your weight from one side to the other. Return to the center and shift your weight to the opposite side. Repeat this movement for 10-15 reps on each side. Standing weight shifts enhance balance and stability.

Conclusion:

Balance is a vital aspect of overall health and well-being, and it is never too early or too late to work on improving it. Incorporating these seven must-try balance exercises into your fitness routine can help you build better coordination, enhance stability, and prevent falls at any age. Remember to start with the basics and progress gradually to more advanced exercises. With dedication and practice, you can achieve better balance and confidence in your everyday activities.

Introduction:

Sitting at a desk for long hours can leave your hips feeling tight and uncomfortable. The good news is that you can do simple hip stretches right from your chair to release tension and find instant relief. Whether you’re taking a quick break or need to alleviate discomfort, these chair-based hip stretches are perfect for desk-bound individuals. Let’s dive into the five stretches that will make a big difference:

 Seated Hip Flexor Stretch:

Sit up straight with both feet flat on the ground. Take your right ankle and place it over your left knee, forming a figure four shape. Gently press down on your right knee to feel the stretch in your right hip. Hold for 20-30 seconds and switch to the other side.

Chair Pigeon Stretch:

Sit tall in your chair with your feet flat on the ground. Cross your right ankle over your left knee, creating a figure four position. Slowly lean forward, keeping your back straight, until you feel a stretch in your right hip. Hold for 20-30 seconds and switch to the other side.

stretch
Photo by Nicholas Fu: https://www.pexels.com/photo/women-using-chairs-in-exercising-9288140/

 Seated Spinal Twist:

Sit with your feet flat on the ground and your spine tall. Place your right hand on your left knee and gently twist your upper body to the left. Feel the stretch in your lower back and hip. Hold for 20-30 seconds and repeat on the other side.

Chair Leg Extension Stretch:

Sit at the edge of your chair and extend your right leg straight out in front of you. Flex your foot and point your toes towards the ceiling. Lean slightly forward, feeling the stretch in your right hip and hamstring. Hold for 20-30 seconds and switch to the other side.

Seated Hip Opener:

Sit on your chair with your feet flat on the ground. Place your hands on the sides of the chair for support. Gently press your knees outward, feeling the stretch in your hips and inner thighs. Hold for 20-30 seconds and release.

Incorporating Hip Stretches into Your Daily Routine:

These chair-based hip stretches are an excellent way to combat the negative effects of prolonged sitting. Taking a few minutes throughout the day to perform these stretches can help increase hip flexibility, reduce tightness, and prevent discomfort. Remember to breathe deeply and relax into each stretch. Avoid forcing your body into positions that cause pain or discomfort. Listen to your body and adjust the intensity of the stretch as needed. Consider combining these chair-based hip stretches with other desk-friendly exercises to promote better overall posture and mobility. Make stretching a part of your daily routine, and you’ll notice a significant improvement in your hip health and overall well-being.

Introduction:

Beauty challenges on social media can be fun and entertaining, with beauty enthusiasts and influencers trying out various trends to create engaging content. One such viral challenge that gained popularity was the “100 layers of bubble mask” challenge. The concept was simple – apply 100 layers of a bubble mask to the face and capture the transformation on camera. It seemed like harmless fun, but little did many know the potential risks that lay beneath the bubbly surface.

The Temptation of Viral Beauty Challenges

In the world of beauty and social media, trends come and go. From the “Kylie Lip Challenge” to the “Ice and Salt Challenge,” people are drawn to these challenges like moths to a flame. The allure of creating eye-catching content and joining a viral trend can be irresistible, especially for beauty bloggers looking to boost their online presence.

The Bubble Mask Frenzy

Bubble masks, also known as oxygen masks, have been hailed for their unique formulation that transforms into a frothy foam when applied to the skin. The bubbly effect can be visually intriguing, making the challenge all the more tempting for adventurous beauty enthusiasts. As with any viral trend, the “100 layers of bubble mask” challenge quickly spread across social media platforms, with participants showcasing their bubbly adventures.

face mask
Photo by Dejà Gibson: https://www.pexels.com/photo/woman-in-white-floral-robe-6371078/


The Beauty Blogger’s Experience

One beauty blogger, let’s call her Sarah, decided to take on the challenge. As a seasoned beauty enthusiast, Sarah was no stranger to trying out new products and sharing her experiences online. Eager to jump on the viral bandwagon, she purchased a popular bubble mask and prepared to take on the 100-layer challenge.

The Application Process

Excited and armed with her camera, Sarah began the challenge. With each layer, the bubbles grew thicker and more voluminous on her face. Initially, the process seemed amusing, and Sarah couldn’t help but laugh at her bubble-covered appearance. She continued layering the mask, capturing the entire process for her followers.

The Aftermath

After completing the 100 layers, Sarah noticed that her skin felt tight and tingly. Although she expected some tingling due to the active ingredients in the mask, the sensation was stronger than usual. Ignoring the discomfort, she removed the mask, only to find her skin looking red and irritated.

The Reality of the Challenge

While the bubble mask challenge appeared harmless, the reality was far from it. The excessive layers of the mask caused over-exfoliation, leading to irritation and sensitivity. Sarah realized that viral trends might not always translate to safe and beneficial skincare practices.

The Lesson Learned

After the ordeal, Sarah took the time to heal her skin and reflect on her experience. She learned that skincare should never be about gimmicks or chasing viral fame but rather about taking care of the skin’s health and well-being. Sarah made it her mission to educate her followers about the potential risks of such challenges and the importance of listening to their skin’s needs.

Skincare Wisdom

While beauty challenges can be entertaining, it’s essential to prioritize skin health above all else. Experimenting with excessive layers of skincare products may lead to adverse reactions and long-term damage. Instead, consult with dermatologists or skincare experts to create a safe and effective skincare routine tailored to your unique needs.

Conclusion

The “100 layers of bubble mask” challenge may have been a viral sensation, but it’s not worth compromising your skin’s health. Beauty should be about feeling good in your skin and taking care of it with products and practices that promote wellness. So, next time you come across a viral beauty trend, take a step back and consider the potential risks before diving in. Your skin will thank you for it in the long run.

Introduction:

Lip fillers have gained popularity as a quick and non-invasive way to enhance one’s appearance and achieve fuller, plumper lips. However, despite the increasing demand for this cosmetic procedure, things can sometimes go wrong, leaving individuals feeling dissatisfied or even panicked about their lip filler results. If you find yourself in this situation, know that you are not alone, and there are steps you can take to address the aftermath of lip filler complications.

Stay Calm and Seek Professional Advice

The first and most crucial step is to remain calm. It’s understandable to feel worried or upset if you’re unhappy with your lip fillers, but panicking will not help the situation. Reach out to the professional who administered the lip fillers and express your concerns. A reputable practitioner should be willing to listen to your worries and work with you to find a solution.

Give It Time

In many cases, the initial appearance after lip fillers may not be the final result. Swelling and bruising are common side effects that can affect the appearance of your lips. Give it some time for these effects to subside and for the fillers to settle into their intended shape. It can take a few days to a week for the full effect to become apparent.

lip filler
Image by: https://www.bbc.com/


Massage the Area (If Recommended)

If your practitioner advises it, gently massaging the treated area may help smooth out any unevenness or lumps caused by the lip fillers. However, only do this if it’s suggested by a qualified professional to avoid any potential damage.

Use Cold Compresses for Swelling

If you’re experiencing swelling, applying cold compresses can help reduce it. Use a clean, cold cloth or an ice pack wrapped in a towel and apply it to the swollen area for a few minutes at a time. Be sure not to apply ice directly to the skin to avoid frostbite.

Avoid Touching or Picking

As tempting as it may be, avoid touching or picking at your lips after the procedure. Doing so can introduce bacteria and lead to infection or further complications.

Seek a Second Opinion

If you’re still unsatisfied or concerned after giving it some time, consider seeking a second opinion from another qualified and experienced practitioner. They may offer valuable insights and alternative solutions to address your concerns.

Dissolving Lip Fillers

In some cases, if you’re extremely dissatisfied with the results, or if there are complications such as asymmetry or overfilling, you may opt to have the lip fillers dissolved. Hyaluronic acid-based lip fillers can be dissolved using an enzyme called hyaluronidase, which can help reverse the effects.

Consider Corrective Treatments

Once the lip fillers have dissolved or if you’ve waited for them to wear off naturally, you can consider corrective treatments or explore other options for lip enhancement. Be sure to discuss your desired results and concerns with your chosen practitioner thoroughly.

Learn from the Experience

Going through an unsatisfactory lip filler experience can be a learning opportunity. Take time to understand what went wrong, communicate better with your practitioner, and choose your future treatments wisely.

Be Patient with Yourself

Above all, be patient and kind to yourself throughout the process. Cosmetic procedures can be emotionally charged, and it’s essential to prioritize your mental and emotional well-being. Remember that it’s okay to seek support from friends, family, or professionals if you’re feeling overwhelmed.

In conclusion, while dealing with lip filler mishaps can be distressing, it’s essential to approach the situation with a level head and take proactive steps to address your concerns. By seeking professional advice, staying patient, and considering corrective options, you can find a solution that helps you achieve the appearance you desire and boosts your confidence once again.

Introduction:

Having strong and healthy nails is not only aesthetically pleasing but also a sign of overall well-being. However, maintaining strong nails can be a challenge, especially with factors like exposure to harsh chemicals, constant use of nail polish, and even poor nutrition. If you’re tired of dealing with brittle and weak nails, don’t worry! Dermatologists have uncovered some expert-backed tips to naturally strengthen your nails and achieve the beautiful, resilient nails you desire. Say goodbye to nail breakage and hello to nails that are ready to shine. Let’s unlock the secrets to nail strength and vitality:

Keep Nails Clean and Dry:

Maintaining proper hygiene is crucial for nail health. Cleanse your nails regularly with mild soap and water to prevent the accumulation of dirt and bacteria. After washing, make sure to dry your nails thoroughly, as prolonged moisture can lead to weakening and peeling.

Protect Your Nails:

When engaging in household chores or any activities that involve water or chemicals, don’t forget to wear gloves. This simple practice will shield your nails from potential damage caused by harsh detergents or cleaning agents.

nails
Photo by Valeria Boltneva: https://www.pexels.com/photo/pink-manicure-939836/


 Trim Regularly:

Keeping your nails at a manageable length is essential for their strength. Use sharp, clean nail scissors or clippers, and avoid cutting nails too short, as this can lead to painful ingrown nails.

File with Care:

Use a fine-grit emery board to shape your nails gently. Avoid sawing back and forth, as this can weaken the nails. Instead, file in one direction to prevent splitting.

Moisturize Your Nails and Cuticles:

Nourishing your nails and cuticles with moisturizers helps maintain their flexibility and prevents dryness and cracking. Opt for lotions or oils that contain ingredients like vitamin E, jojoba oil, or almond oil.

Avoid Harsh Chemicals:

Traditional nail polish removers containing acetone can strip your nails of essential oils, leaving them brittle and weak. Look for acetone-free removers or try natural alternatives like soy-based removers.

Embrace Nail Hardening Treatments:

There are nail hardeners available in the market that can help reinforce weak nails. Look for products containing ingredients like calcium, protein, and keratin to promote nail strength.

 Go Natural:

Occasionally, give your nails a break from polish and let them breathe. Going polish-free for a few days allows your nails to recover and regenerate, which ultimately promotes their overall health.

Maintain a Balanced Diet:

Healthy nails start from within. Ensure you’re consuming a well-balanced diet rich in vitamins and minerals like biotin, vitamin C, and iron, which are vital for nail growth and strength.

Stay Hydrated:

Drinking enough water is essential for overall health, and it also plays a role in keeping your nails strong and hydrated. Aim to drink at least eight glasses of water daily to maintain nail moisture.

With these expert-backed tips, you can unleash the potential of your nails and achieve natural strength and resilience. Say goodbye to weak and brittle nails and embrace the beauty of naturally strong nails that reflect your overall well-being. Your hands will thank you for the care you give them, and you’ll be ready to flaunt those fabulous nails with confidence!

Are you ready to take your fitness journey to the next level and unlock your full potential? Look no further! The SELF Bodyweight Workout Finder is here to revolutionize your workouts and help you achieve your fitness goals like never before.

The Power of Bodyweight Workouts

Bodyweight workouts are a fantastic way to build strength, improve flexibility, and boost cardiovascular fitness, all while using the resistance of your own body. They are versatile, effective, and can be done anywhere, anytime, without the need for equipment or gym memberships. Whether you’re a fitness enthusiast or just starting, bodyweight exercises cater to all fitness levels and can be easily modified to suit your needs.

The Challenge of Finding the Right Workout

With so many workout routines available online, it’s easy to feel overwhelmed and uncertain about which one is best for you. You might spend hours searching for the perfect routine, only to end up feeling frustrated and unsure about where to start. This is where the SELF Bodyweight Workout Finder comes to the rescue.

Introducing the SELF Bodyweight Workout Finder

Our Bodyweight Workout Finder is designed with you in mind. It takes the guesswork out of your fitness routine and provides you with customized workouts that align with your goals, fitness level, and schedule. Whether you want to lose weight, tone your muscles, improve flexibility, or simply stay active, this powerful tool has got you covered.

How It Works

  1. Set Your Fitness Goals: Define your fitness objectives, whether it’s losing weight, building muscle, or improving overall fitness. Our finder will tailor workouts to meet your specific goals.
  2. Choose Your Experience Level: Whether you’re a beginner, intermediate, or advanced, we have workouts suitable for everyone. Select your experience level to get workouts that match your fitness capabilities.
  3. Select Your Workout Duration: We understand that time is valuable. Specify how much time you can dedicate to your workouts, and we’ll provide options that fit your schedule.
  4. Discover Your Personalized Workouts: With a simple click, you’ll receive a curated list of bodyweight workouts customized just for you. Each workout comes with detailed instructions and videos to guide you every step of the way.


workout
Photo by Andres Ayrton: https://www.pexels.com/photo/overweight-woman-standing-on-scales-6550828/

The Benefits of the SELF Bodyweight Workout Finder

  1. Efficiency: No more wasting time trying to figure out which workout is right for you. The SELF Workout Finder streamlines the process, saving you time and effort.
  2. Effective and Safe: Our workouts are carefully selected to ensure they are effective and safe for all fitness levels. You can trust that you’re getting high-quality routines that deliver results.
  3. Progressive Advancement: The finder allows you to progress at your pace. As you get stronger and more confident, you can explore more challenging workouts to continue your fitness journey.
  4. Versatility: From high-intensity circuits to calming yoga flows, our finder offers a diverse range of workouts to suit your preferences and keep your fitness routine exciting.
  5. Motivation: Trying new and personalized workouts keeps your fitness journey fresh and exciting. The SELF Bodyweight Workout Finder introduces you to a variety of exercises, keeping you motivated to stay committed.


workout
Photo by MART PRODUCTION: https://www.pexels.com/photo/a-woman-in-brown-leggings-holding-a-dumbbell-8846108/


Take the First Step Towards a Stronger, Healthier You

Are you ready to embark on a fitness journey that is tailored to your needs and designed for success? Let the SELF Bodyweight Workout Finder be your guide. Whether you’re a fitness enthusiast or just starting, this tool will empower you to achieve your fitness goals and unlock your true potential. Start your transformation today and embrace a healthier, happier, and more confident you. Remember, the power to unlock your potential lies within you!

Introduction

Maintaining flexibility and relieving muscle tension are essential for a healthy, pain-free body. Incorporating standing stretches into your daily routine can unlock your body’s potential and improve your overall well-being. Unlike traditional static stretches, standing stretches engage multiple muscle groups and promote better posture. In this article, we present 14 standing stretches that will help you start your day feeling flexible, energized, and ready to take on the world.

Neck Stretch

Gently tilt your head to one side, bringing your ear towards your shoulder. Hold for 15-20 seconds and repeat on the other side. This stretch releases tension in the neck and upper back, ideal for those who spend long hours at a desk.

Shoulder Roll

Roll your shoulders in a circular motion, forward and backward. Repeat for 30 seconds each direction. This exercise helps release tightness in the shoulders and upper back.

Arm Cross Stretch

Extend one arm straight in front of you, then cross it over your chest. Use your other arm to gently pull the extended arm closer to your chest. Hold for 15 seconds and switch sides. This stretch targets the shoulders and upper back.

Side Bend Stretch

With feet hip-width apart, reach one arm over your head and bend to the opposite side. Hold for 20 seconds and repeat on the other side. The side bend stretch stretches the obliques and promotes spine flexibility.

Spinal Twist

Stand with feet shoulder-width apart and twist your torso to one side, placing the opposite hand on the outside of the knee. Hold for 15 seconds and switch sides. This stretch helps improve spine mobility and releases tension in the lower back.

Hip Flexor Stretch

Take a step back with one foot, keeping the toes pointing forward. Shift your weight forward, bending the front knee, until you feel a stretch in the hip of the back leg. Hold for 20 seconds and repeat on the other side. The hip flexor stretch is beneficial for those with sedentary lifestyles.

Quadriceps Stretch

Stand with feet hip-width apart, bend one knee, and bring the foot towards your glutes. Hold the ankle with your hand for balance and stability. Hold for 15 seconds and switch legs. This stretch targets the front thigh muscles.

exercise
Photo by Vi Nguyen: https://www.pexels.com/photo/woman-stretching-her-arms-over-her-head-17440741/

Hamstring Stretch

Place one foot on a raised surface, like a step or stool, keeping the leg straight. Lean forward from the hips, reaching towards the toes of the elevated foot. Hold for 20 seconds and switch legs. The hamstring stretch increases flexibility in the back of the legs.

Calf Stretch

Step one foot back and press the heel into the ground, keeping the back leg straight. Lean forward into the stretch, feeling it in the calf muscle. Hold for 15 seconds and switch legs. This stretch is beneficial for runners and those with tight calf muscles.

Inner Thigh Stretch

Take a wide stance, toes pointing outward. Shift your weight to one side, bending the knee, and keeping the other leg straight. Hold for 20 seconds and switch sides. The inner thigh stretch improves flexibility in the groin area.

stretch
Photo by RF._.studio: https://www.pexels.com/photo/woman-in-white-sports-bra-and-yellow-leggings-stretching-3820441/

Ankle Circles

Stand with feet shoulder-width apart and lift one foot off the ground. Rotate your ankle in a circular motion, first clockwise and then counterclockwise. Repeat on the other foot. This stretch helps improve ankle mobility and prevents stiffness.

Forward Fold

Stand with feet hip-width apart and slowly hinge at the hips, folding forward. Let your arms hang towards the ground and relax the upper body. Hold for 30 seconds. The forward fold stretch releases tension in the lower back and hamstrings.

Chest Opener

Clasp your hands behind your back and straighten your arms. Lift your hands upward, opening your chest and stretching the front shoulder muscles. Hold for 15 seconds. This stretch counteracts hunched posture from prolonged sitting.

Full Body Stretch

Reach your arms overhead, interlace your fingers, and turn your palms upward. Inhale deeply and stretch your whole body from fingertips to toes. Hold for 20 seconds. The full body stretch energizes and wakes up your muscles.

Conclusion

Incorporating standing stretches into your daily routine can have a transformative impact on your flexibility and overall well-being. Spend just a few minutes each morning performing these stretches to unlock your body’s potential and start your day with a flexible and pain-free body. As with any exercise routine, listen to your body and adjust the intensity as needed. Regular stretching can lead to improved posture, reduced muscle tension, and enhanced mobility, contributing to a healthier and more active lifestyle.

Introduction:

Focus groups, a moderated conversation with a group of participants, are a valuable method for UX researchers to delve into attitudes, beliefs, and perceptions. Unlike interviews, the power of focus groups lies in group discussions and interactions among members. This article will explore the concept of focus groups, their applications in UX research, potential drawbacks, and how to mitigate common problems. Learn how to conduct effective focus groups, analyze the data, and share your findings to make informed decisions in product development.

What is a Focus Group?

A focus group involves 5 to 10 participants engaged in a conversation moderated by a researcher on a specific topic. It is an effective tool for learning about user attitudes, desires, and reactions to concepts or designs. The social dimension of focus groups often uncovers spontaneous reactions and ideas that might be missed in one-on-one interviews. Researchers use them to understand group dynamics and gain insights into product feedback or brand perceptions.

Why Some User Researchers Hate Focus Groups?

Focus groups have their detractors due to certain drawbacks and potential pitfalls:

  1. Focus groups reveal what people say, not what they do, leading to discrepancies between stated intent and actual behavior.
  2. Groupthink can arise in focus groups, as participants tend to conform to the opinions of the group, providing a skewed understanding of individual experiences.
  3. Dominant personalities in a group can overshadow others, inhibiting the contributions of quieter participants.
  4. Effective moderation requires skill and experience, as group dynamics can be unpredictable and challenging to manage.
focus group
Image by: https://productcoalition.com/

When to Use Focus Groups for UX Research:

Focus groups are best used to uncover perceptions, beliefs, and opinions rather than behaviors. They are valuable in the following scenarios:

  1. Identifying research questions during the early stages of a project.
  2. Exploring how people discuss problems, products, or shared experiences in a group setting.
  3. Gathering opinions, attitudes, and preferences after users interact with a prototype.

Conducting a Focus Group:

To conduct an effective focus group, follow these steps:

  1. Define your research goals and questions.
  2. Choose the location and decide on in-person or online focus groups.
  3. Select an experienced moderator to lead the discussions.
  4. Recruit participants who align with your research goals.
  5. Decide the number of groups and participants needed for your study.
  6. Obtain informed consent from participants.
  7. Offer appropriate incentives for participants’ time and expertise.
focus group
Image by: https://lucidspark.com/

Analyzing Focus Group Data:

Focus group data analysis involves reviewing session notes, recordings, and artifacts. Use qualitative coding to tag and organize data into themes or categories. Analyze patterns and key insights to create a report focused on meeting the study’s research goals.

Sharing Your Findings:

When sharing your focus group findings, keep the deliverables focused on key insights, themes, and takeaways relevant to the research goals. Use video clips, key quotes, and participant-made artifacts to contextualize the information for stakeholders.

Conclusion:

Mastering focus groups in UX research requires careful planning, skilled moderation, and thoughtful analysis. By understanding their strengths and limitations, researchers can harness the power of focus groups to gain valuable insights into user perceptions and inform product development decisions. With the right approach, focus groups become an indispensable tool in the UX researcher’s toolkit.

Introduction:

Beta software provides developers with a unique opportunity to test and optimize their applications with the latest features and improvements before the official release. Among the critical aspects of beta testing is ensuring the smooth functioning of payment functionality, especially when it comes to Apple Pay. This article explores the significance of testing payment functionality with Apple Pay on beta software and provides guidelines for developers to conduct effective testing.

Understanding Beta Software and Apple Pay Integration:

Beta software refers to pre-release versions of software that undergo testing and feedback collection before the official launch. Developers use beta versions to identify and resolve bugs, improve performance, and gather user insights. Integrating Apple Pay into beta software allows developers to ensure a seamless payment experience for users.

Different Types of Beta Software:

Apple provides two main types of beta software:

Developer Beta:

Available to registered developers, developer betas allow them to test their apps’ payment functionality with Apple Pay on the latest iOS version.

Public Beta:

Sometimes, Apple releases public betas that non-developers can access to participate in testing. However, it’s essential to note that public beta versions might not be as stable as the final releases.

Utilizing TestFlight for Beta App Distribution:

To test payment functionality on your app, developers can use TestFlight. It is Apple’s platform for distributing beta versions of apps to selected testers, allowing developers to gather valuable feedback before the app’s official release on the App Store.

Apple Pay Sandbox for Testing Transactions:

Developers can test Apple Pay transactions without processing actual payments using the Apple Pay sandbox environment. This environment supports various countries and regions, enabling simulated payment scenarios for testing.

apple pay
Image by: https://logos-world.net/a

Necessary Preparations for Apple Pay Testing:

Before testing Apple Pay functionality, developers must ensure their Apple Developer account is properly configured for Apple Pay. This includes registering a merchant ID, creating certificates, and verifying the website domain for web-based implementations.

Setting Up a Sandbox Tester Account:

Developers can create sandbox tester accounts in App Store Connect to simulate payment interactions using test credit and debit cards. These tester accounts enable the safe testing of payment functionality without using personal production cards.

Testing with Test Cards:

Apple provides a list of test card numbers for different payment networks (American Express, Discover, Mastercard, Visa, and China UnionPay) that developers can use for testing Apple Pay on supported devices.

Conducting Real-Device Testing:

To ensure accurate testing results, developers should conduct testing on actual devices. This step provides insights into how Apple Pay functions in real-world scenarios.

Backing Up Data:

Since beta software can be unstable, it’s essential to back up devices before installing beta versions. This precautionary measure allows users to revert to a stable version if necessary.

Reporting Feedback and Issues:

During testing, if developers encounter any issues or bugs related to Apple Pay functionality, they should report them to Apple or the relevant development team. Feedback helps improve the performance and security of the software.

Conclusion:

Testing payment functionality with Apple Pay on beta software is crucial for developers to ensure a seamless user experience and identify potential issues before the official release. By using the Apple Pay sandbox environment, TestFlight, and real devices, developers can thoroughly test payment interactions and optimize their applications for secure and efficient transactions. Embracing beta testing allows developers to fine-tune their apps, ensuring smooth Apple Pay integration for users worldwide.